


In beauty and cosmetics, you never get a second chance at a first impression. Whether your customer discovers you on a crowded retail shelf or through an unboxing video, your folding carton delivers the very first sensory proof of who you are as a brand. Before they smell the serum, feel the texture, or read the ingredient list, they’re already deciding: Does this brand understand me? Is this worth the price? Can I trust what’s inside?
Your packaging answers those questions in seconds—through weight, finish, structure, and visual clarity. A flimsy box with inconsistent printing signals “cheap formulation” even if your R&D is world-class. A thoughtfully engineered carton with smart material choices and confident design tells a completely different story, even at mid-market price points.
This guide is built for beauty brand founders, packaging managers, and product development teams who need folding cartons that do more than “look nice in a mockup.” We’ll walk through structure selection by product type, insert engineering, material and finishing strategies, retail vs e-commerce performance, sustainability without sacrifice, and the design trends actually shaping purchase decisions in 2026. By the end, you’ll know how to brief your packaging partner with clarity and make decisions that protect your product, elevate your brand, and align with where beauty is heading.
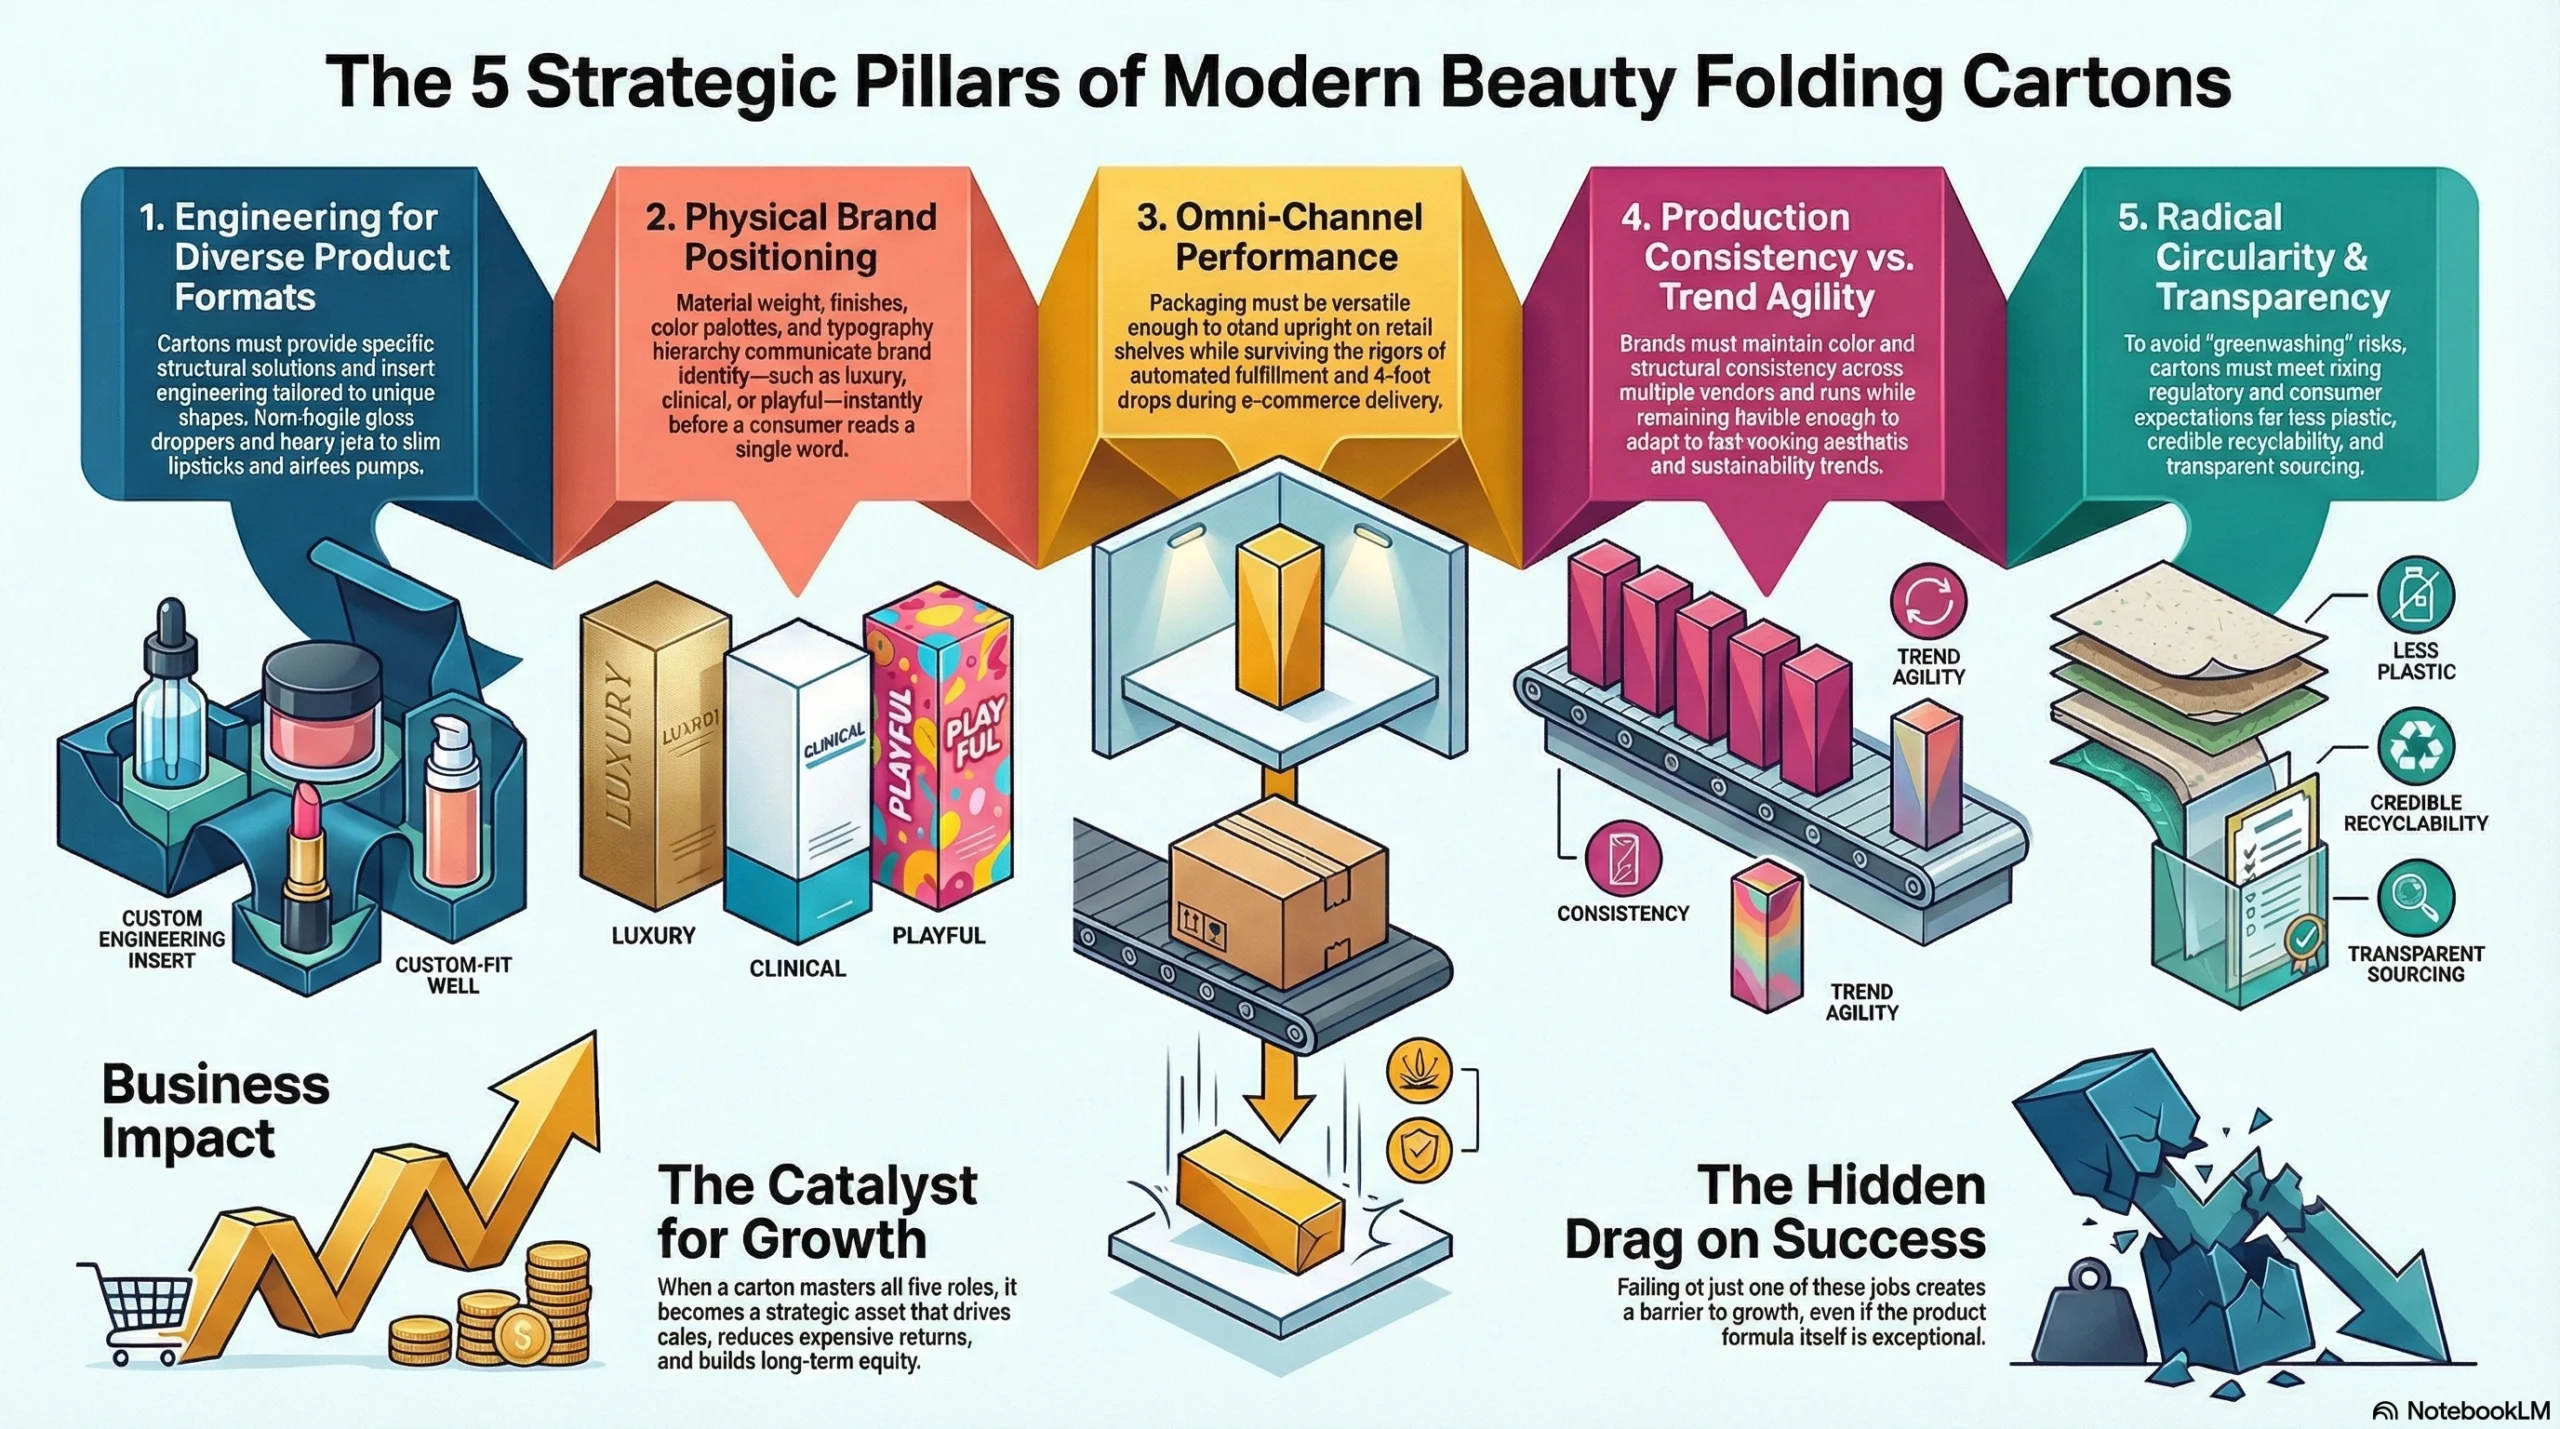
This guide focuses specifically on paper-based unit cartons (folding cartons) for skincare, makeup, and haircare—the secondary packaging that holds your tubes, jars, bottles, and compacts. These cartons are being asked to do more than ever before:
Protect wildly different product formats. Tubes, glass droppers, heavy jars, airless pumps, slim lipsticks, and fragile compacts all demand different structural solutions and insert engineering. A carton that works beautifully for a tube will fail catastrophically for a glass serum bottle.
Communicate your brand positioning instantly. Clinical? Clean? Luxury? Playful? Your material weight, finish choices, color palette, and typography hierarchy tell that story before a single word is read. The carton is your positioning, made physical.
Perform across channels. The same SKU might need to stand perfectly upright on a Sephora shelf and survive automated fulfillment, conveyor-belt sorting, and a 4-foot drop onto concrete during last-mile delivery. Retail-only thinking or DTC-only thinking both create expensive problems.
Stay production-consistent while adapting to trends. Your brand colors and structural family need to print the same way across multiple runs and vendors, but you also need flexibility to respond to fast-moving aesthetic and sustainability shifts without re-tooling your entire line every season.
Meet rising expectations for circularity and transparency. Customers, retailers, and increasingly regulators expect less plastic, credible recyclability claims, and transparent sourcing. “Greenwashing” is now a reputational risk, so your carton choices need to be both genuinely better and clearly explainable.
If your folding cartons accomplish all five of these jobs well, they become a strategic asset that drives sales, reduces returns, and builds long-term brand equity. If they fail at even one, they become a hidden drag on growth—even if the formulas inside are exceptional.
Folding Carton Structures by Product Type
The right carton structure is dictated by the primary packaging format inside it. A tube behaves nothing like a glass dropper bottle, and a heavy jar has completely different shipping risks than a slim lipstick. Understanding these differences up front prevents expensive failures later—returns, breakage, poor shelf presentation, and customer complaints. This section breaks down best practices by format so you can brief your packaging partner with precision.
Tubes (Cleansers, Creams, Masks, Serums)
Tubes are among the most forgiving formats to package because they’re flexible, relatively lightweight, and resilient to moderate handling. But “forgiving” doesn’t mean your carton design doesn’t matter—poor structural choices still create problems with shelf presentation, fill‑line efficiency, and e‑commerce durability.
Best Box Styles for Tubes
The two most common folding carton styles for tubes are straight tuck end (STE) and reverse tuck end (RTE), and the choice between them depends on your priorities around cost, shelf display, and consumer experience.
Straight tuck end (STE): Both the top and bottom tuck flaps fold toward the same side of the carton (typically the back panel). This means your front and back panels remain completely clean and uninterrupted by flap lines, which is ideal when you want strong, unbroken branding or shelf graphics. STE cartons use slightly less material because both closures originate from the same side, making them marginally more economical than reverse tuck. These are the go‑to choice for retail‑heavy beauty brands that prioritise shelf impact and need consistent front‑panel branding across an entire range.
Reverse tuck end (RTE): The top and bottom tuck flaps fold in opposite directions—one toward the front panel, one toward the back. This gives consumers easier access to the product from either end and makes the box slightly easier to open and close repeatedly. RTE is particularly popular for products that customers might open and reclose multiple times (for example, travel‑size tubes kept in a toiletry bag) or when you want to design both the front and back panels as distinct “faces” rather than prioritising one clean surface.
Structural Details That Prevent Common Failures
Even though tubes are flexible, poorly designed cartons still fail in predictable ways:
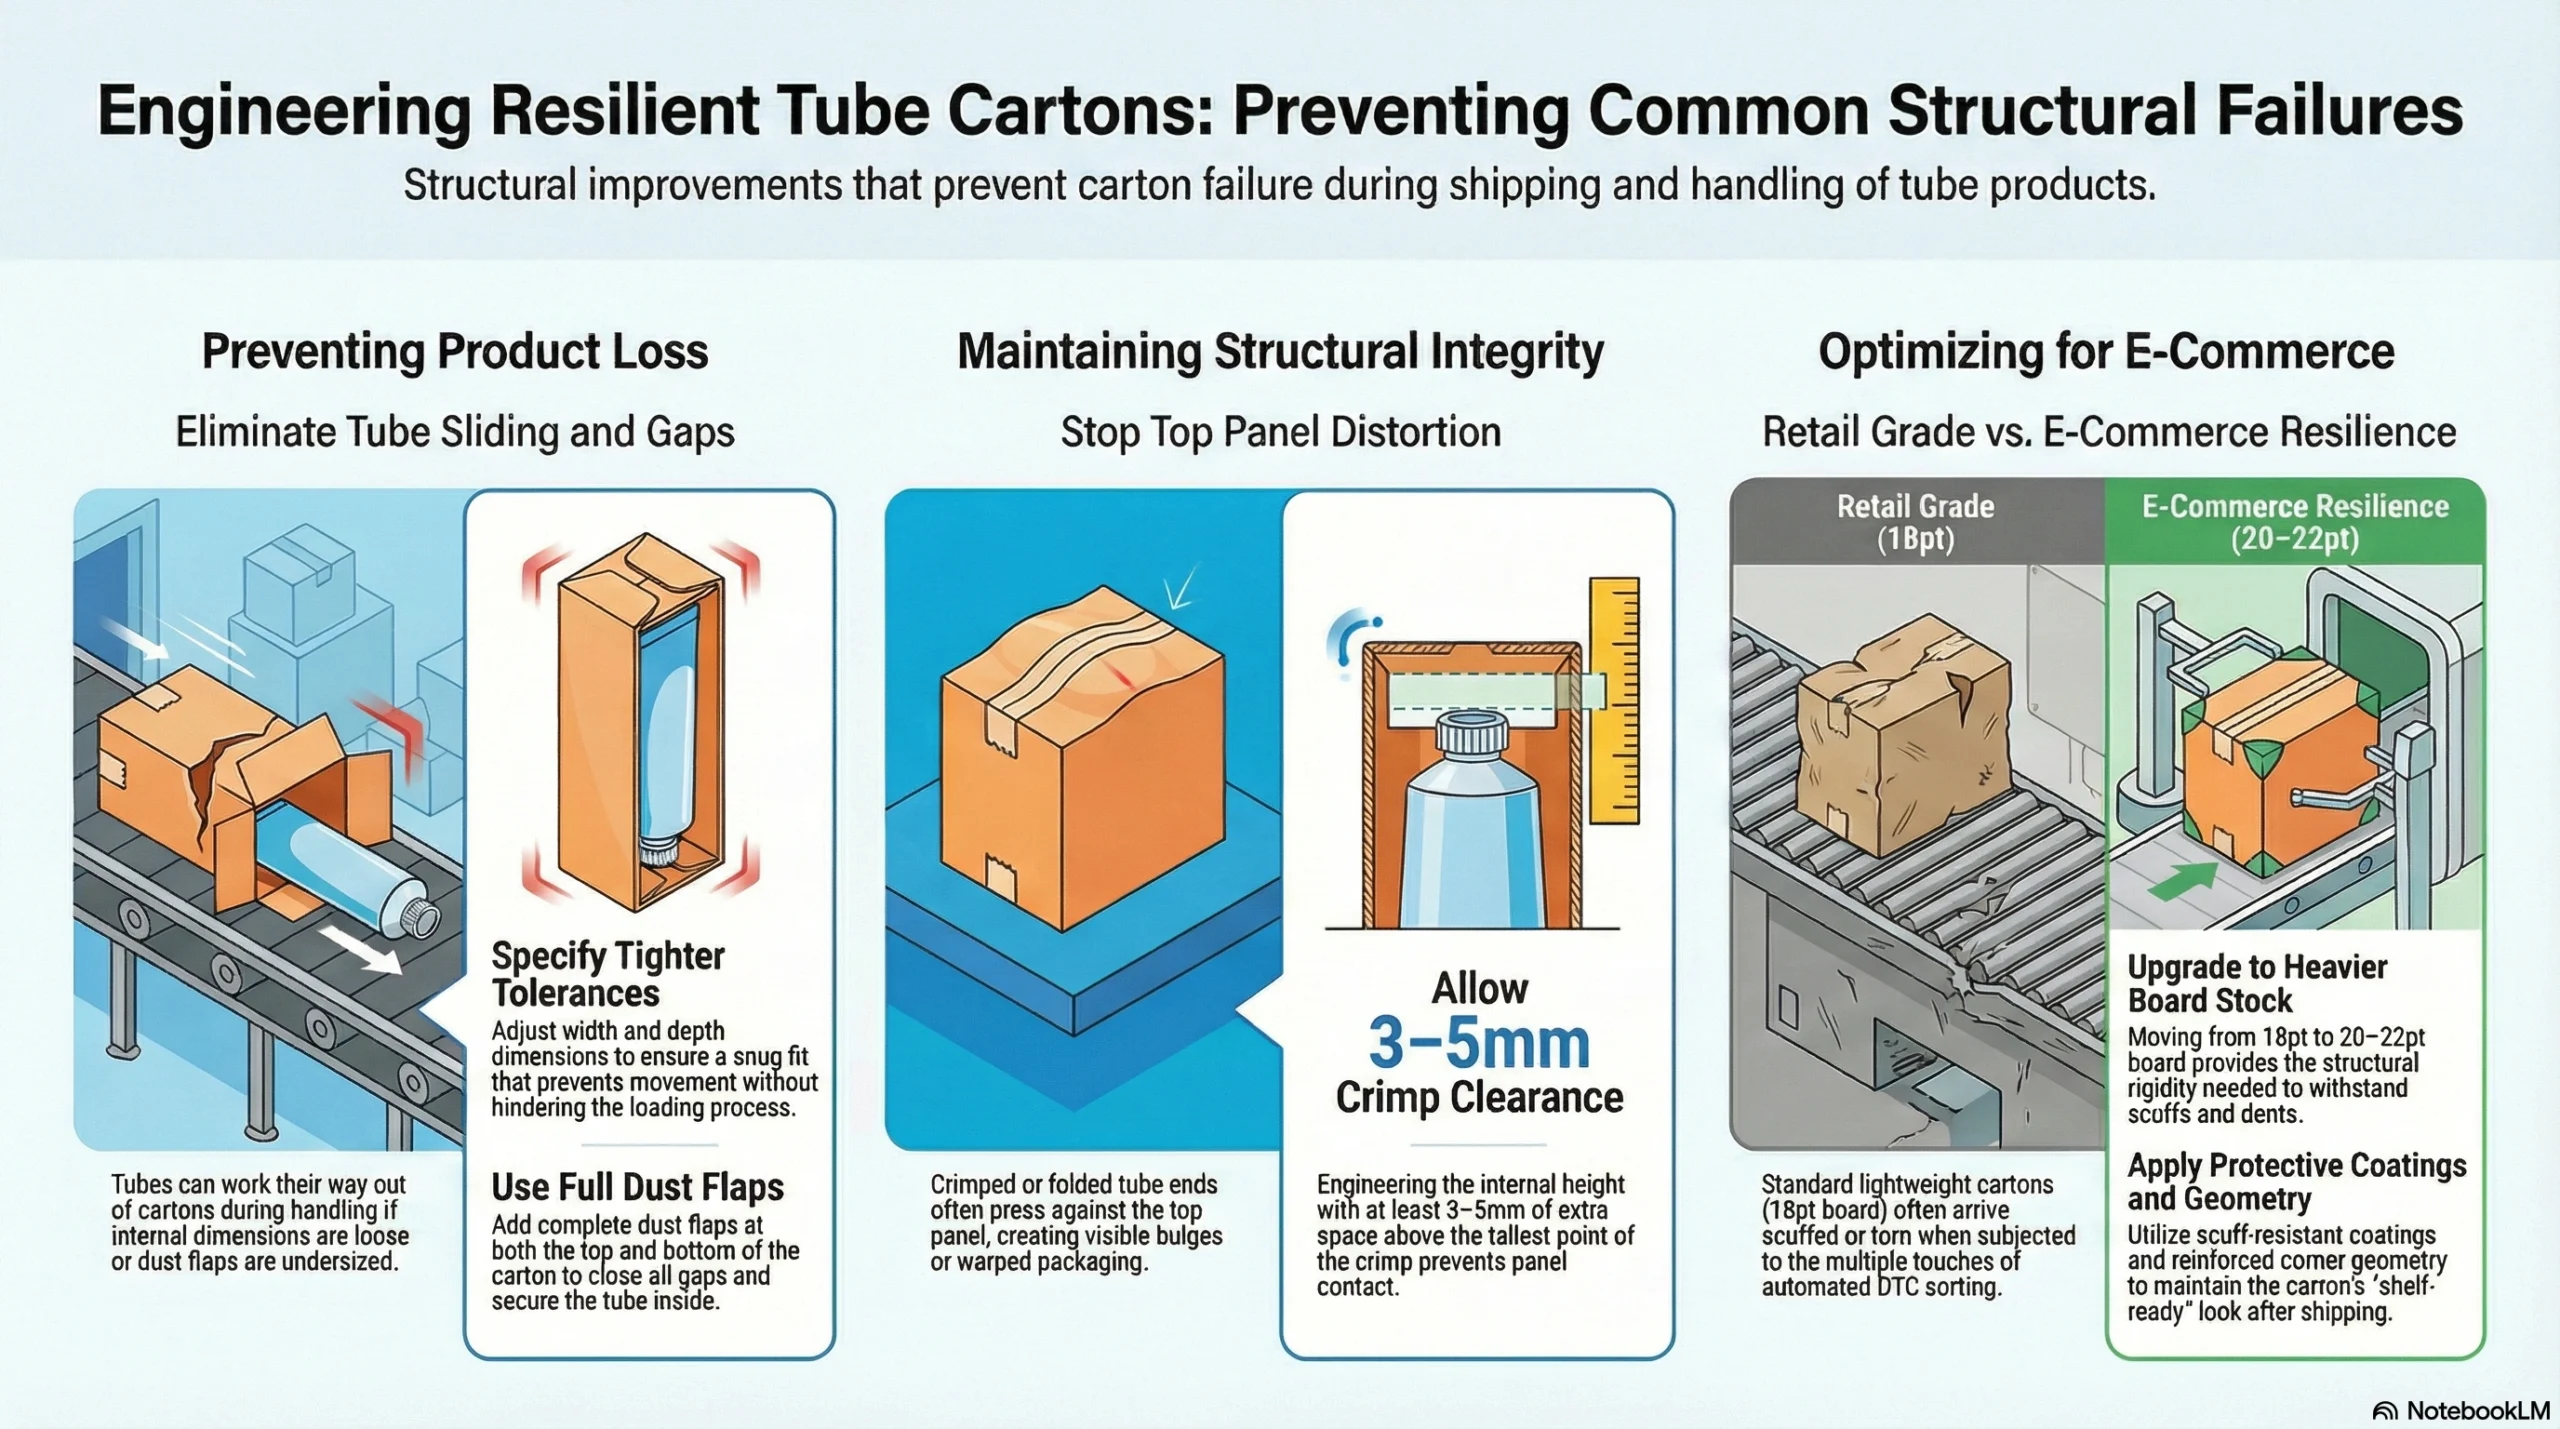
Tubes sliding out during shipping: If the internal dimensions are too loose or dust flaps are undersized, tubes can work their way out of the carton during handling. To prevent this, specify tighter tolerances on width and depth so the tube fits snugly without being difficult to load. Add full dust flaps at the top and bottom that close completely rather than leaving gaps.
Crimped tube ends distorting the top panel: Many tubes are sealed with a crimped or folded end. If the internal height doesn’t account for this, the crimp will press against the top panel and create a visible bulge or warp. Design the carton height with at least 3–5mm clearance above the tallest point of the crimp.
Weak performance in e‑commerce: For DTC brands, standard lightweight tube cartons designed only for retail shelf display often arrive scuffed, dented, or with torn corners. Consider specifying slightly heavier board (moving from 18pt to 20–22pt), scuff‑resistant coatings, and reinforced corner geometry so the carton can withstand automated sorting and multiple touches without looking damaged.
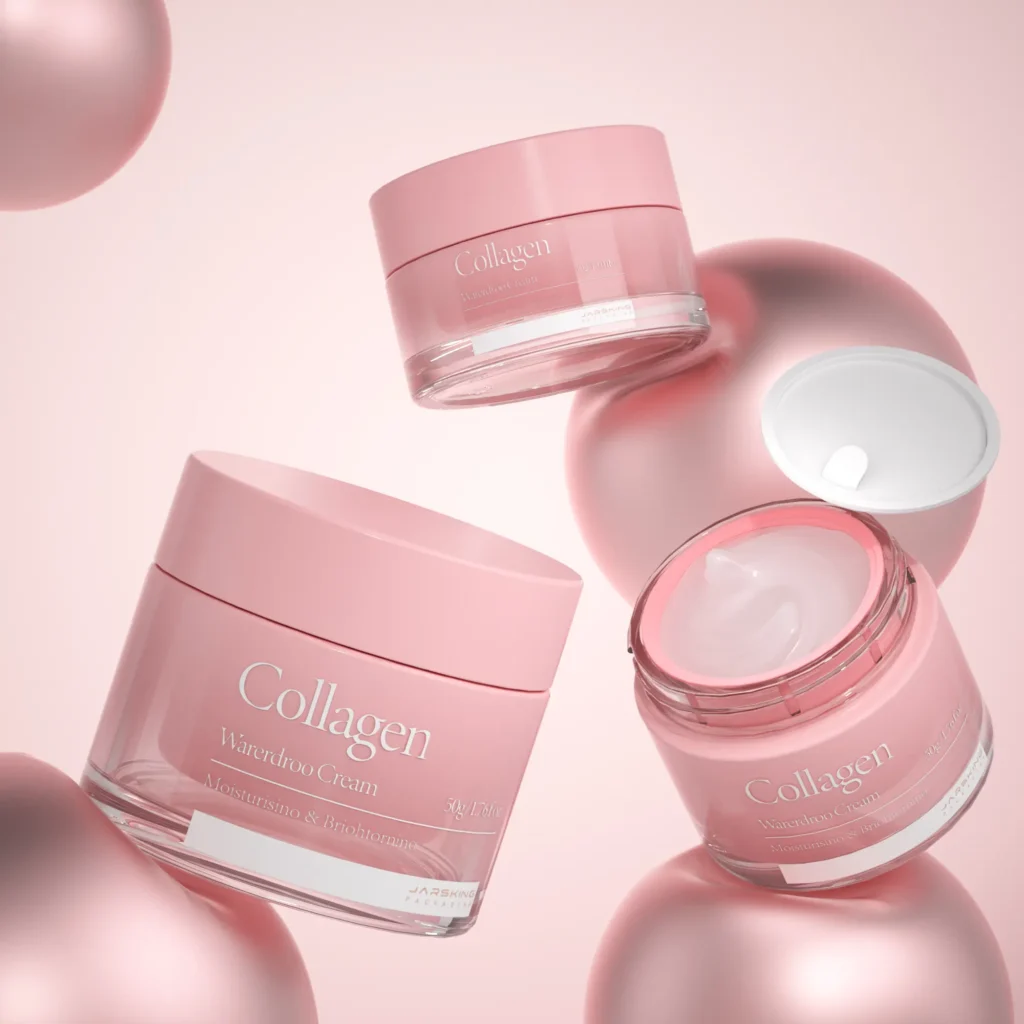
Jars (Moisturizers, Masks, Balms, Body Butters)
Jars introduce weight and breakage risk that tubes don’t have. Glass jars can shatter if dropped; heavy acrylic jars can punch through weak carton bottoms; and any jar that rocks or shifts inside its box creates scuffing, rattling, and a cheap first impression.
Best Box Styles for Jars
For jars, the bottom structure is the critical decision point because it has to carry all the weight and absorb vertical impact.
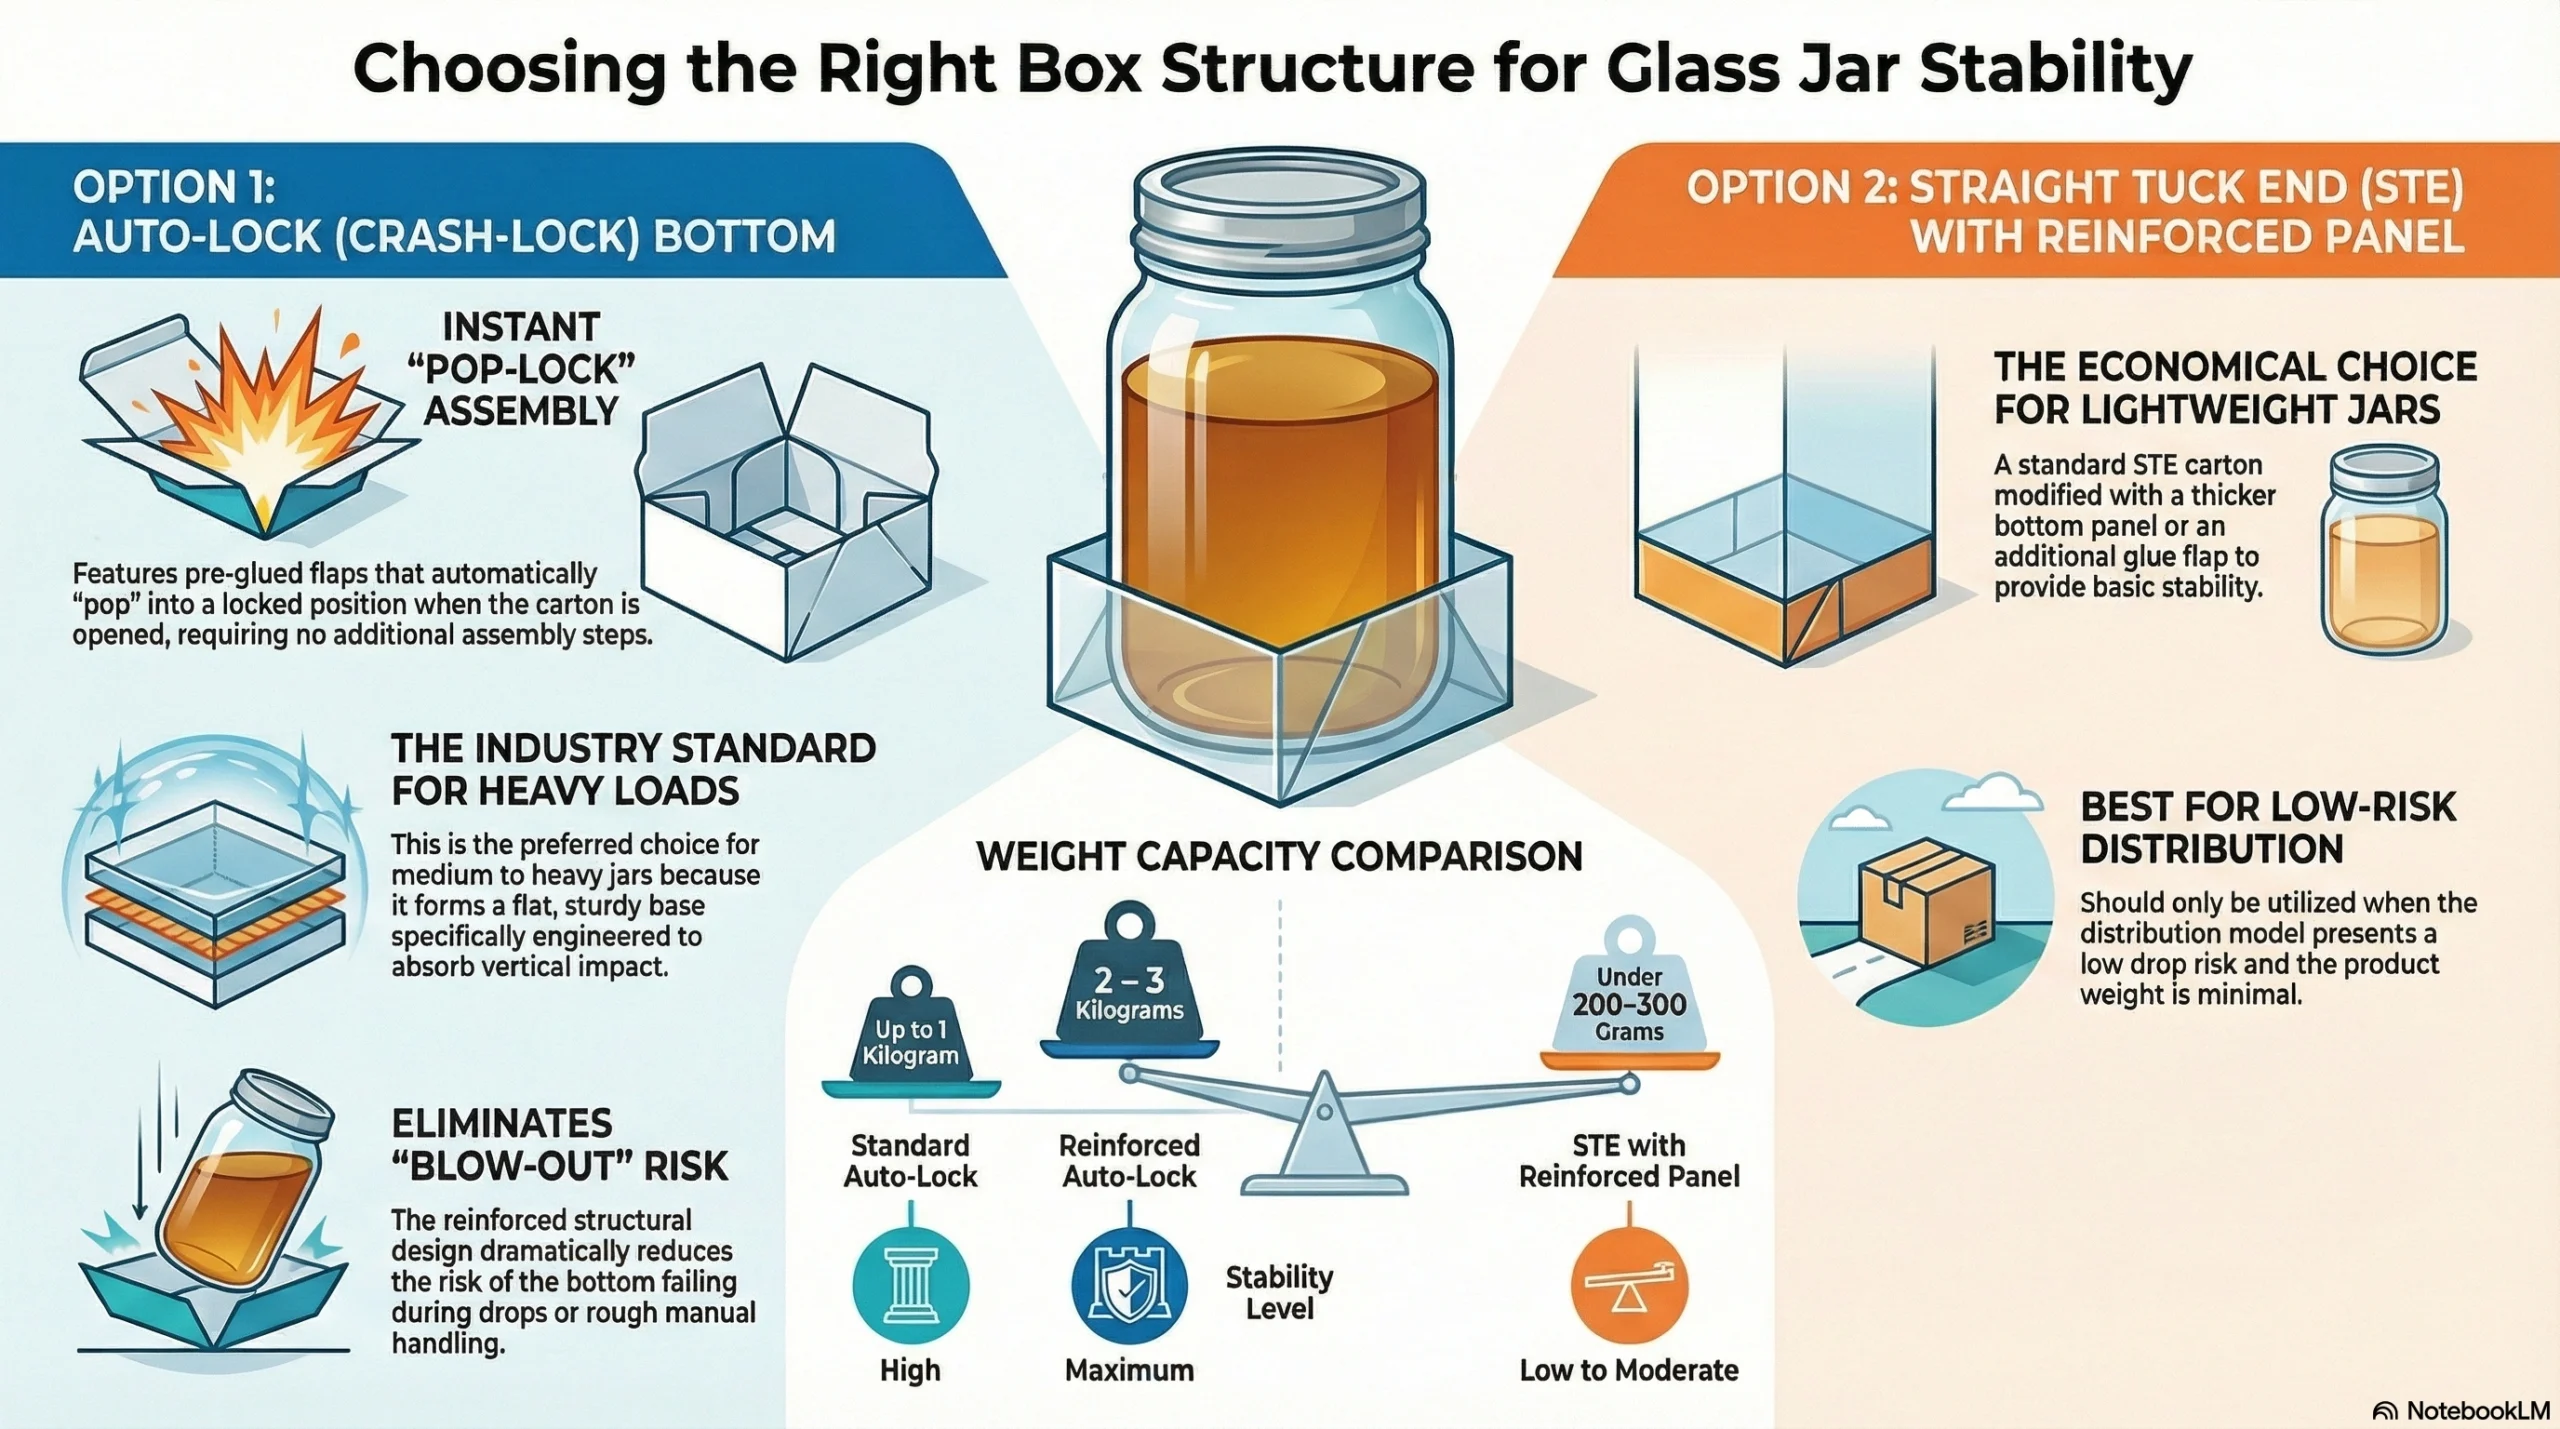
Auto‑lock (crash‑lock) bottom cartons: This is the industry standard for medium to heavy jars. An auto‑lock bottom uses pre‑glued flaps that “pop” into a locked position when the carton is opened, forming a flat, sturdy base without additional assembly steps. According to industry specifications, standard auto‑lock bottoms can safely carry products up to 1 kilogram; reinforced versions using heavier board or additional locking panels can handle up to 2–3 kilograms. These bottoms dramatically reduce the risk of “blow‑out” (the bottom failing and the jar falling through) during drops or rough handling.
Straight tuck end with reinforced bottom panel: For lighter jars (under 200–300 grams), a standard STE carton with a slightly thicker bottom panel or additional glue flap can work. This is more economical than auto‑lock but should only be used when the product weight and distribution model don’t create high drop risk.
Insert Ideas That Actually Work
Even with a strong bottom, jars need to be held in place to prevent internal movement, scuffing against the carton walls, and lid damage.
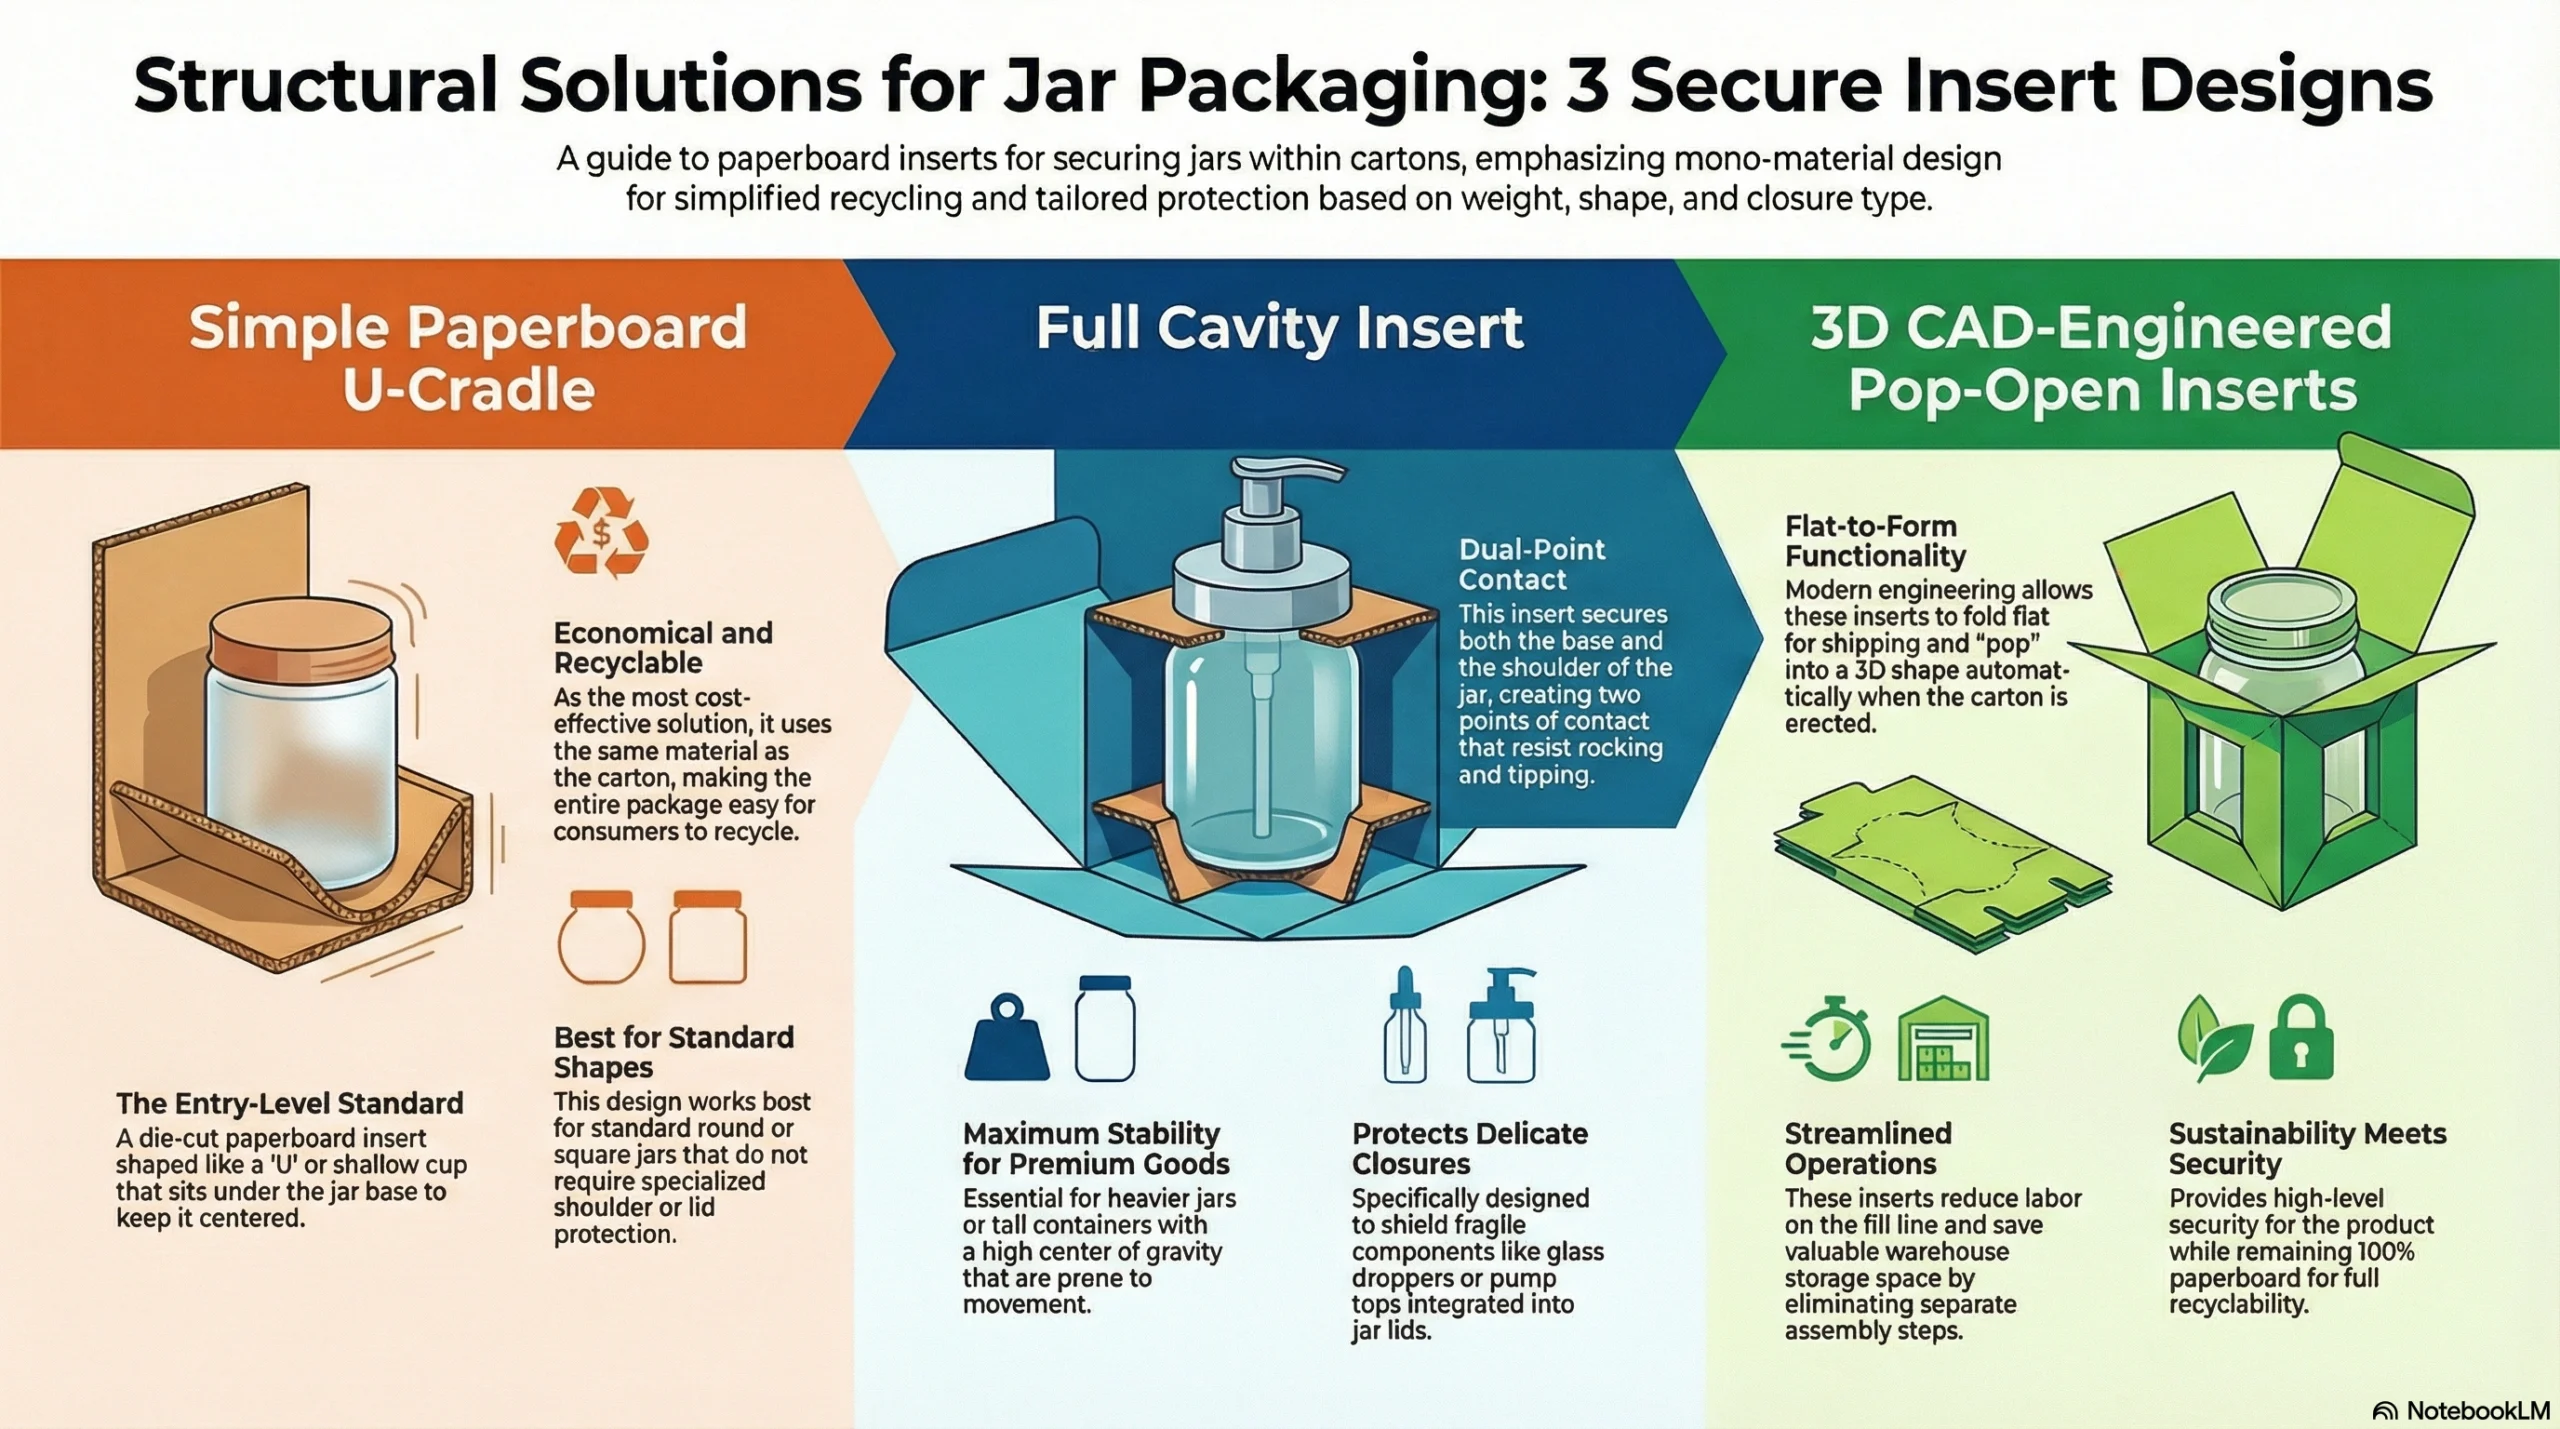
Simple paperboard U‑cradle: A die‑cut paperboard insert shaped like a “U” or shallow cup sits under the jar base and keeps it centered. This is the most economical solution and works well for standard round or square jars. It’s mono‑material with the carton, making the whole package easier to recycle.
Full cavity insert: For heavier or more premium jars, a full cavity insert grabs both the base and the shoulder of the jar, creating two points of contact that resist rocking and tipping. This is particularly important for tall jars with a high center of gravity or for jars with delicate lids (such as droppers or pump tops integrated into jar closures).
3D CAD‑engineered pop‑open inserts: Modern carton engineering can design inserts that fold flat during shipping and “pop” into their final 3D shape when the carton is erected, without requiring separate assembly steps. These reduce labour on the fill line, save storage space, and can be designed to cradle jars securely while remaining fully paperboard for recyclability.
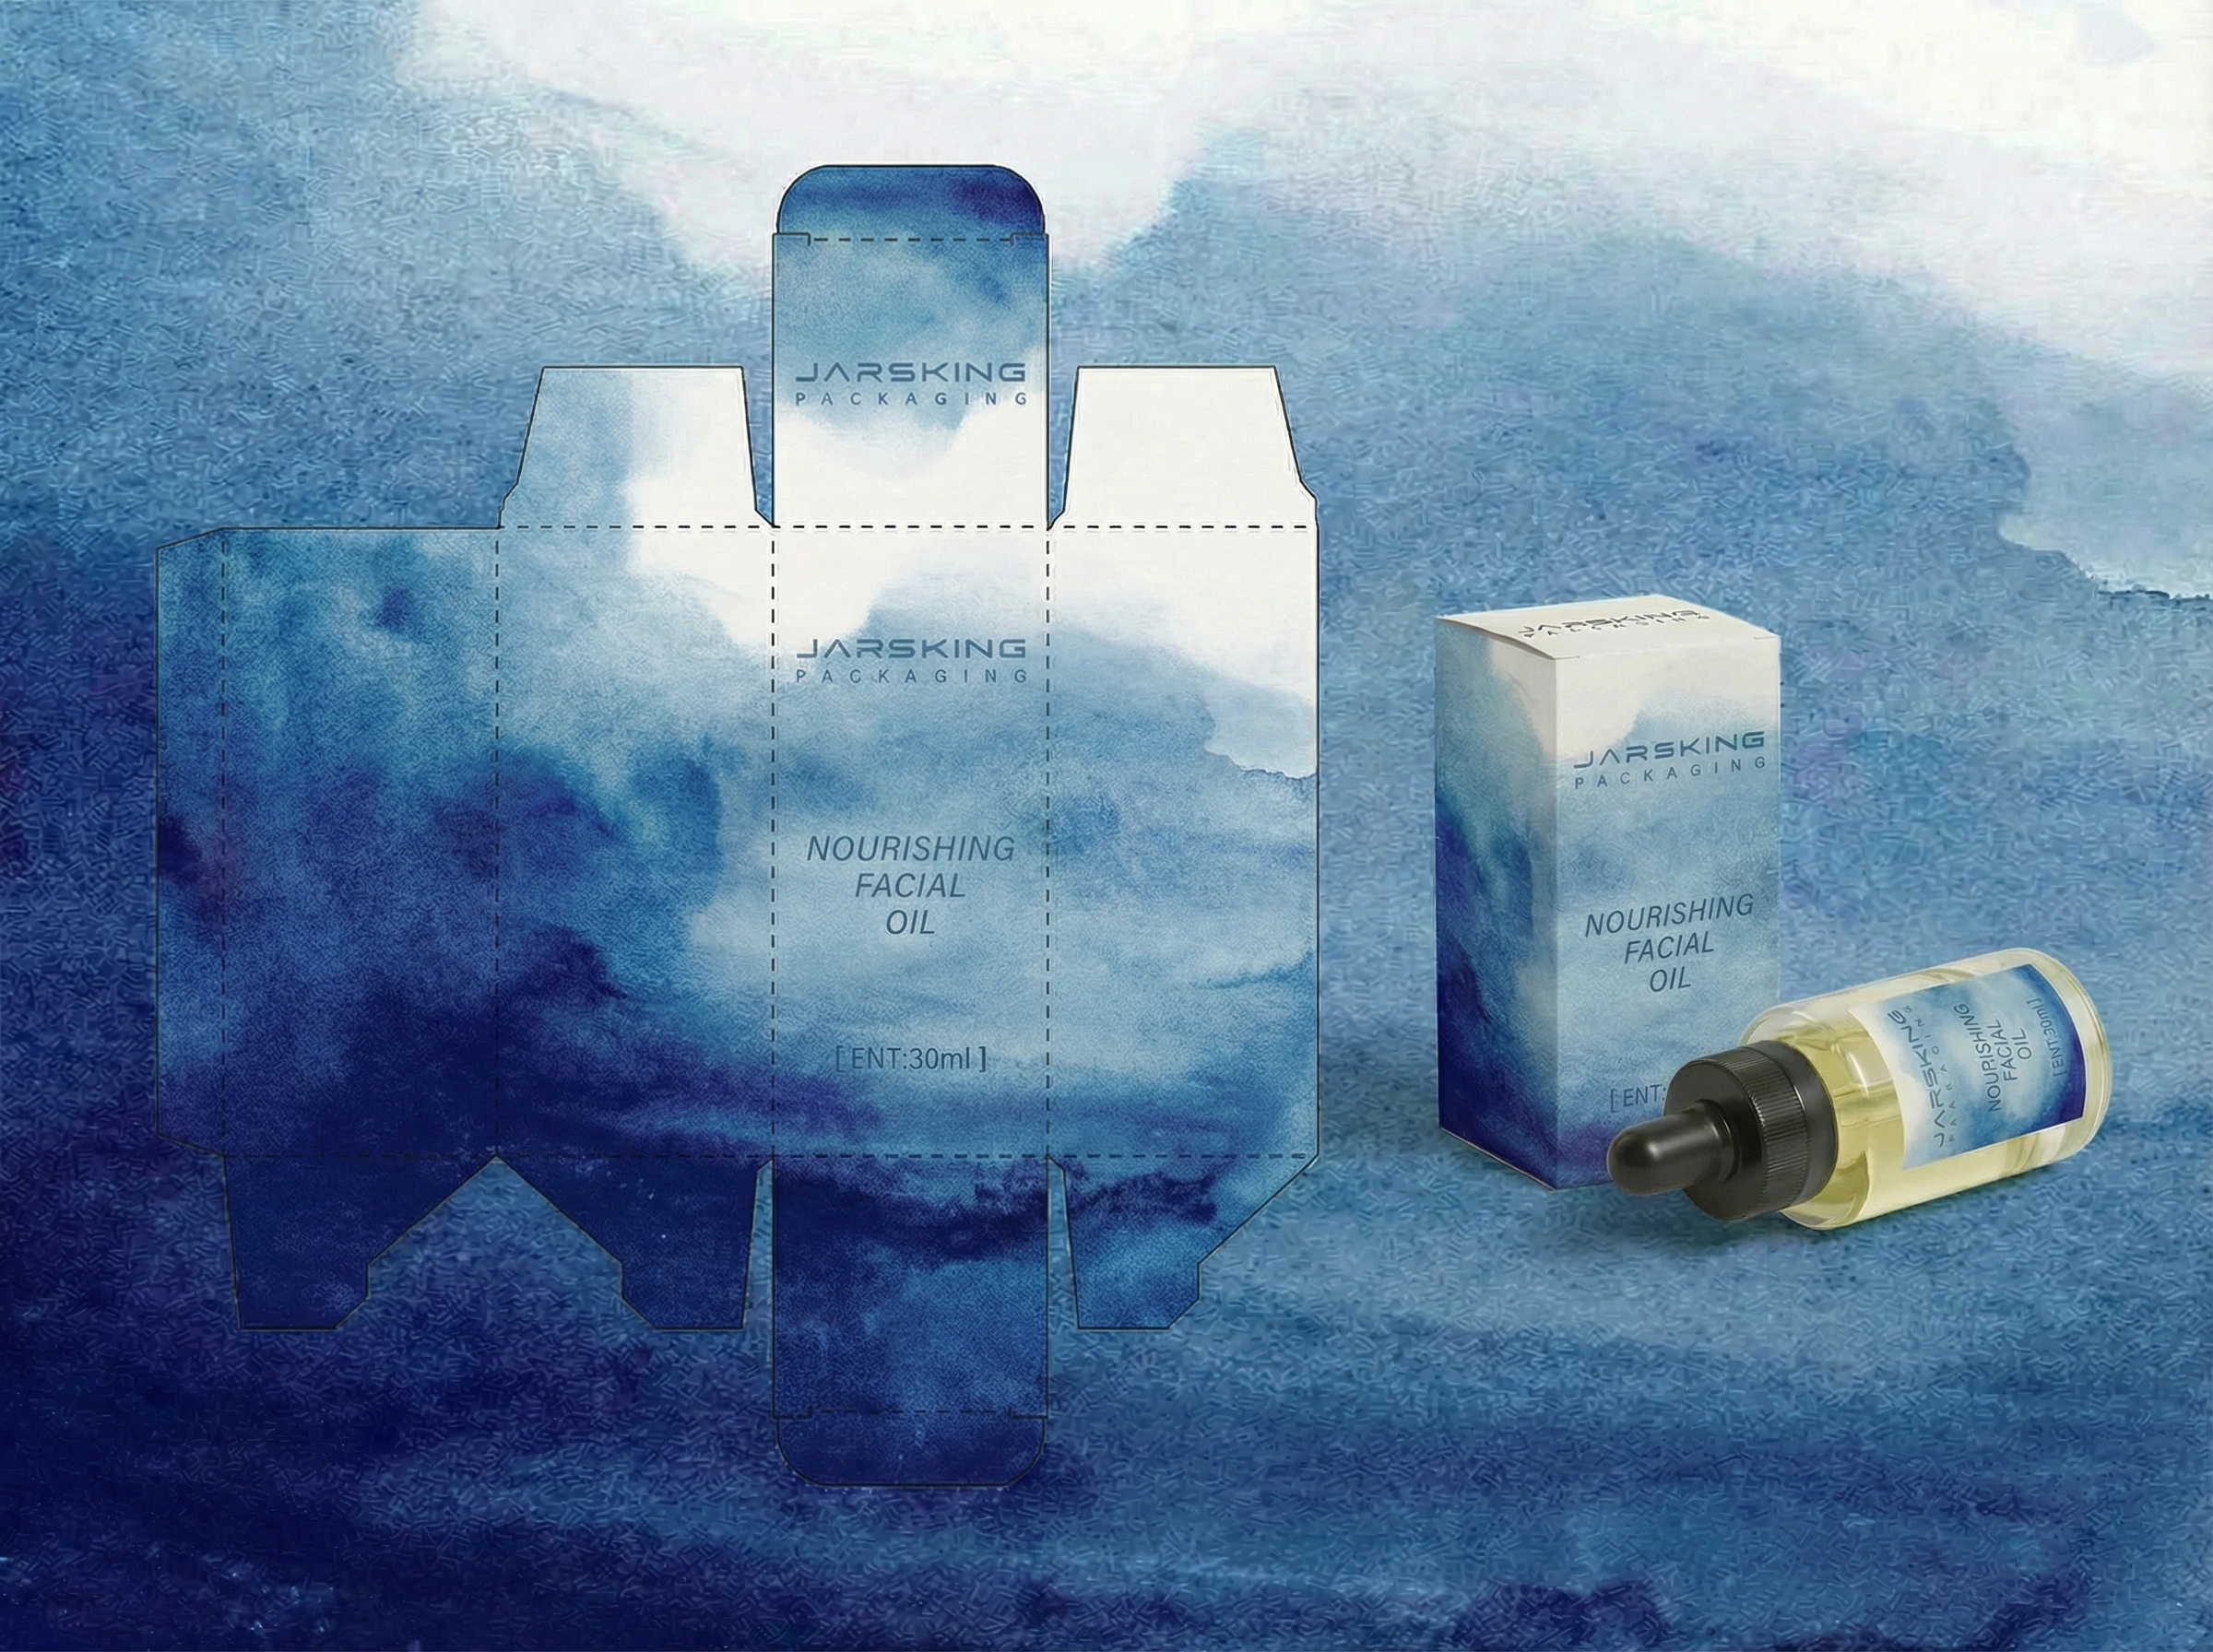
Droppers & Serums (Glass Bottles with Pipettes)
Glass dropper bottles are the most challenging format to package well. They combine high unit value (premium serums, actives, oils), extreme fragility (thin glass necks, exposed pipettes), and unfavourable geometry (tall, slender, top‑heavy). A $60 serum in a poorly designed carton that arrives with a snapped dropper neck is a brand disaster, not just a packaging problem.
Structural Priorities
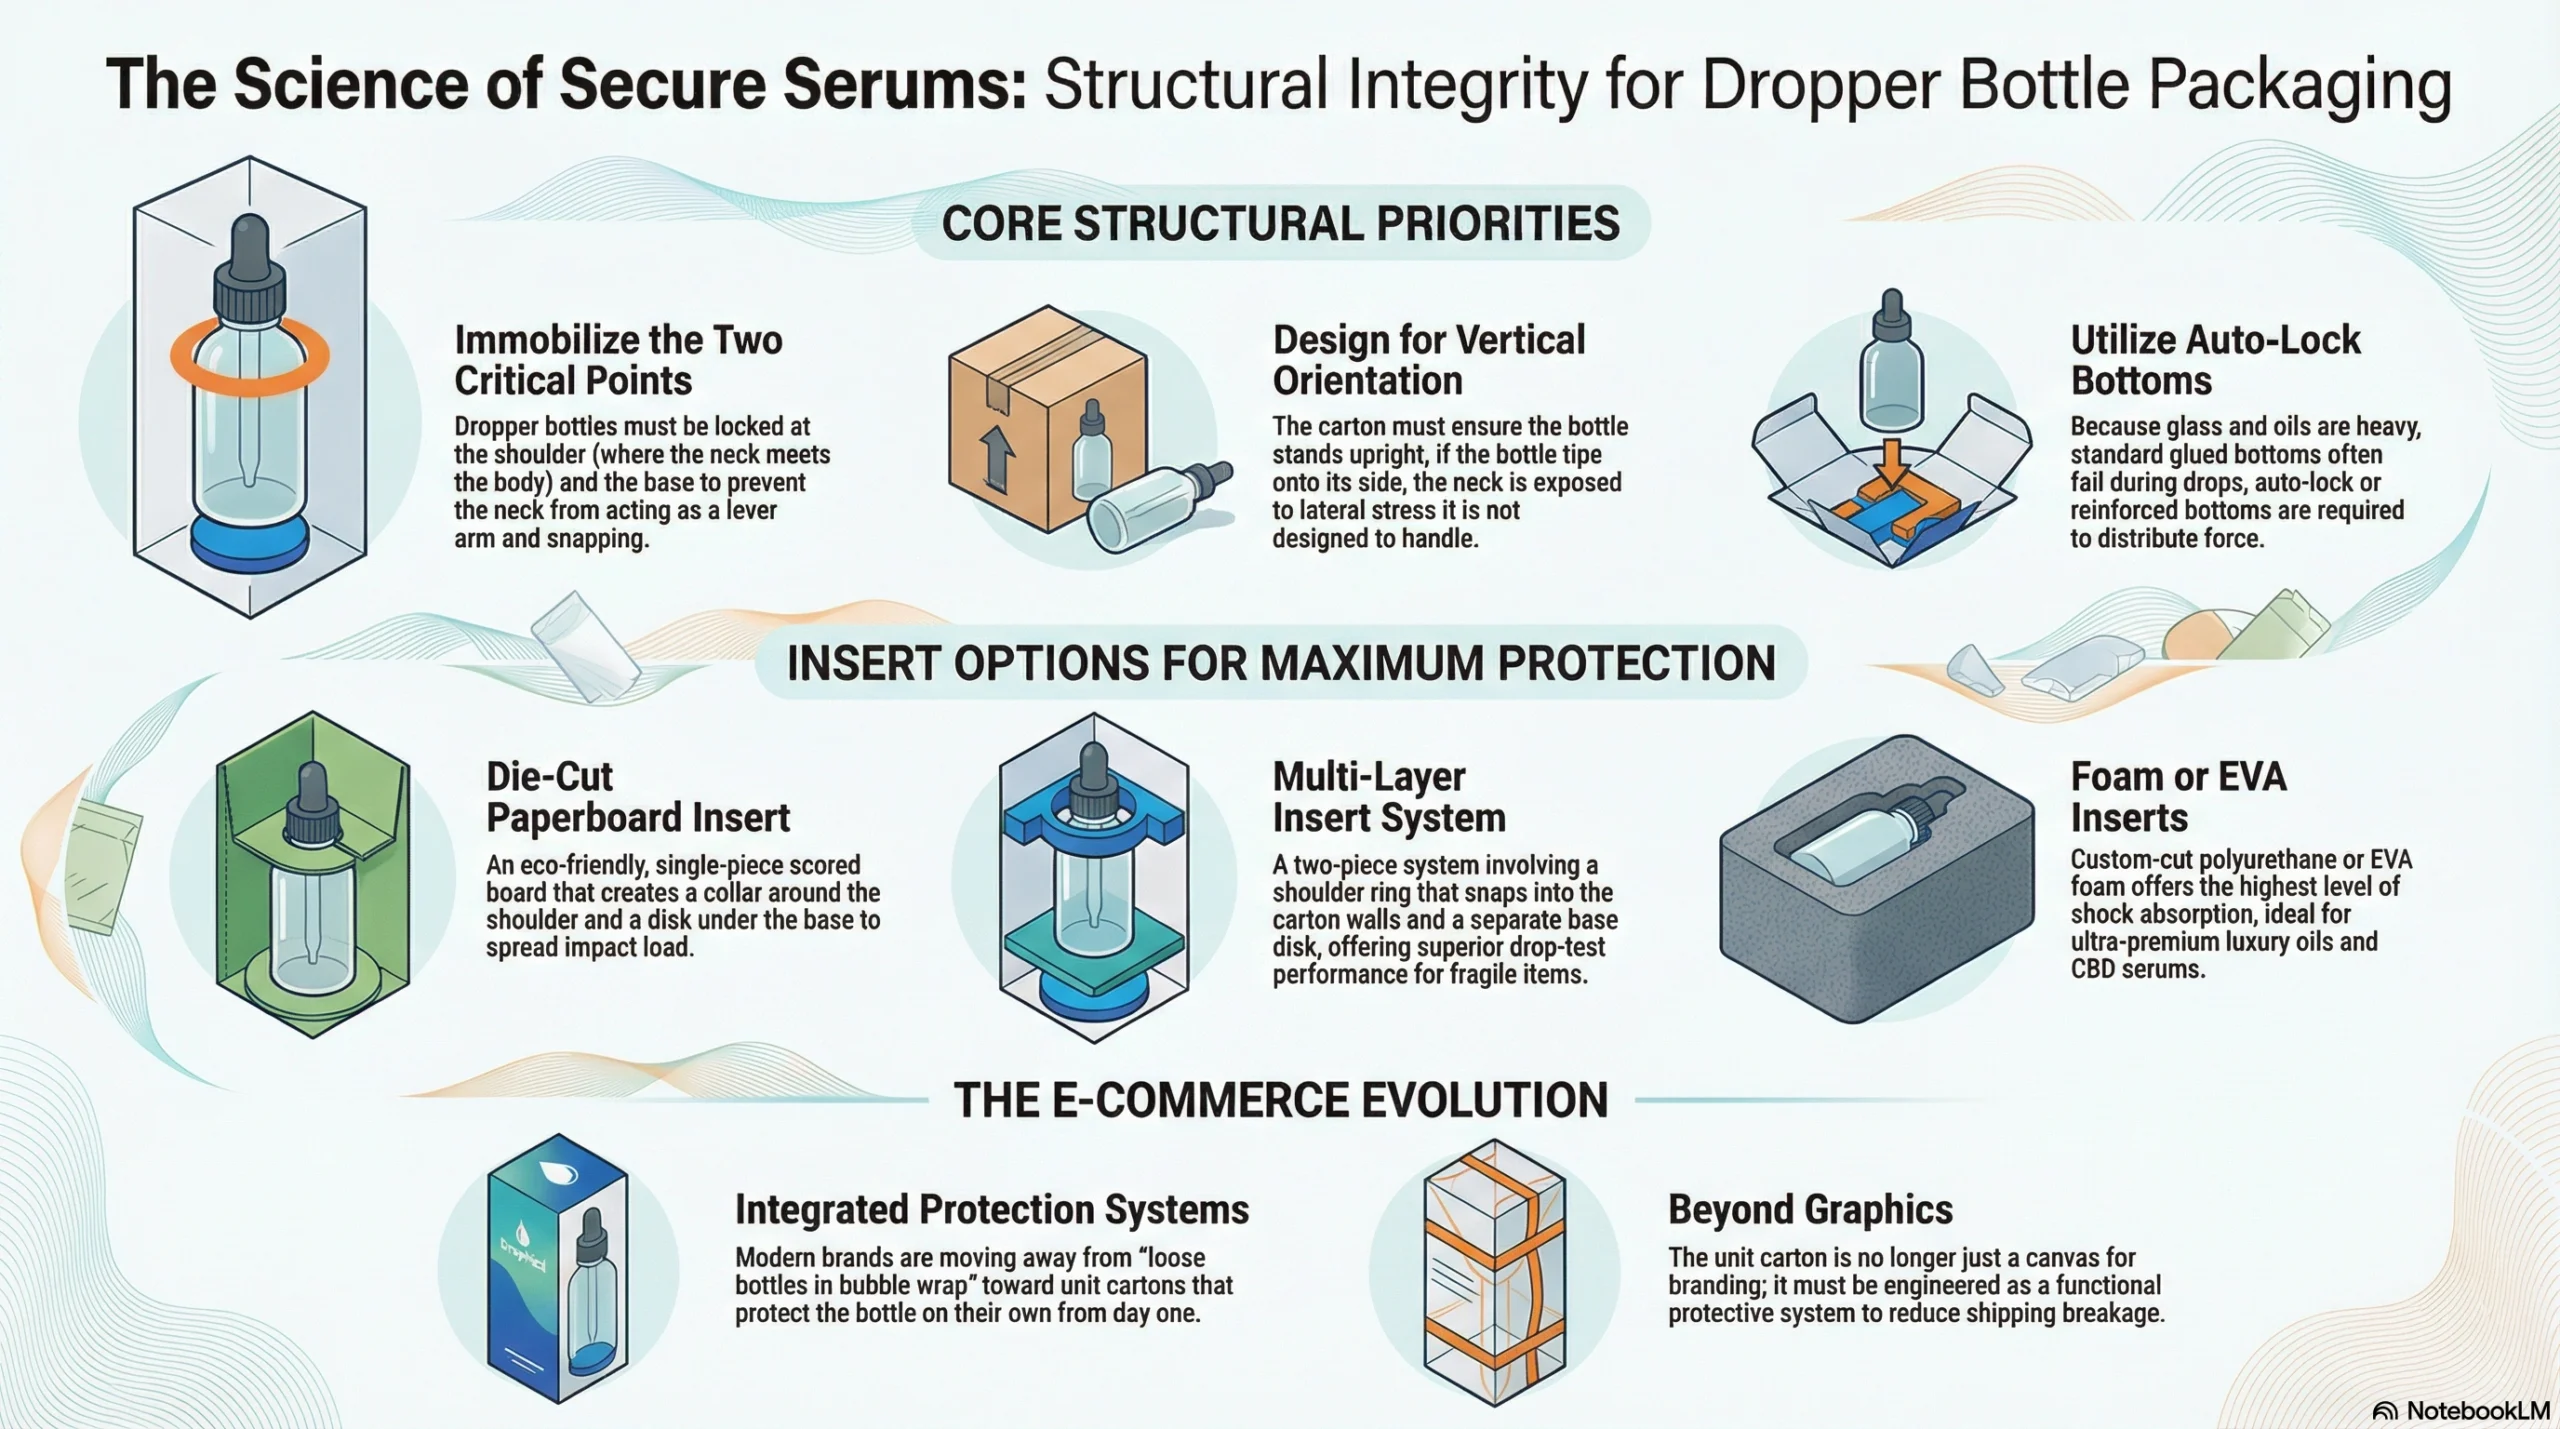
Dropper bottles must be held upright and immobilised at two critical points: the shoulder (where the neck meets the body) and the base. If the bottle can tip or rock, the neck becomes a lever arm during impact and will snap under surprisingly low force.
Keep the bottle upright: Design the carton so the bottle stands vertically and cannot tip onto its side. If the bottle lies down, the neck is exposed to lateral stress that it’s not designed to handle.
Use auto‑lock or reinforced bottoms: Glass adds weight, and dropper bottles are often filled with dense oils or viscous serums. Standard glued bottoms can fail under the combined weight and shock of a drop; auto‑lock bottoms distribute force better.
Insert Options for Maximum Protection
The insert is the single most important element in preventing dropper breakage.
Die‑cut paperboard insert hugging shoulder and base: A well‑engineered paperboard insert can create a collar around the bottle shoulder and a disk or cup under the base, effectively locking the bottle at two points. The collar prevents the neck from flexing during impact; the base disk spreads the load. This can be accomplished with a single piece of scored, die‑cut board that folds into shape.
Multi‑layer insert system: For very fragile or high‑value droppers, use a two‑piece insert: a ring or collar at the shoulder that snaps into the carton walls, plus a separate base disk that sits under the bottle. This adds a small amount of cost and assembly complexity but dramatically improves drop‑test performance.
Foam or EVA for ultra‑premium lines: If the product price point supports it, custom‑cut foam inserts (EVA or polyurethane) offer the highest level of shock absorption. These are particularly common for luxury facial oils, CBD serums, and other high‑margin categories where breakage is unacceptable. The trade‑off is cost and recyclability; foam inserts are not mono‑material with the paperboard carton.
E‑commerce Shift: Integrated Protection
As more beauty brands sell direct‑to‑consumer, the expectation is shifting from “loose bottle in a carton, then wrapped in bubble wrap and put in a big box” to integrated unit cartons that protect the bottle on their own or with minimal outer packaging. This means designing the folding carton and insert as a protective system from day one, not treating the carton as “just graphics” and relying on the fulfilment team to add cushioning later.
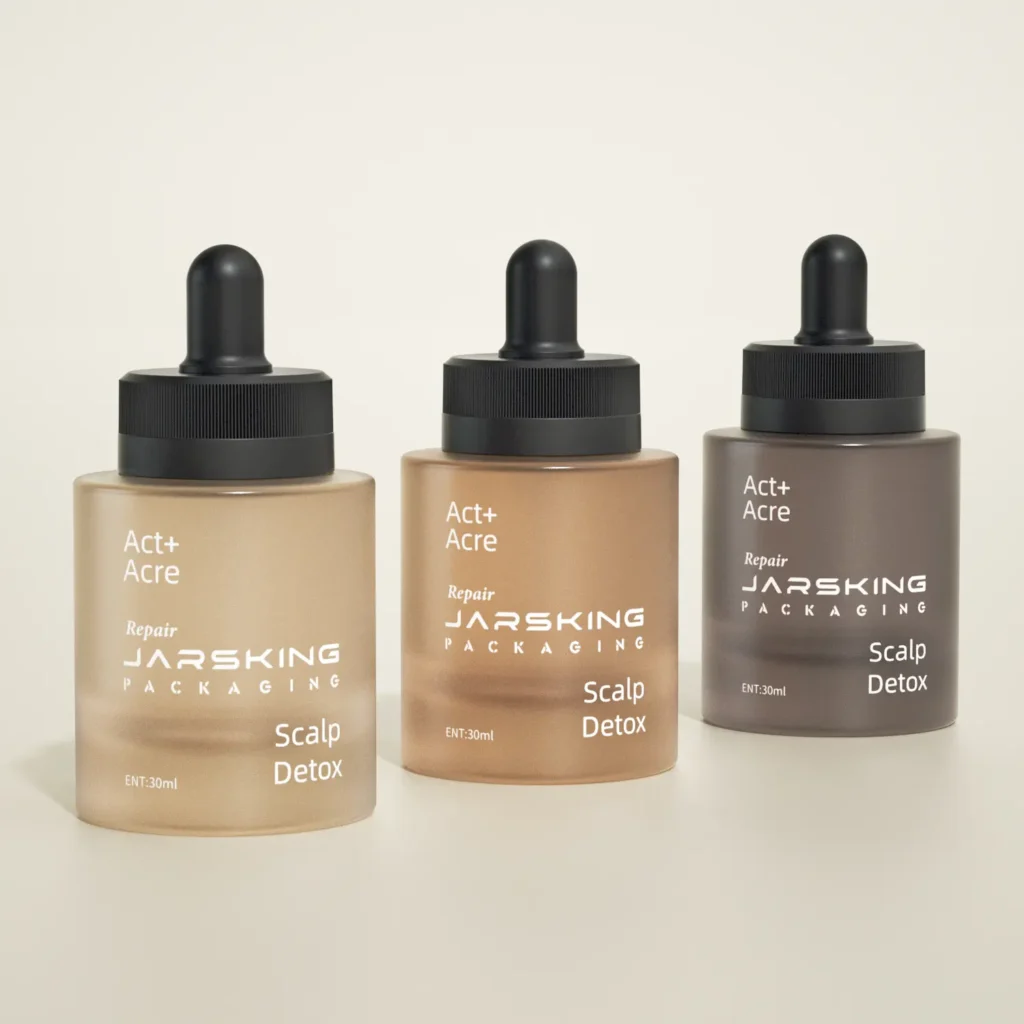
Pumps & Airless Bottles
Pump bottles and airless dispensers are extremely popular for serums, foundations, and treatment creams because they protect the formula from air exposure and allow precise dosing. But they add height and a vulnerable mechanical component—the actuator—that your carton has to accommodate and protect.
Box Design Tips
The pump head is the tallest part of the assembly and also the most likely to be damaged if compressed from above.
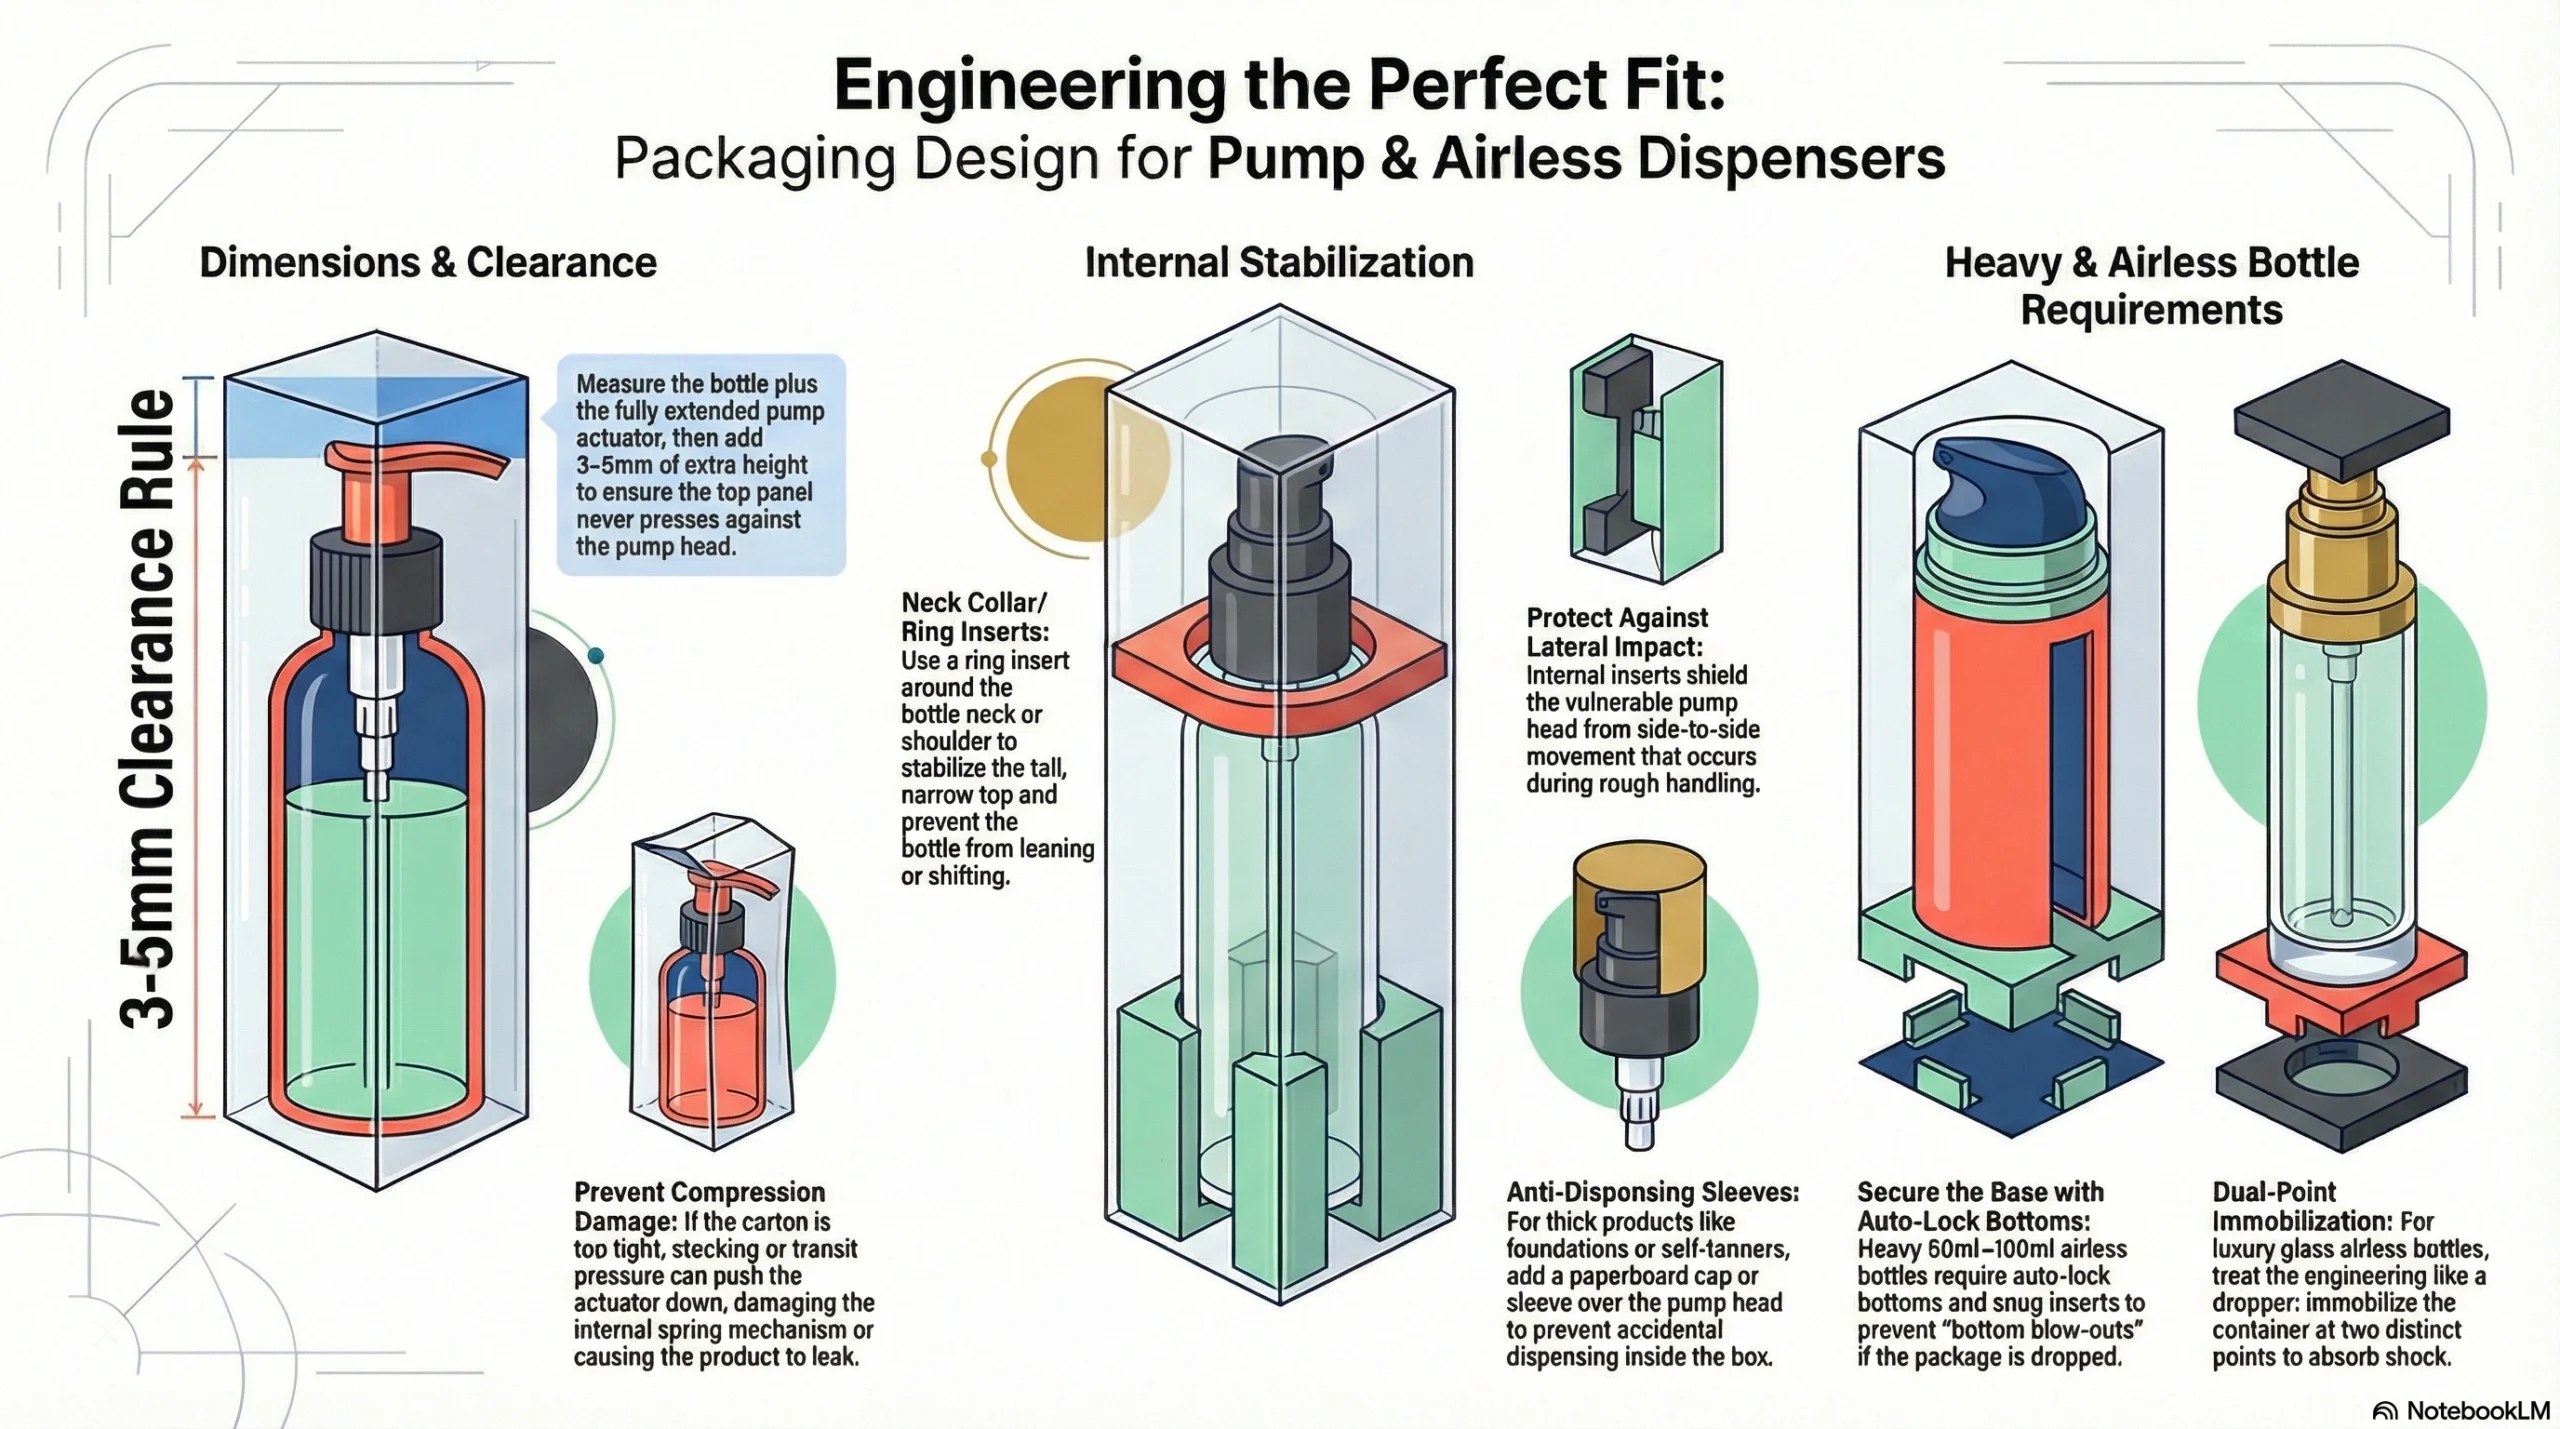
Set internal height with clearance: Measure the total height of the bottle plus the fully extended pump actuator, then add 3–5mm of clearance so the pump head is not pressing into the top panel of the carton. If the carton is too tight, the pump can be pushed down during stacking or transit, which can damage the spring mechanism or cause the pump to leak.
Add a collar or ring insert around the neck: Pump bottles have most of their weight low (the liquid in the bottle body) but a tall, narrow neck. A simple ring insert around the neck or shoulder prevents the bottle from leaning to one side and protects the pump from lateral impact.
Protect the actuator from accidental dispensing: Some brands add a small paperboard cap or sleeve over the pump head inside the carton to prevent the actuator from being pressed during handling. This is particularly important for products that are thick or difficult to clean if they leak (foundations, self‑tanners, hair treatments).
For Heavier Airless Bottles
Airless bottles can hold substantial volumes—50ml to 100ml or more—and when filled, they become quite heavy. Pair these with auto‑lock bottoms and snug inserts to avoid bottom blow‑outs during drops. If the bottle is also glass (increasingly common for luxury airless serums), treat it like a dropper in terms of insert engineering: immobilise it at two points and assume it will be dropped.
Slim Cartons (Lipsticks, Mascaras, Eyeliners, Lip Pencils)
Slim cartons are deceptively difficult to engineer well. Their narrow footprint and small tuck flaps make them prone to structural failure, and because they’re handled frequently—opened and closed by testers in stores, tossed in handbags—they need to be more robust than their size suggests.
Common Failure Modes
When slim cartons are poorly designed, they fail in predictable ways:
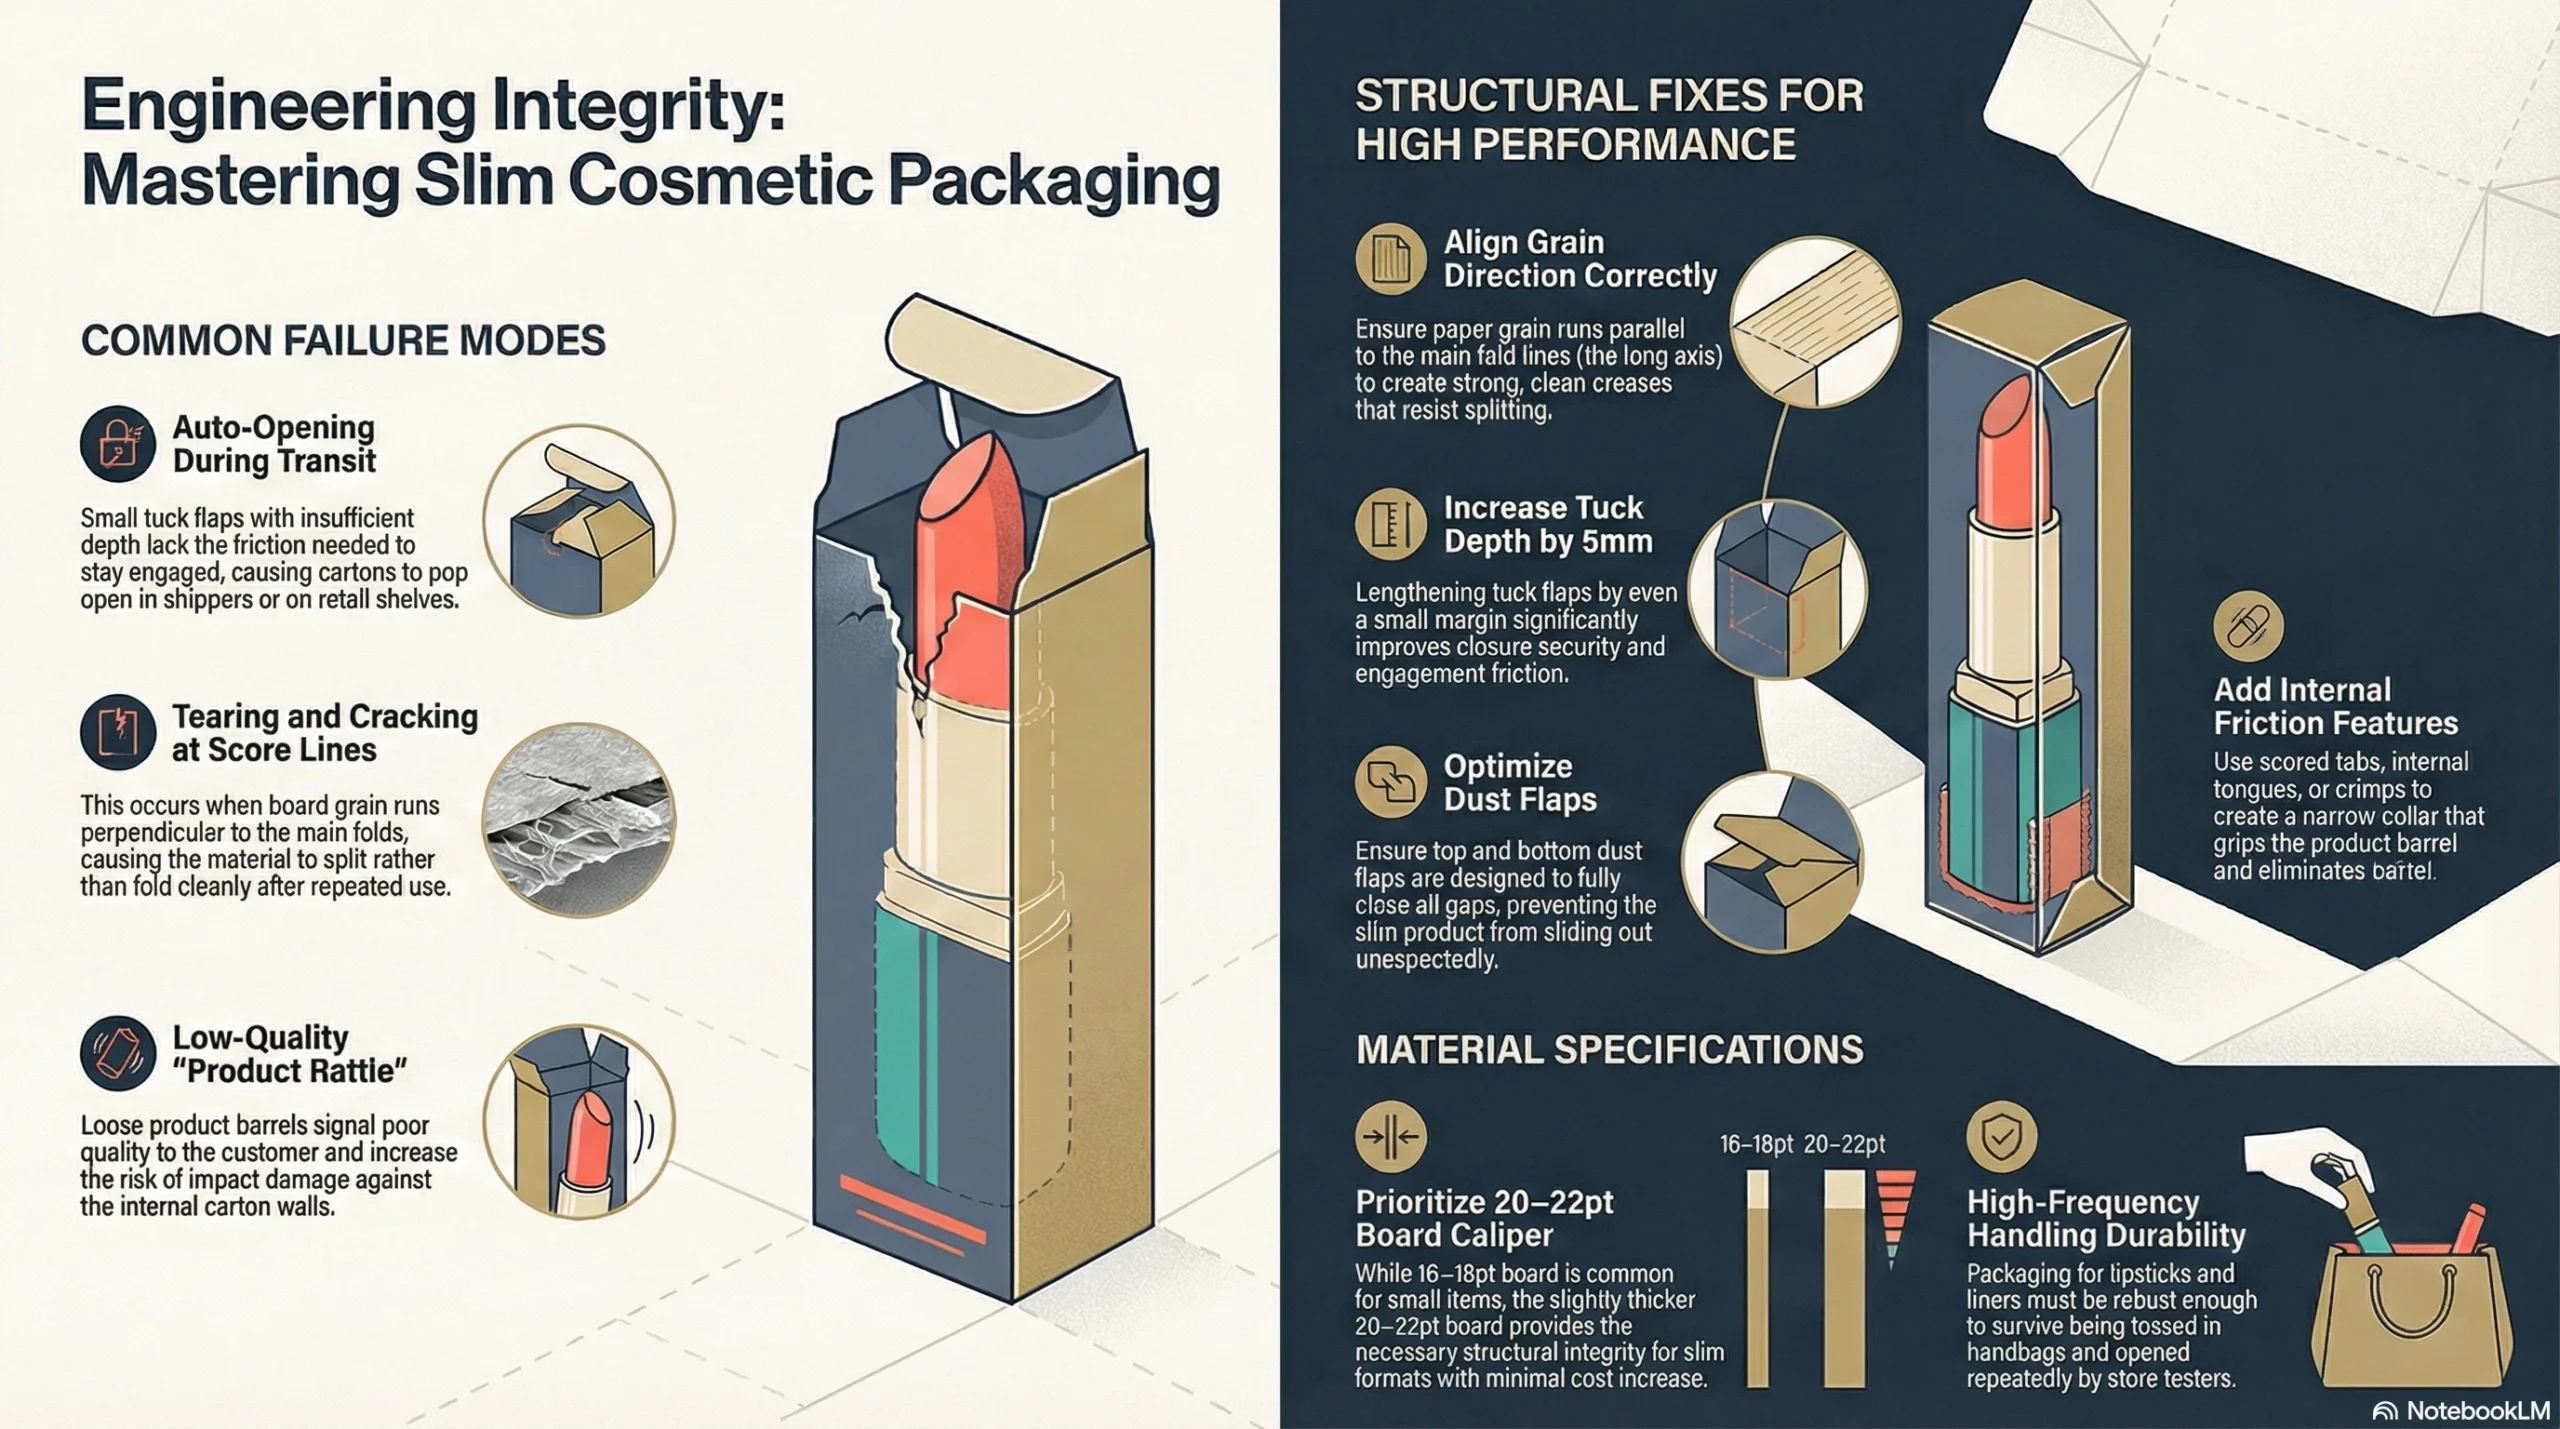
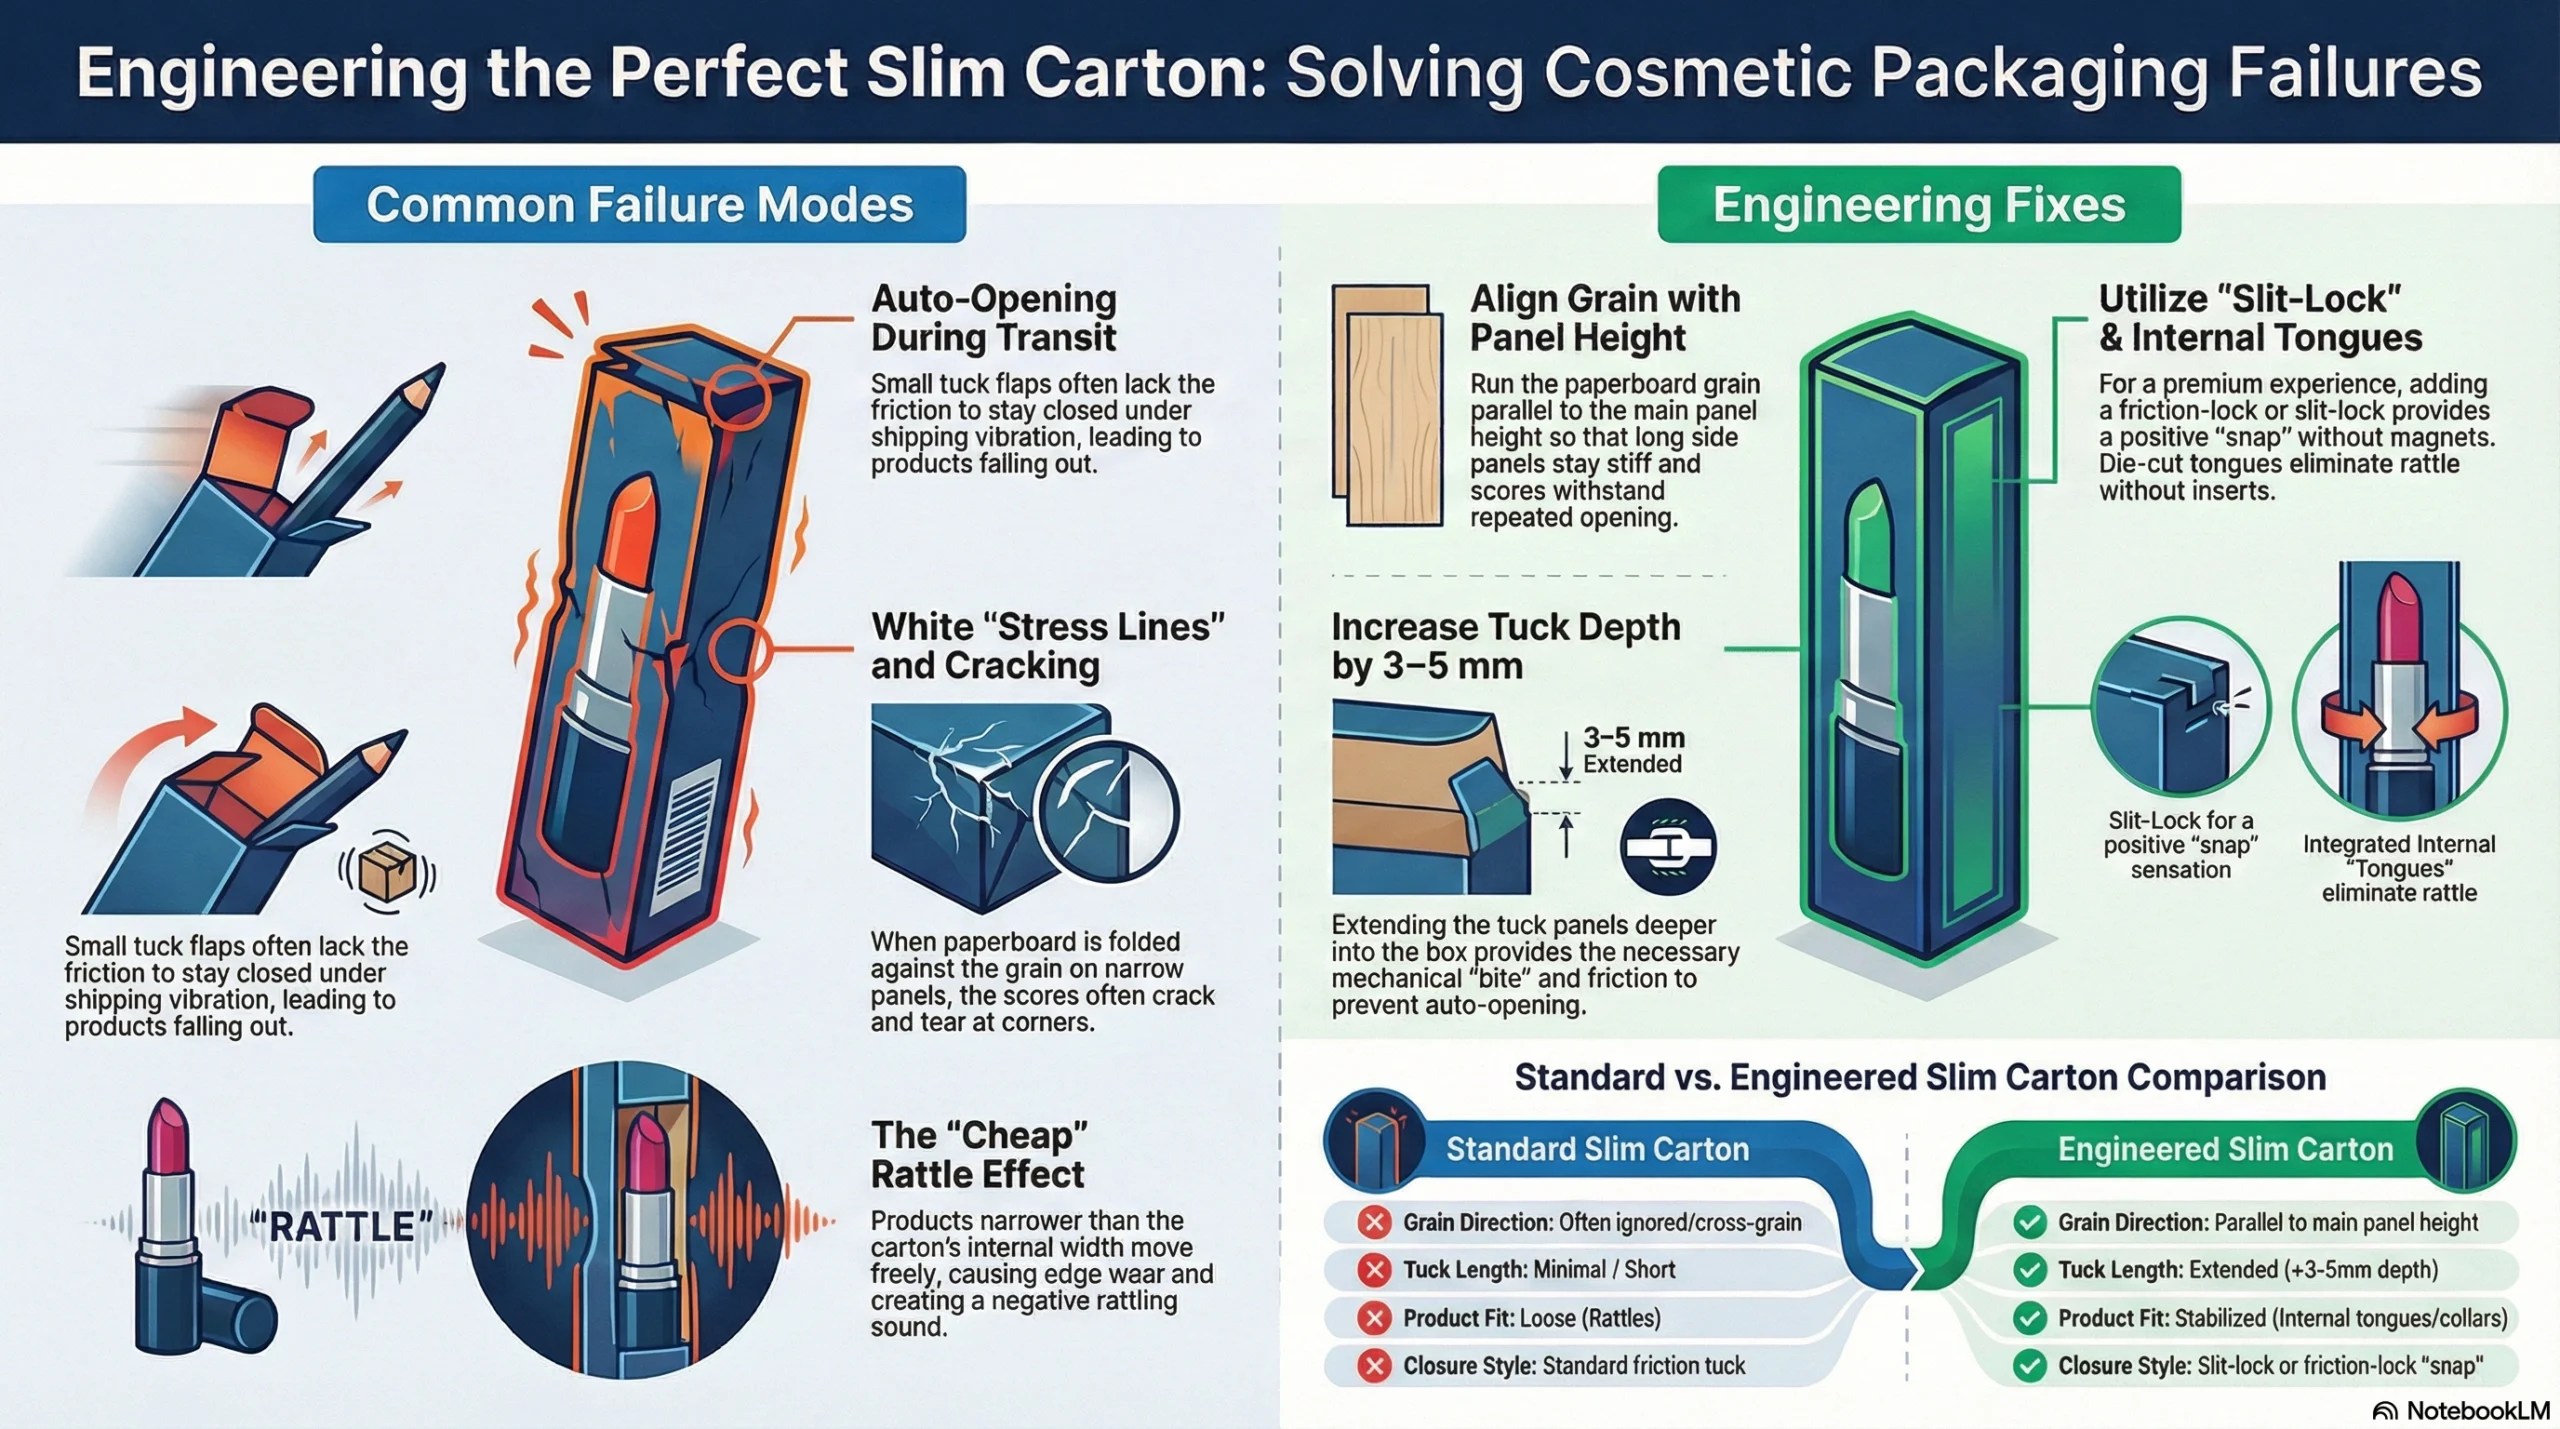
Auto‑opening during transit: Small tuck flaps with insufficient depth don’t have enough friction or engagement to stay closed, so the carton pops open in the shipper or on the shelf.
Tearing and cracking at score lines: If the board grain runs perpendicular to the main folds (wrong grain direction), the scores will crack rather than fold cleanly, especially after repeated opening and closing.
Product rattle: A lipstick or mascara barrel that’s loose inside its carton rattles when picked up, which immediately signals low quality to the customer. It also increases the chance of the product being damaged by impact against the carton walls.
Structural Fixes That Dramatically Improve Performance
Small adjustments make a big difference in slim formats:
Specify grain direction correctly: The paper grain should run parallel to the main fold lines (the long axis of the carton). This ensures clean, strong creases that won’t crack or split after repeated use.
Increase tuck depth: Lengthen the tuck flaps so they engage more deeply into the carton. Even an extra 5mm of tuck depth significantly improves closure security.
Optimise dust flaps: Make sure top and bottom dust flaps fully close any gaps. In slim cartons, even a small opening can allow the product to slide out.
Add internal friction features: Design small internal tongues, crimps, or a narrow collar that lightly grips the lipstick or mascara barrel. This removes rattle and holds the product in position without making it difficult to load or remove. These features can be as simple as a scored tab that folds inward to create gentle contact with the product.
Material Considerations
Because slim cartons are so dependent on structural integrity, don’t go too thin on board caliper. A 20–22pt board performs much better than a 16–18pt in slim formats, even though the size is small. The incremental cost is minimal, and the improvement in perceived quality is immediate.
Insert Engineering That Actually Works
Inserts are what turn a “printed box” into real packaging. They decide whether your jars and bottles sit perfectly, survive a drop, and feel premium—or rattle, arrive damaged, and cheapen the experience. Thinking about inserts as engineered components (not an afterthought) is one of the fastest ways to improve your beauty packaging performance.
Paperboard Inserts (Your Workhorse)
Paperboard inserts are the default choice for most skincare and cosmetics lines because they balance cost, protection, sustainability, and speed on the line.
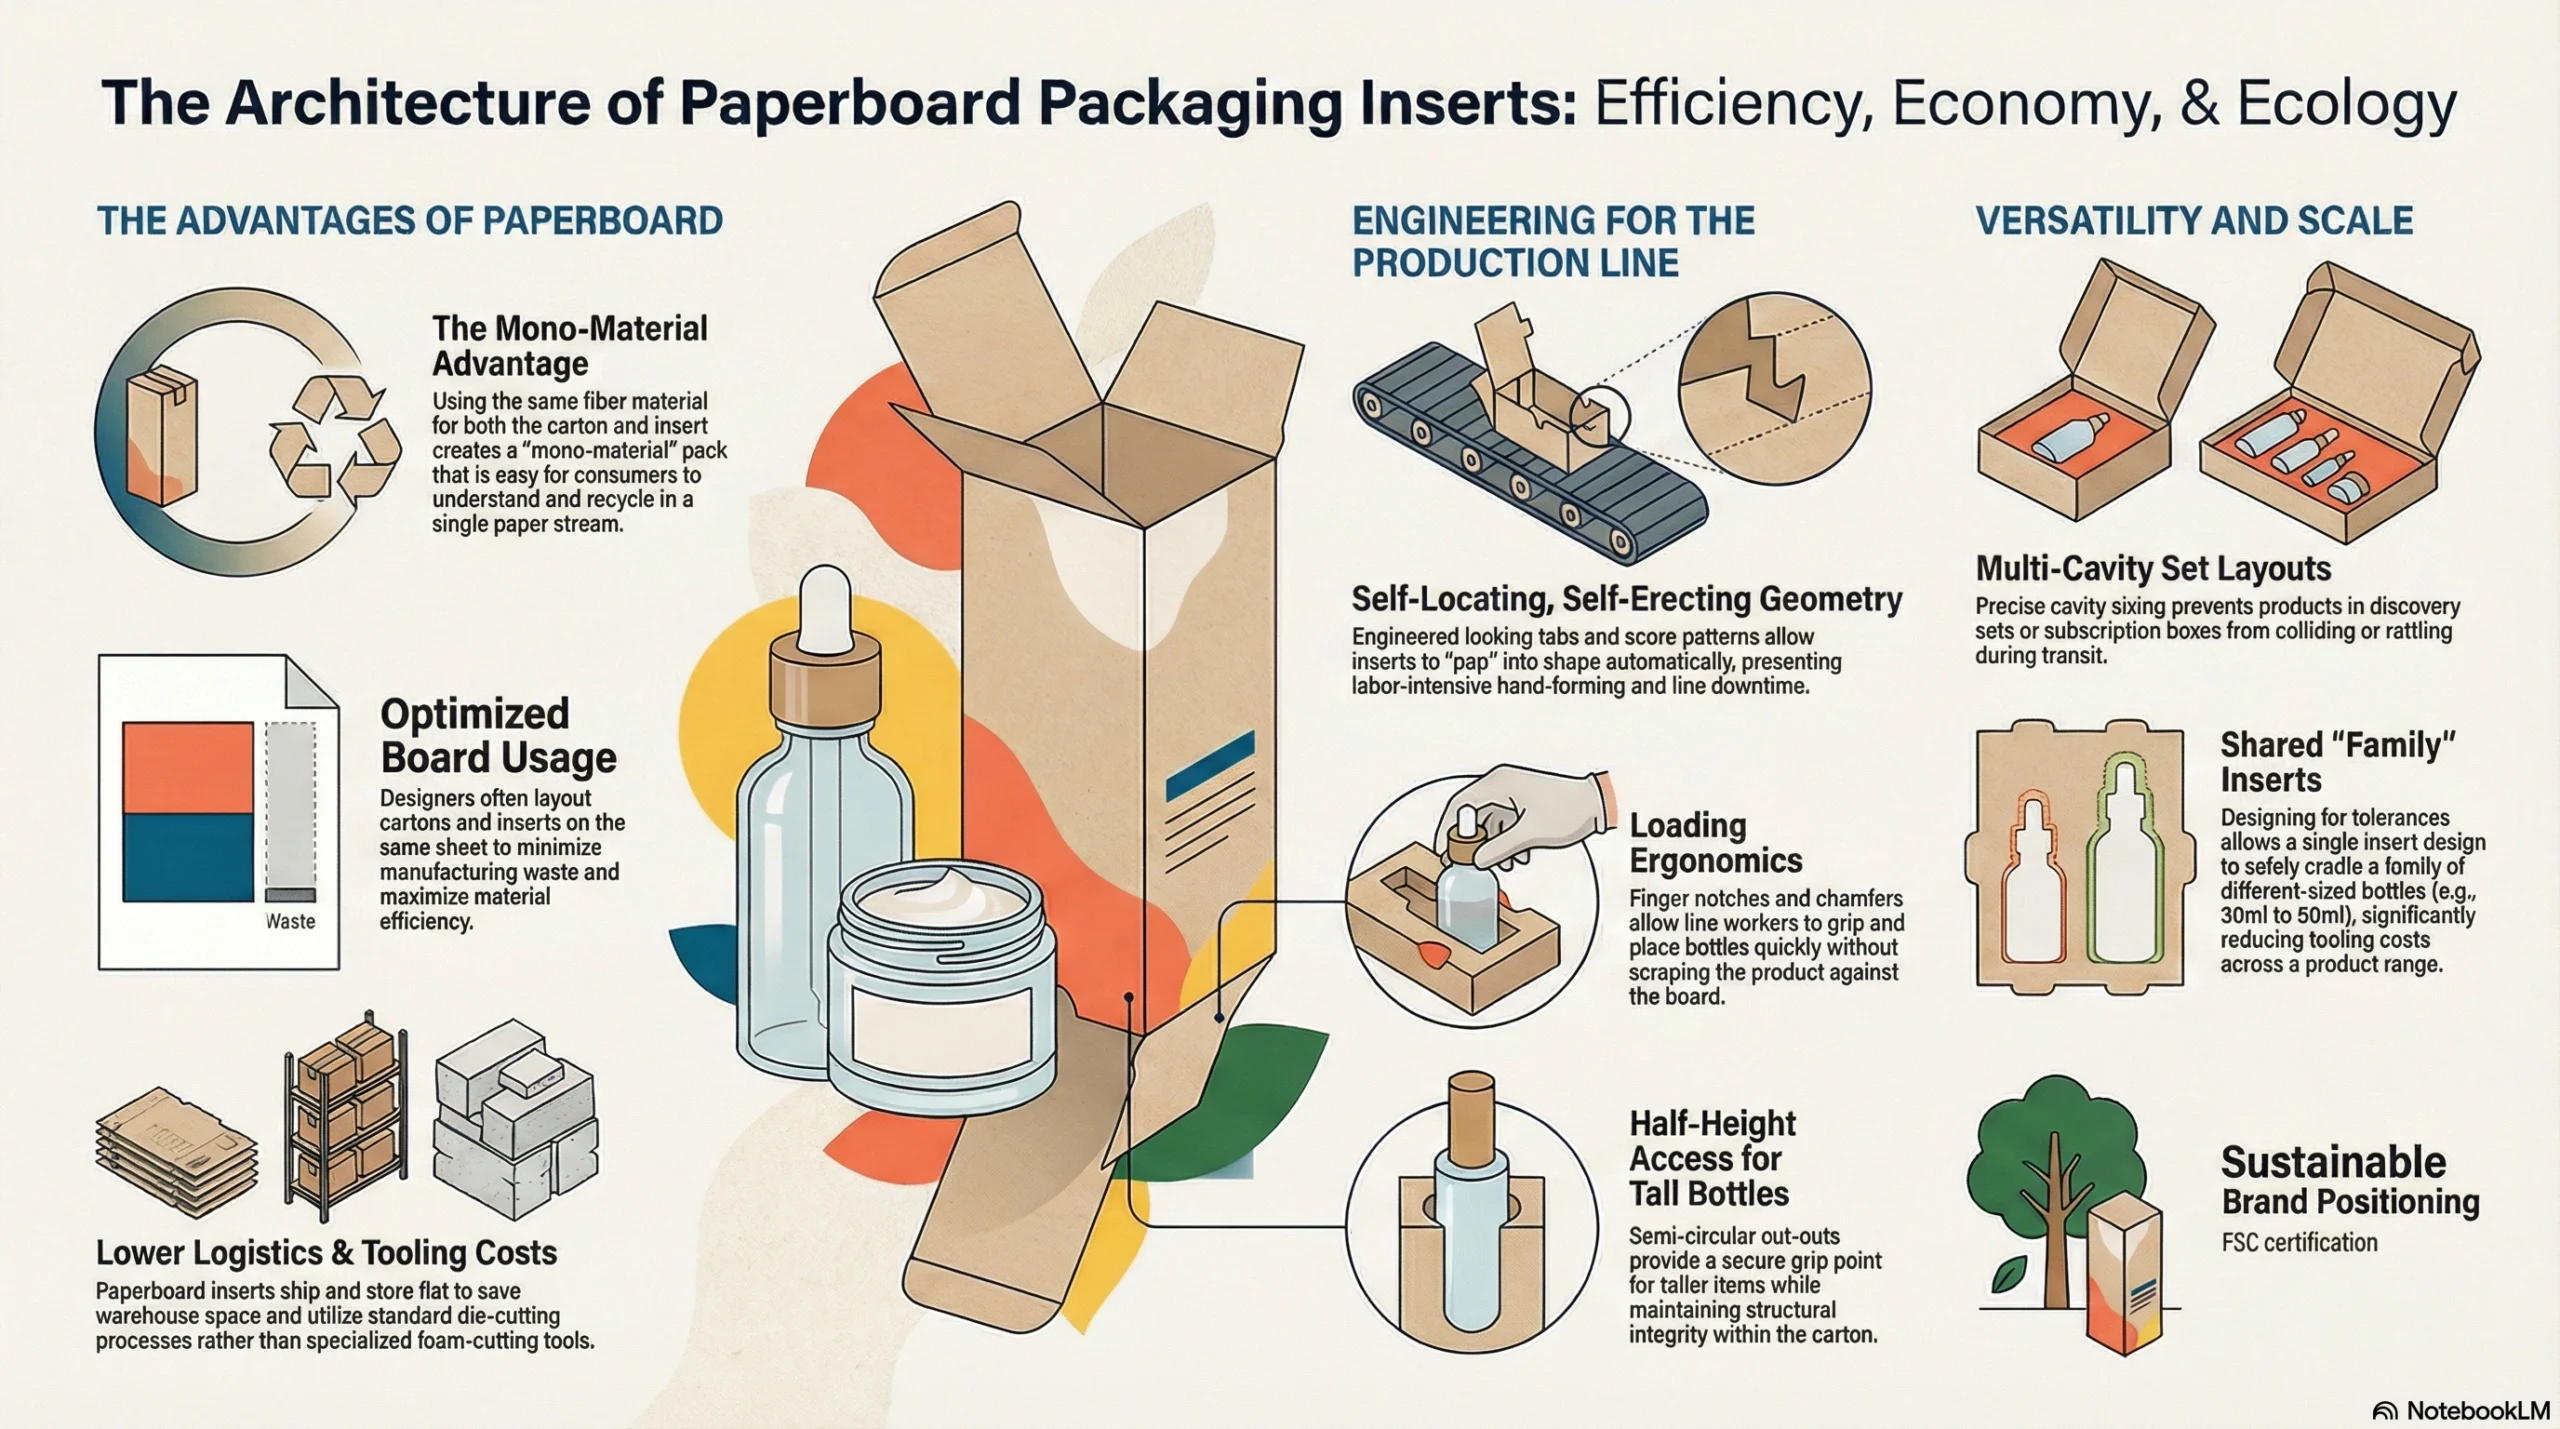
From a sustainability perspective, using the same fibre material for both carton and insert gives you a mono‑material pack that’s easy to explain and easier to recycle: everything goes in the paper stream together. Many converters now design cartons and inserts to come off the same sheet, which reduces waste and optimises board usage.
On the cost side, paperboard inserts:
Use standard die‑cutting and creasing processes (no specialised foam cutting).
Have relatively low tooling costs, especially when designed as family inserts that work across multiple SKUs.
Ship and store flat, minimising warehouse space and inbound freight compared with pre‑formed plastic or foam.
Design principles that make paperboard inserts actually work:
Self‑locating, self‑erecting geometry
Good inserts are engineered with locking tabs and precise score patterns so they “pop” into the correct shape when folded, without fiddly hand‑forming. This matters on high‑speed lines: if operators have to fight the insert into place, your labour cost and line downtime spike fast. A well‑designed insert drops into the carton, locks against the walls, and stays put.Finger access and loading ergonomics
Adding finger notches, chamfers, or open ends in the right places lets line workers load jars and bottles quickly without forcing or scraping products against the board. For tall bottles, a half‑height front wall or semi‑circular cut‑out gives just enough access to grip and place the product securely.Multi‑cavity layouts for sets
In discovery sets or subscription boxes, multi‑cavity inserts prevent products from colliding and looking chaotic. Each SKU gets a cavity sized to its diameter and height so there’s no rattle but still enough clearance for easy loading. Good packaging engineers will account for tolerances in both the product and the board so cavities aren’t so tight that they slow the line.Shared inserts across a range
To keep tooling manageable, brands often use one insert design that fits, for example, all 30–50ml serums with slight diameter or height variation. This is where CAD work matters: you design tolerances into the cavity so it can safely cradle a family of bottles instead of cutting a new tool for every SKU.
Paperboard inserts are especially powerful when you align them with your sustainability story. They support plastic‑reduction goals and, when combined with FSC or similar certified boards, reinforce your overall environmental positioning.
Foam & EVA Inserts (Premium or Ultra‑Fragile)
Foam inserts—typically EVA (ethylene‑vinyl acetate) or PU foam—are still widely used in premium beauty, fragrance, and high‑risk glass applications. Their job is simple and critical: absorb shock and hold the product in an exact position, even under severe impact.
Why foam and EVA are still attractive:
Excellent shock absorption and void filling
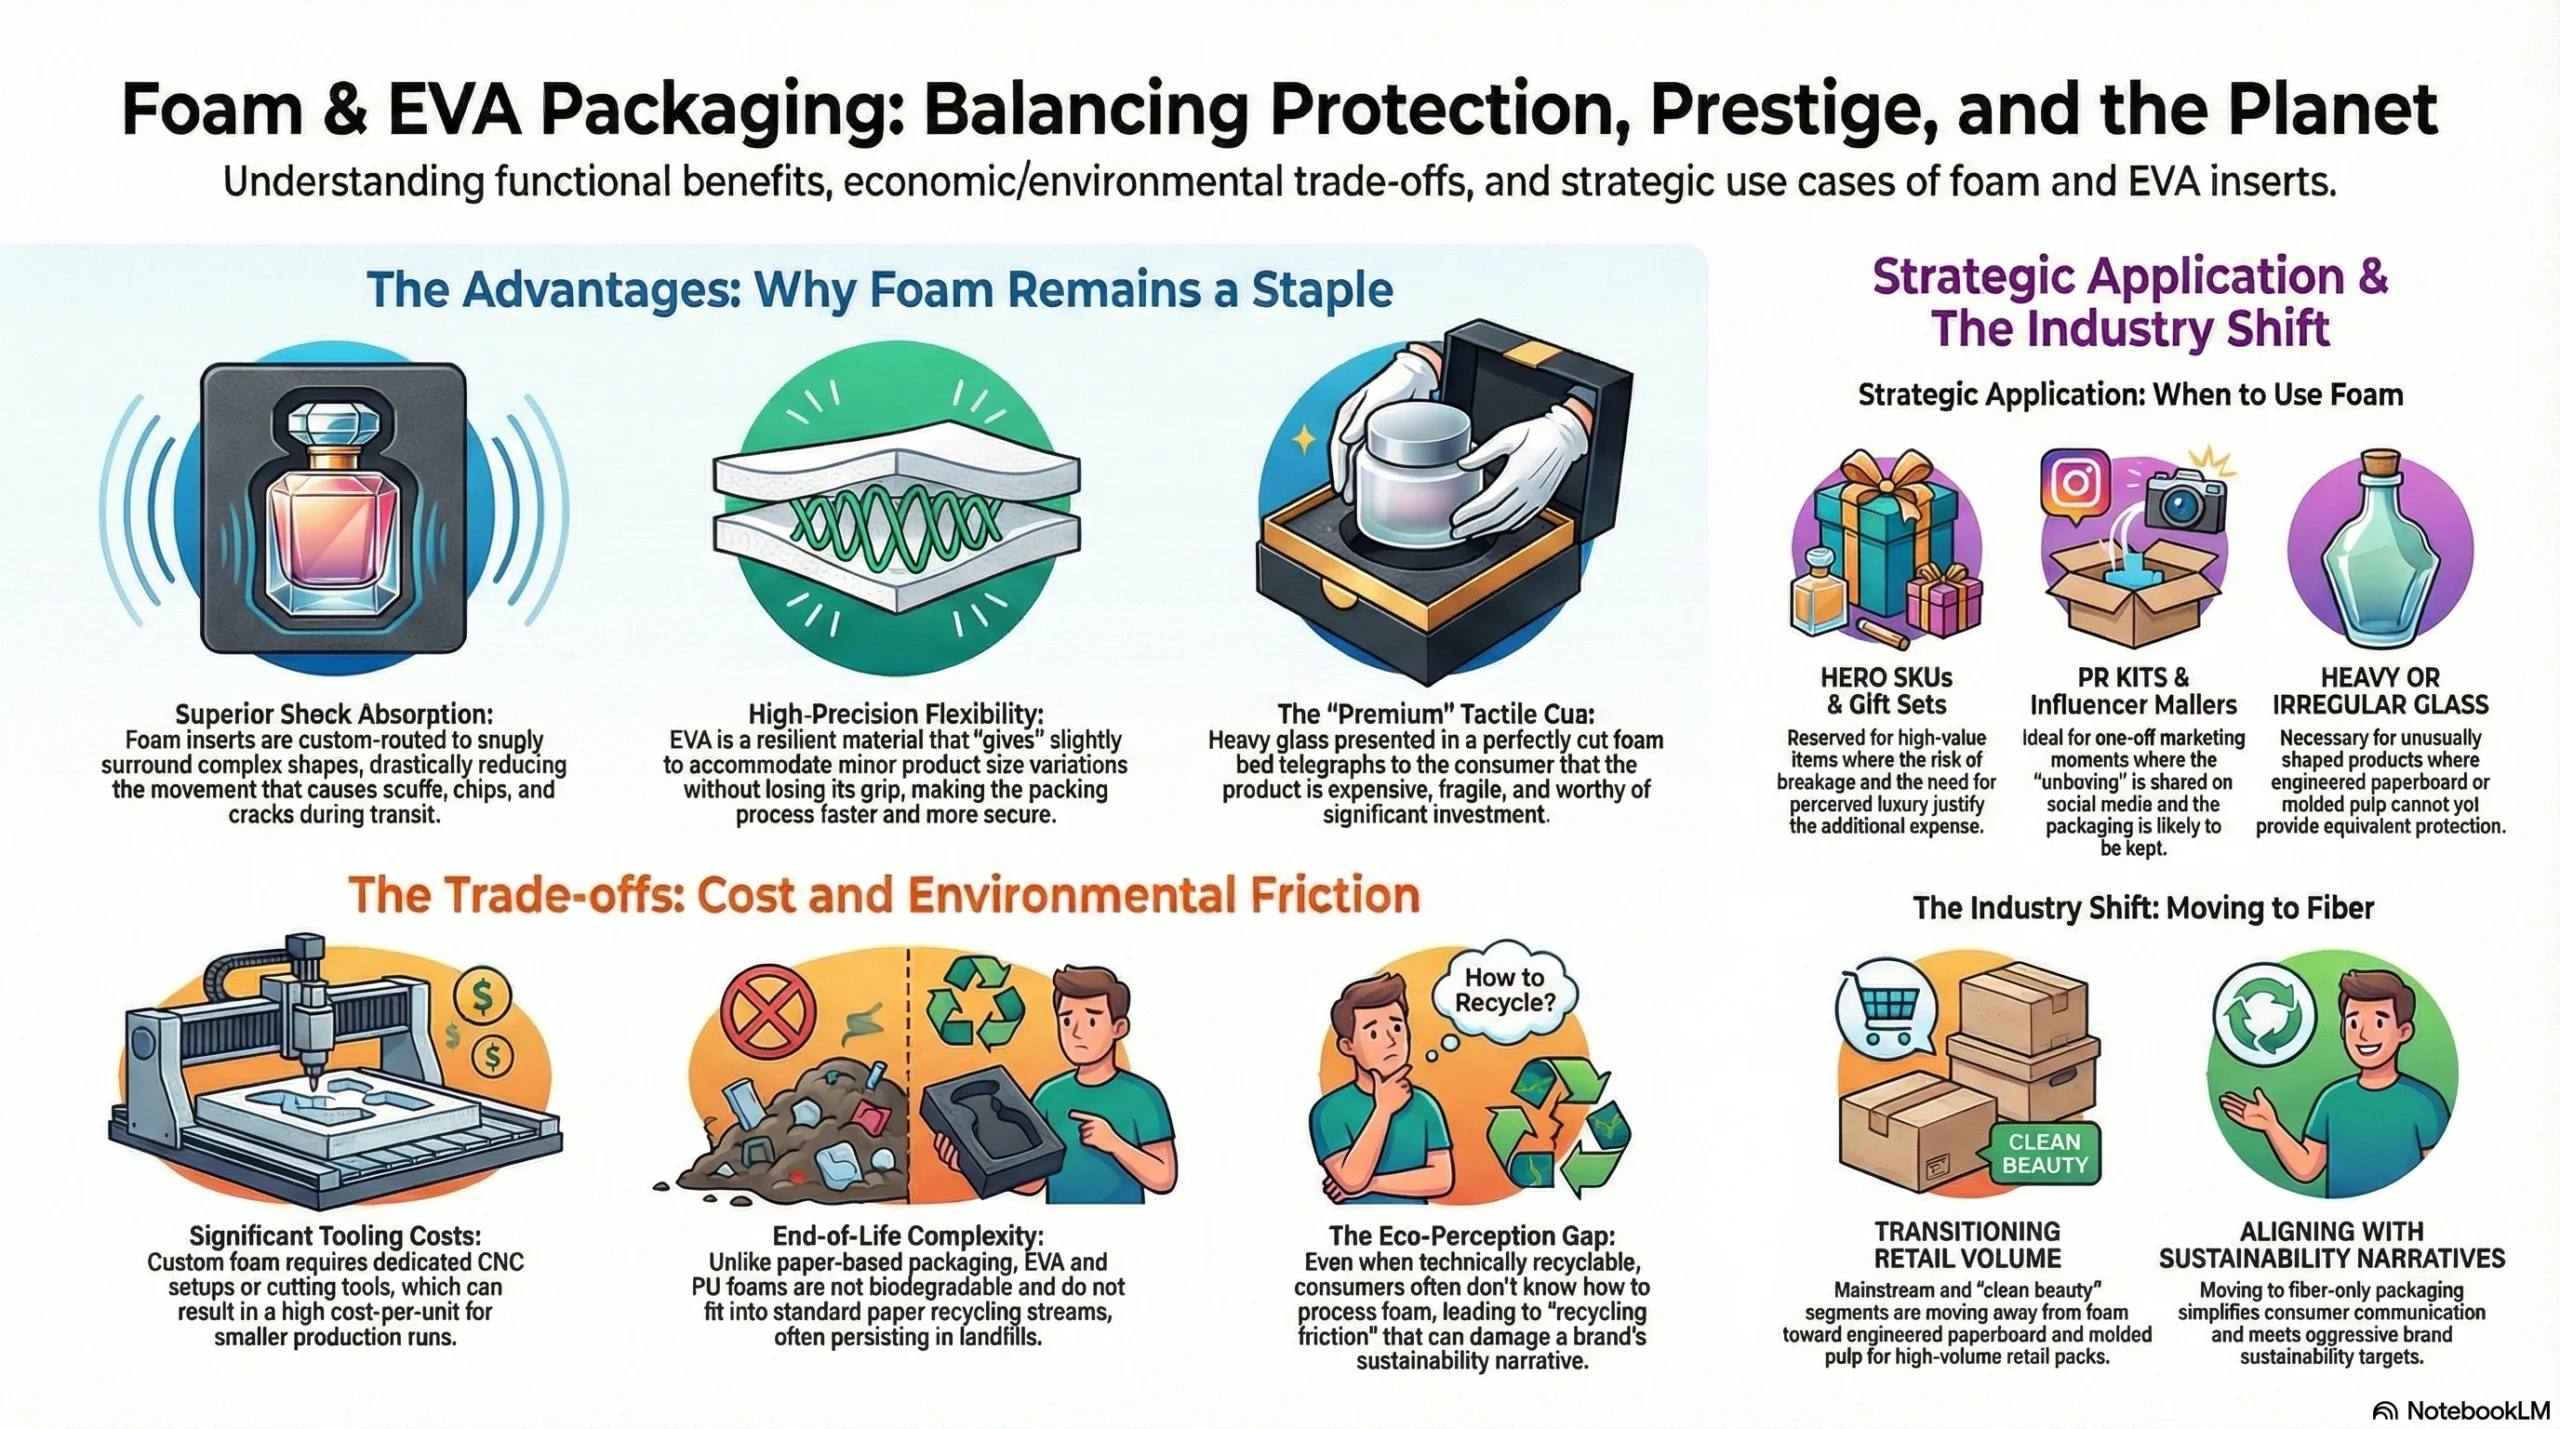
Foam inserts can be cut or routed to snugly match complex shapes, then surround them with cushioning material that fills almost all empty space. This drastically reduces movement, which is the main cause of scuffs, chips, and cracks in transit.Precision and flexibility
EVA in particular is lightweight, slightly flexible, and resilient, so minor variations in product size don’t cause problems—it “gives” a little without losing its grip. That flexibility also makes it easy to press inserts into cartons quickly during packing.Premium tactile and visual cues
A heavy glass bottle presented in a perfectly cut foam bed looks expensive, especially in rigid gift boxes or PR kits. It telegraphs that the product is important and fragile, and that the brand invested in protection.
But foam has real trade‑offs:
Cost and tooling
Custom foam inserts require their own cutting tools or CNC setups. For small runs, this can be a significant cost per unit. For large runs, the cost is manageable but still higher than paperboard in most cases.End‑of‑life complexity
EVA and PU foam don’t go into the paper stream and are not biodegradable; some EVA formulations can persist in landfills for long periods. That clashes with many beauty brands’ sustainability targets.Eco‑perception
Even where EVA is technically recyclable or relatively inert, consumers rarely know how to handle it. A fibre‑only pack is easier to communicate; a foam insert raises “is this recyclable?” friction.
Because of this, a lot of brands now reserve foam for specific use cases:
High‑value hero SKUs or gift sets where breakage risk and perceived value justify the extra cost.
PR kits and influencer mailers where the unboxing is a marketing moment and the insert will likely be kept rather than immediately discarded.
Very heavy or unusually shaped glass where paperboard or pulp cannot yet provide equivalent protection at acceptable thickness.
Retail volume packs—especially in mainstream and “clean beauty” segments—are shifting to more fibre‑based solutions like engineered paperboard or molded pulp to align with broader sustainability narratives.
Molded Pulp & Hybrid Solutions
Molded pulp inserts sit between paperboard and foam: they offer 3D protection and cushioning, like foam, but are made from fibre—typically recycled paper or plant‑based feedstocks. For beauty and personal care, they’re gaining traction as more brands look for plastic‑free, visibly eco‑friendly packaging that still feels intentional and premium.
Why molded pulp is attractive for beauty:
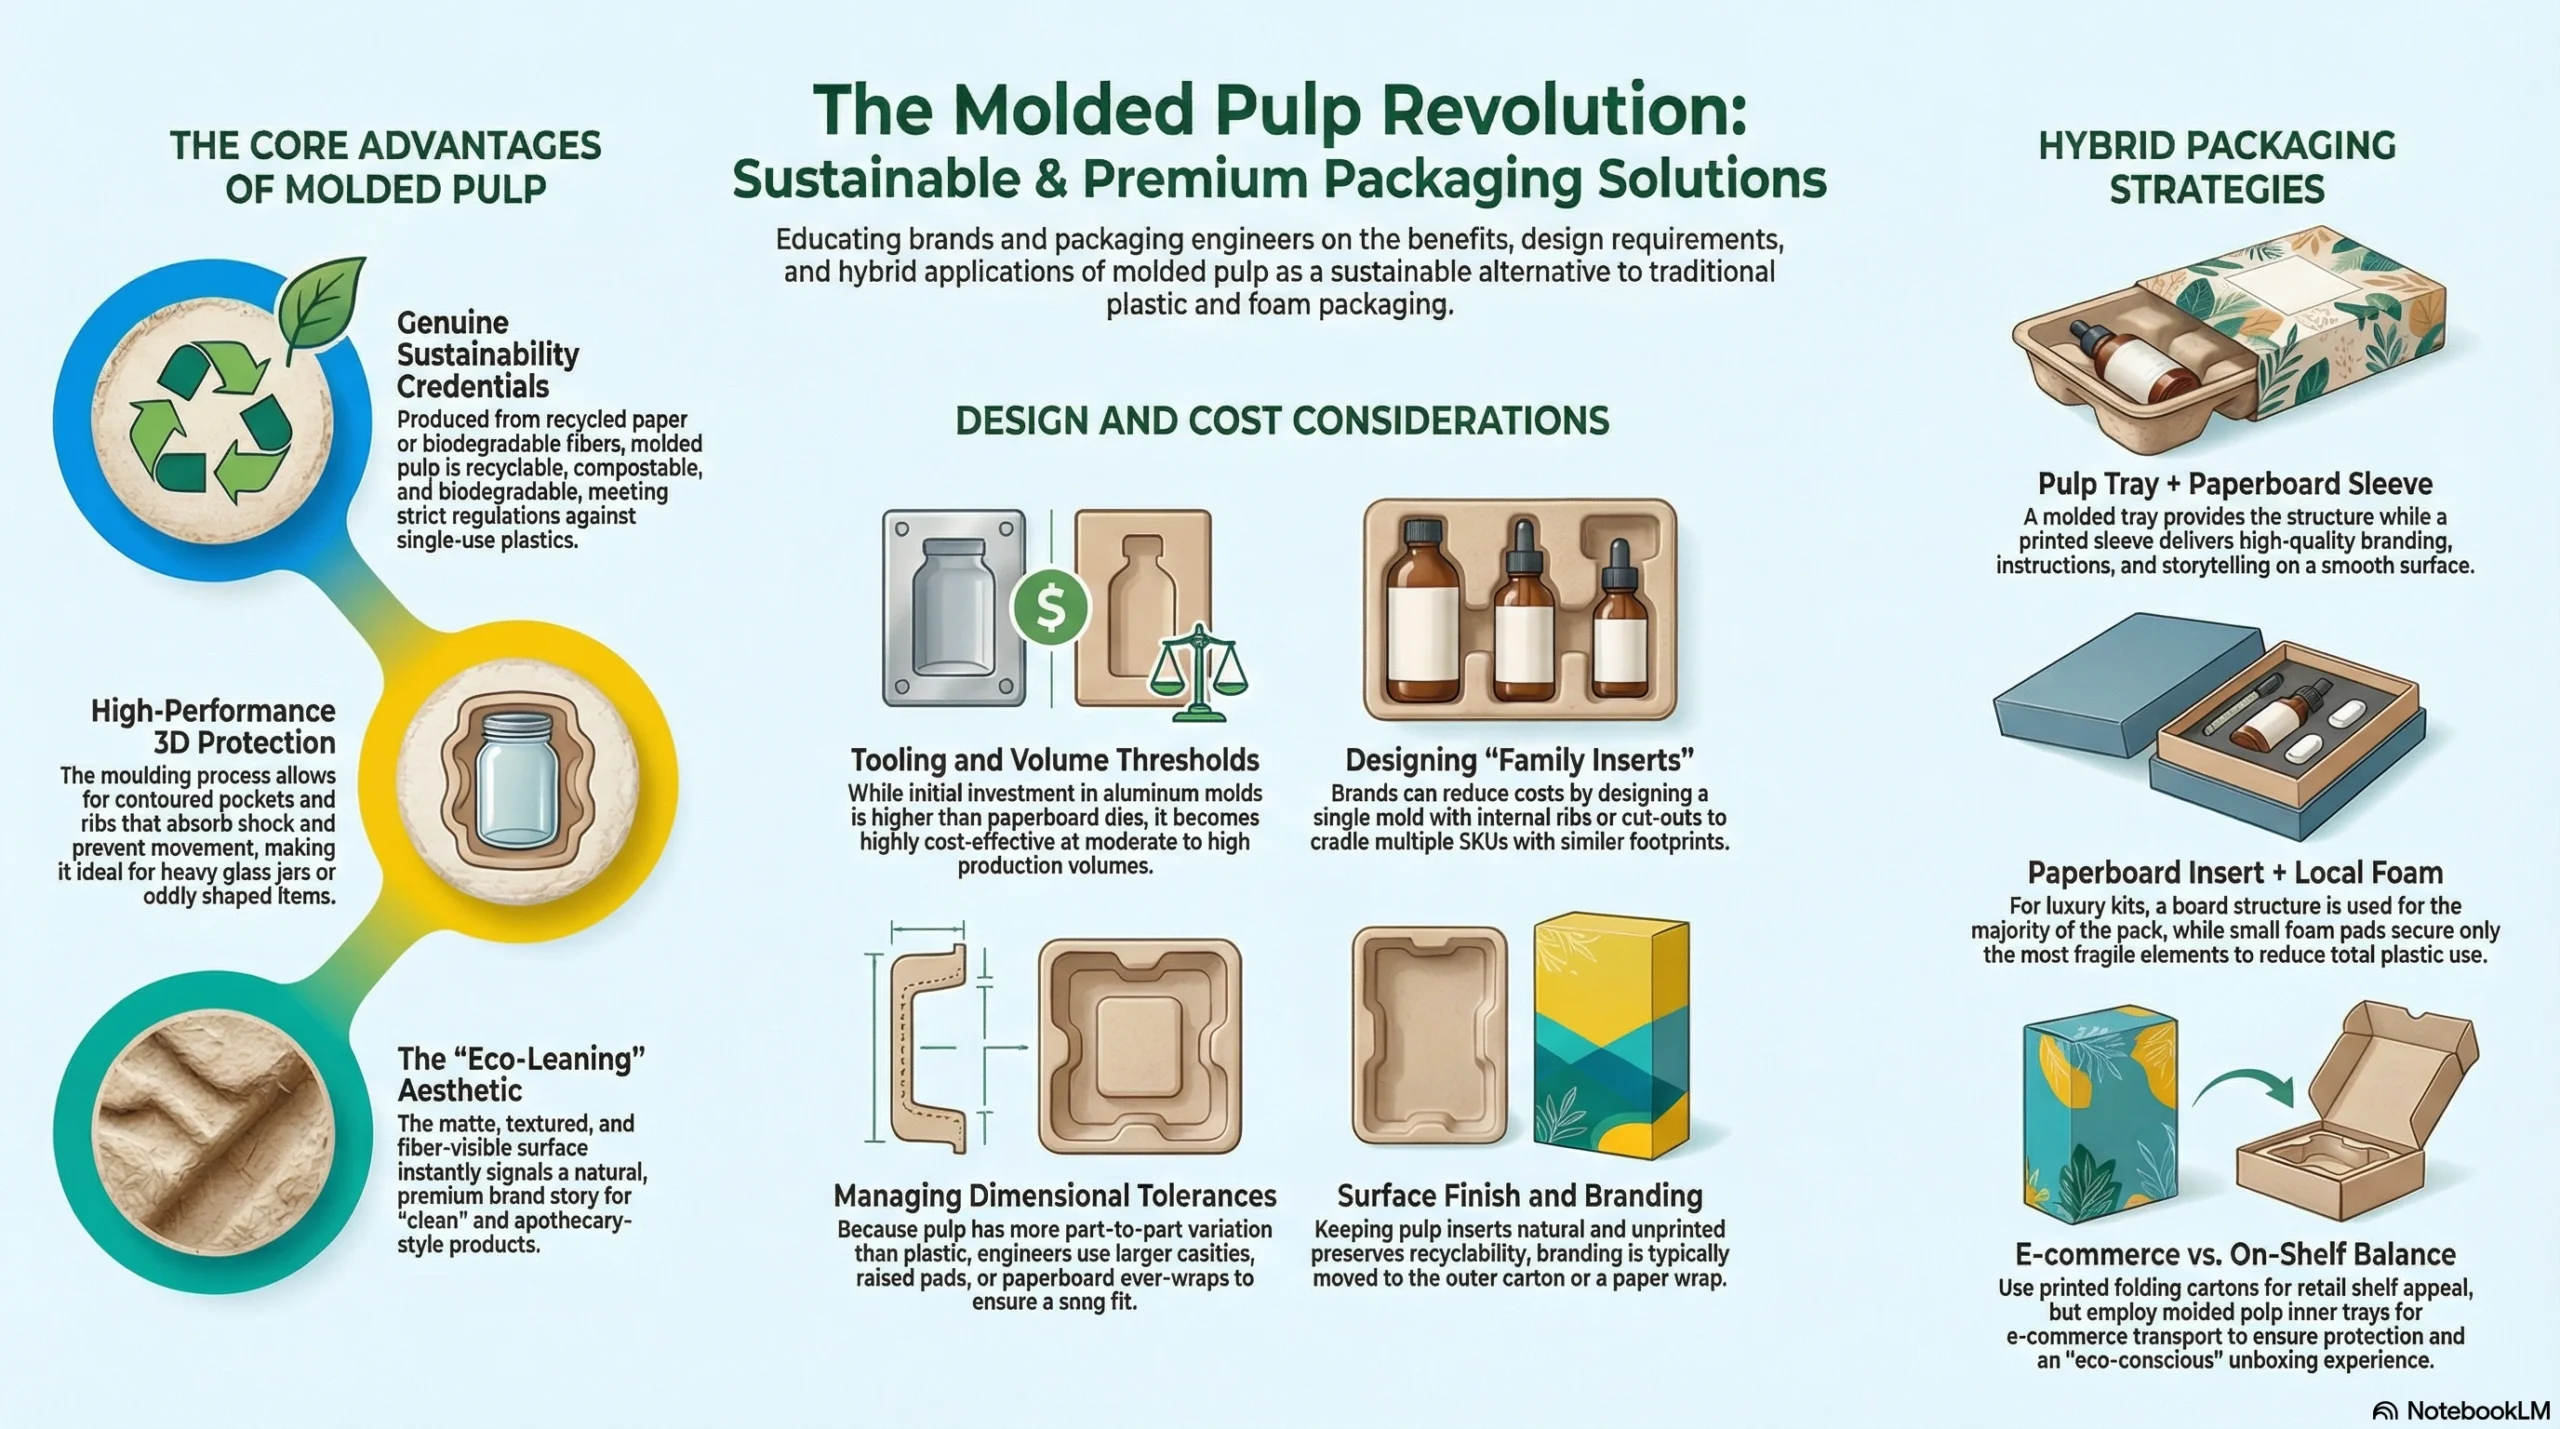
Genuine sustainability credentials
Molded pulp is usually produced from recycled paper or other biodegradable fibres and is recyclable, compostable, and biodegradable. Industry analyses point to molded pulp as a key response to regulations tightening around single‑use plastics in cosmetics and personal care.3D shape and protection
Because it’s formed in a mould, pulp can be shaped to fit jars, bottles, compacts, or multi‑product arrangements with contoured pockets and ribs that absorb shock and prevent movement. This makes it especially useful for heavy jars and oddly shaped glass, where simple flat board doesn’t offer enough support.Natural, “eco‑leaning” look
The visual language of molded pulp—matte, textured, fibre‑visible—instantly signals an environmental stance. For “clean,” “green,” and apothecary‑style brands, that natural aesthetic reinforces the brand story and can become a deliberate part of the design, not just a hidden inside element.
Design and cost considerations:
Tooling and volume thresholds
Molded pulp requires hard tooling (aluminium or similar moulds). That initial investment is higher than a paperboard cutting die but becomes cost‑effective at moderate to high volumes. To keep costs predictable, smart brands design family inserts: a single mold that can cradle several SKUs with similar footprints, sometimes with small internal ribs or cut‑outs to adapt fit.Dimensional tolerances and fit
Pulp has different tolerances than foam or plastic; there’s more variation from part to part. Packaging engineers compensate with slightly larger cavities, small raised pads, or flexible paperboard “over‑wraps” that integrate the pulp tray into the carton snugly.Surface finish and branding
Pulp can be left natural or coated, dyed, or printed, though heavy printing or coating may undermine recyclability. Many beauty brands choose to keep pulp inserts unprinted and let the main branding live on the outer carton and any paper wrap, using the pulp’s texture as a design feature.
Hybrid approaches
Hybrid solutions combine materials to balance performance, cost, and perception:
Pulp tray + paperboard sleeve or card
A molded pulp tray holds the products; a printed card or sleeve sits on top to deliver branding, instructions, or storytelling. This keeps most of the structure fibre‑based and recycle‑friendly while giving you a smooth, high‑print‑quality surface where you need it.Paperboard insert with local foam
In some luxury kits, a board insert provides overall structure while small foam pads or collars secure the most fragile elements. This reduces the volume of foam used and keeps the visual language more aligned with paper.Pulp for in‑transport, board for on‑shelf
For e‑commerce, you might use a molded pulp inner tray inside a printed folding carton. The consumer sees the printed carton first; when they open it, the pulp feels like a purposeful, eco‑conscious choice rather than a compromise.
When you think about inserts at the same level of detail as your outer box—especially paperboard inserts, foam for specific applications, and molded pulp where sustainability is key—you turn the “inside” of your packaging into a lever for protection, perceived value, and brand story, not just a cost line on a spec sheet.
How to Look Luxury on a Mid‑Range Budget
When you’re not Chanel, but your customer still expects “Chanel energy,” the trick is to make the structure, substrate, and a few smart finishes do most of the heavy lifting. That means you invest in what people touch and notice first (weight, texture, light) and avoid paying for every special effect under the sun. The goal: a box that feels like it belongs in prestige beauty, while still hitting mid‑range COGS.
Strategic Material Choices
Think of your carton’s base material as the “fabric” of a luxury garment. If the fabric feels thin and plasticky, no amount of embellishment saves it. If the fabric is dense and tactile, even a simple cut looks expensive.
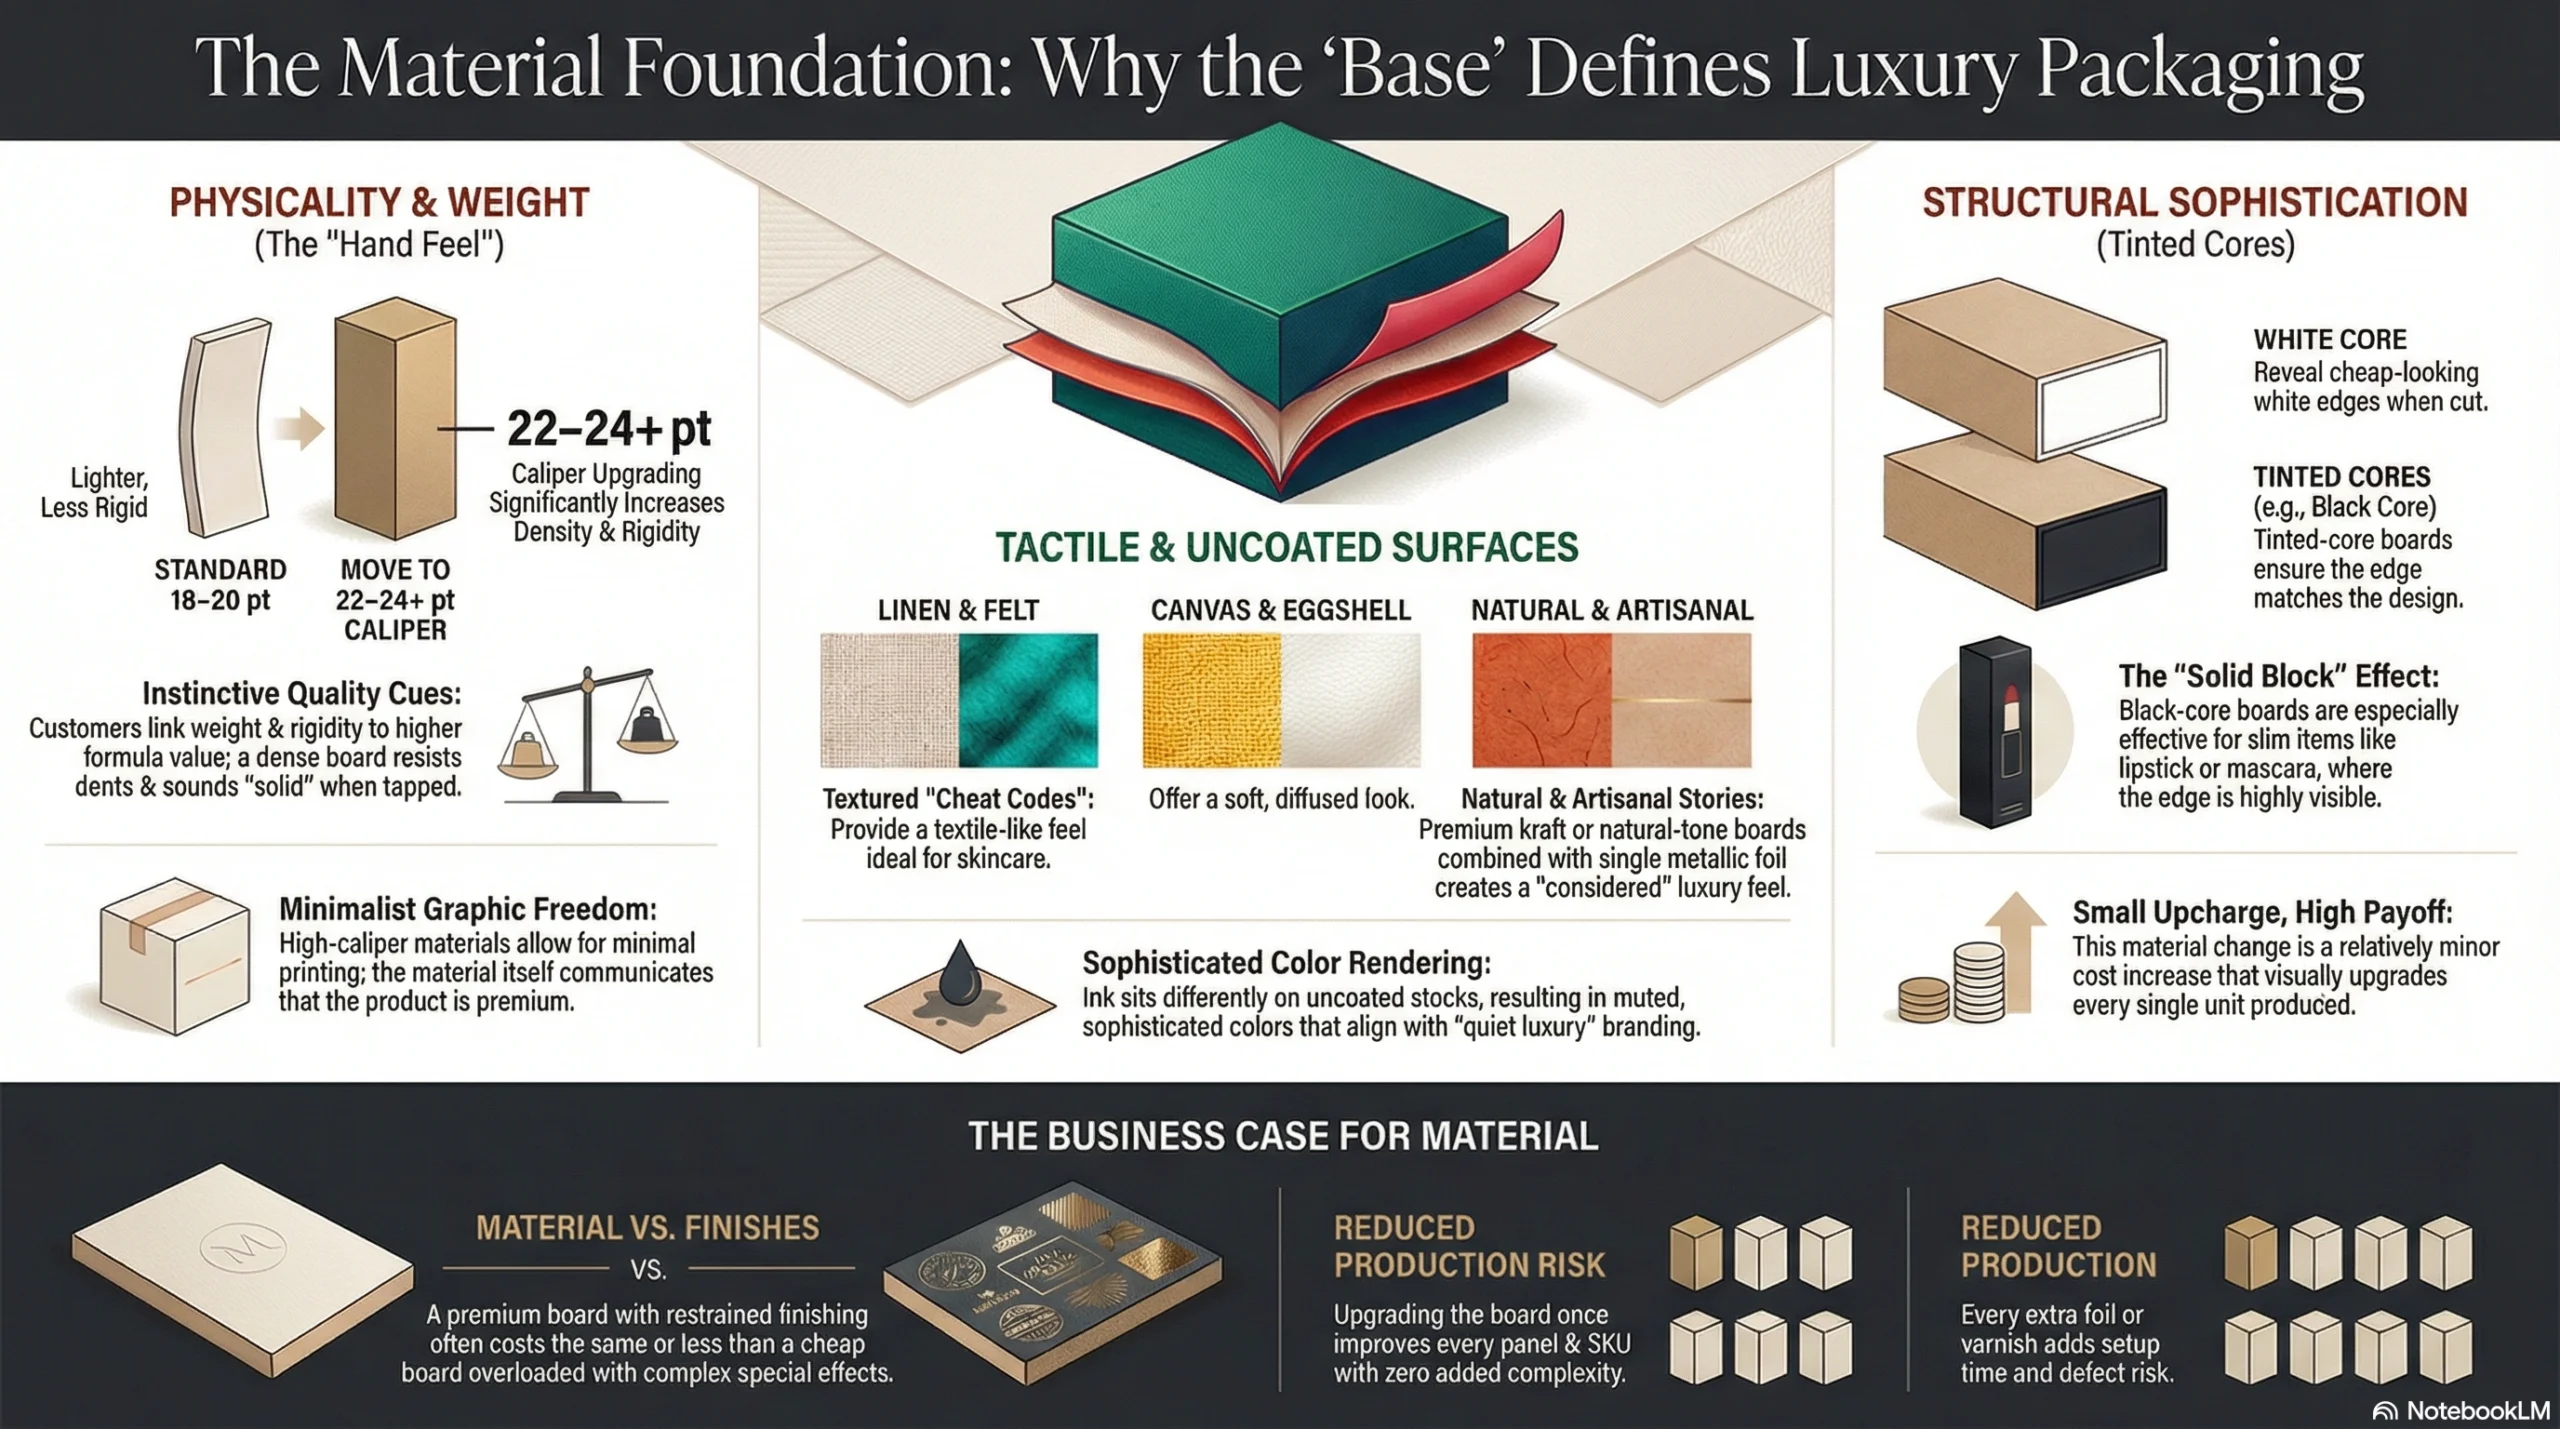
Heavier board caliper
Moving from a light board (around 18–20 pt) to a denser 22–24+ pt changes the entire “hand feel” of your packaging. The box flexes less, resists dents better, and sounds more solid when tapped. Customers often can’t verbalise this, but they instinctively link weight and rigidity with higher formula value. The beauty here is that you can keep graphics minimal; the material itself is communicating “this is substantial.”
Textured and uncoated stocks
Textured papers are your best “cheat code” for mid‑range luxury:
Linen and felt textures add a quiet, textile‑like feel that works beautifully for skincare and fragrance.
Subtle canvas or eggshell textures give a soft, diffused look that pairs well with minimalist typography.
Uncoated or lightly coated natural‑tone boards (e.g., premium kraft) tell a “natural, artisanal” story while still feeling considered and premium when combined with sharp print and a small metallic or white foil.
These papers make even a one‑color logo look intentional. Because ink sits differently on textured or uncoated stocks, you also get a more sophisticated, muted color rendering that suits “quiet luxury” brands.
Black or tinted cores
Standard white‑core board reveals a white edge wherever the carton is cut—at panel edges, tucks, and any die‑cuts. In a luxury context, those bright white edges can look a bit cheap, especially on dark designs. Black‑core or tinted through‑color boards solve that: when you cut them, the edge is also black (or whatever the board color is), so the entire object feels more like a solid, intentional block. This is especially striking on slim lipstick and mascara cartons that show more edge than face. It’s a relatively small material upcharge that pays off visually across every single unit.
Why this can be cheaper than “more finishes”
Every additional process—extra ink colors, foils, special varnishes—adds setup, make‑ready, and risk of defects. Upgrading your board once affects every panel, every SKU, and every run with zero added complexity on press. In practice, a heavier, textured, or colored board plus restrained finishing can cost the same or less than a thin, cheap board overloaded with special effects—and will look far more expensive.
High‑Impact, Low‑Cost Finishing Combos
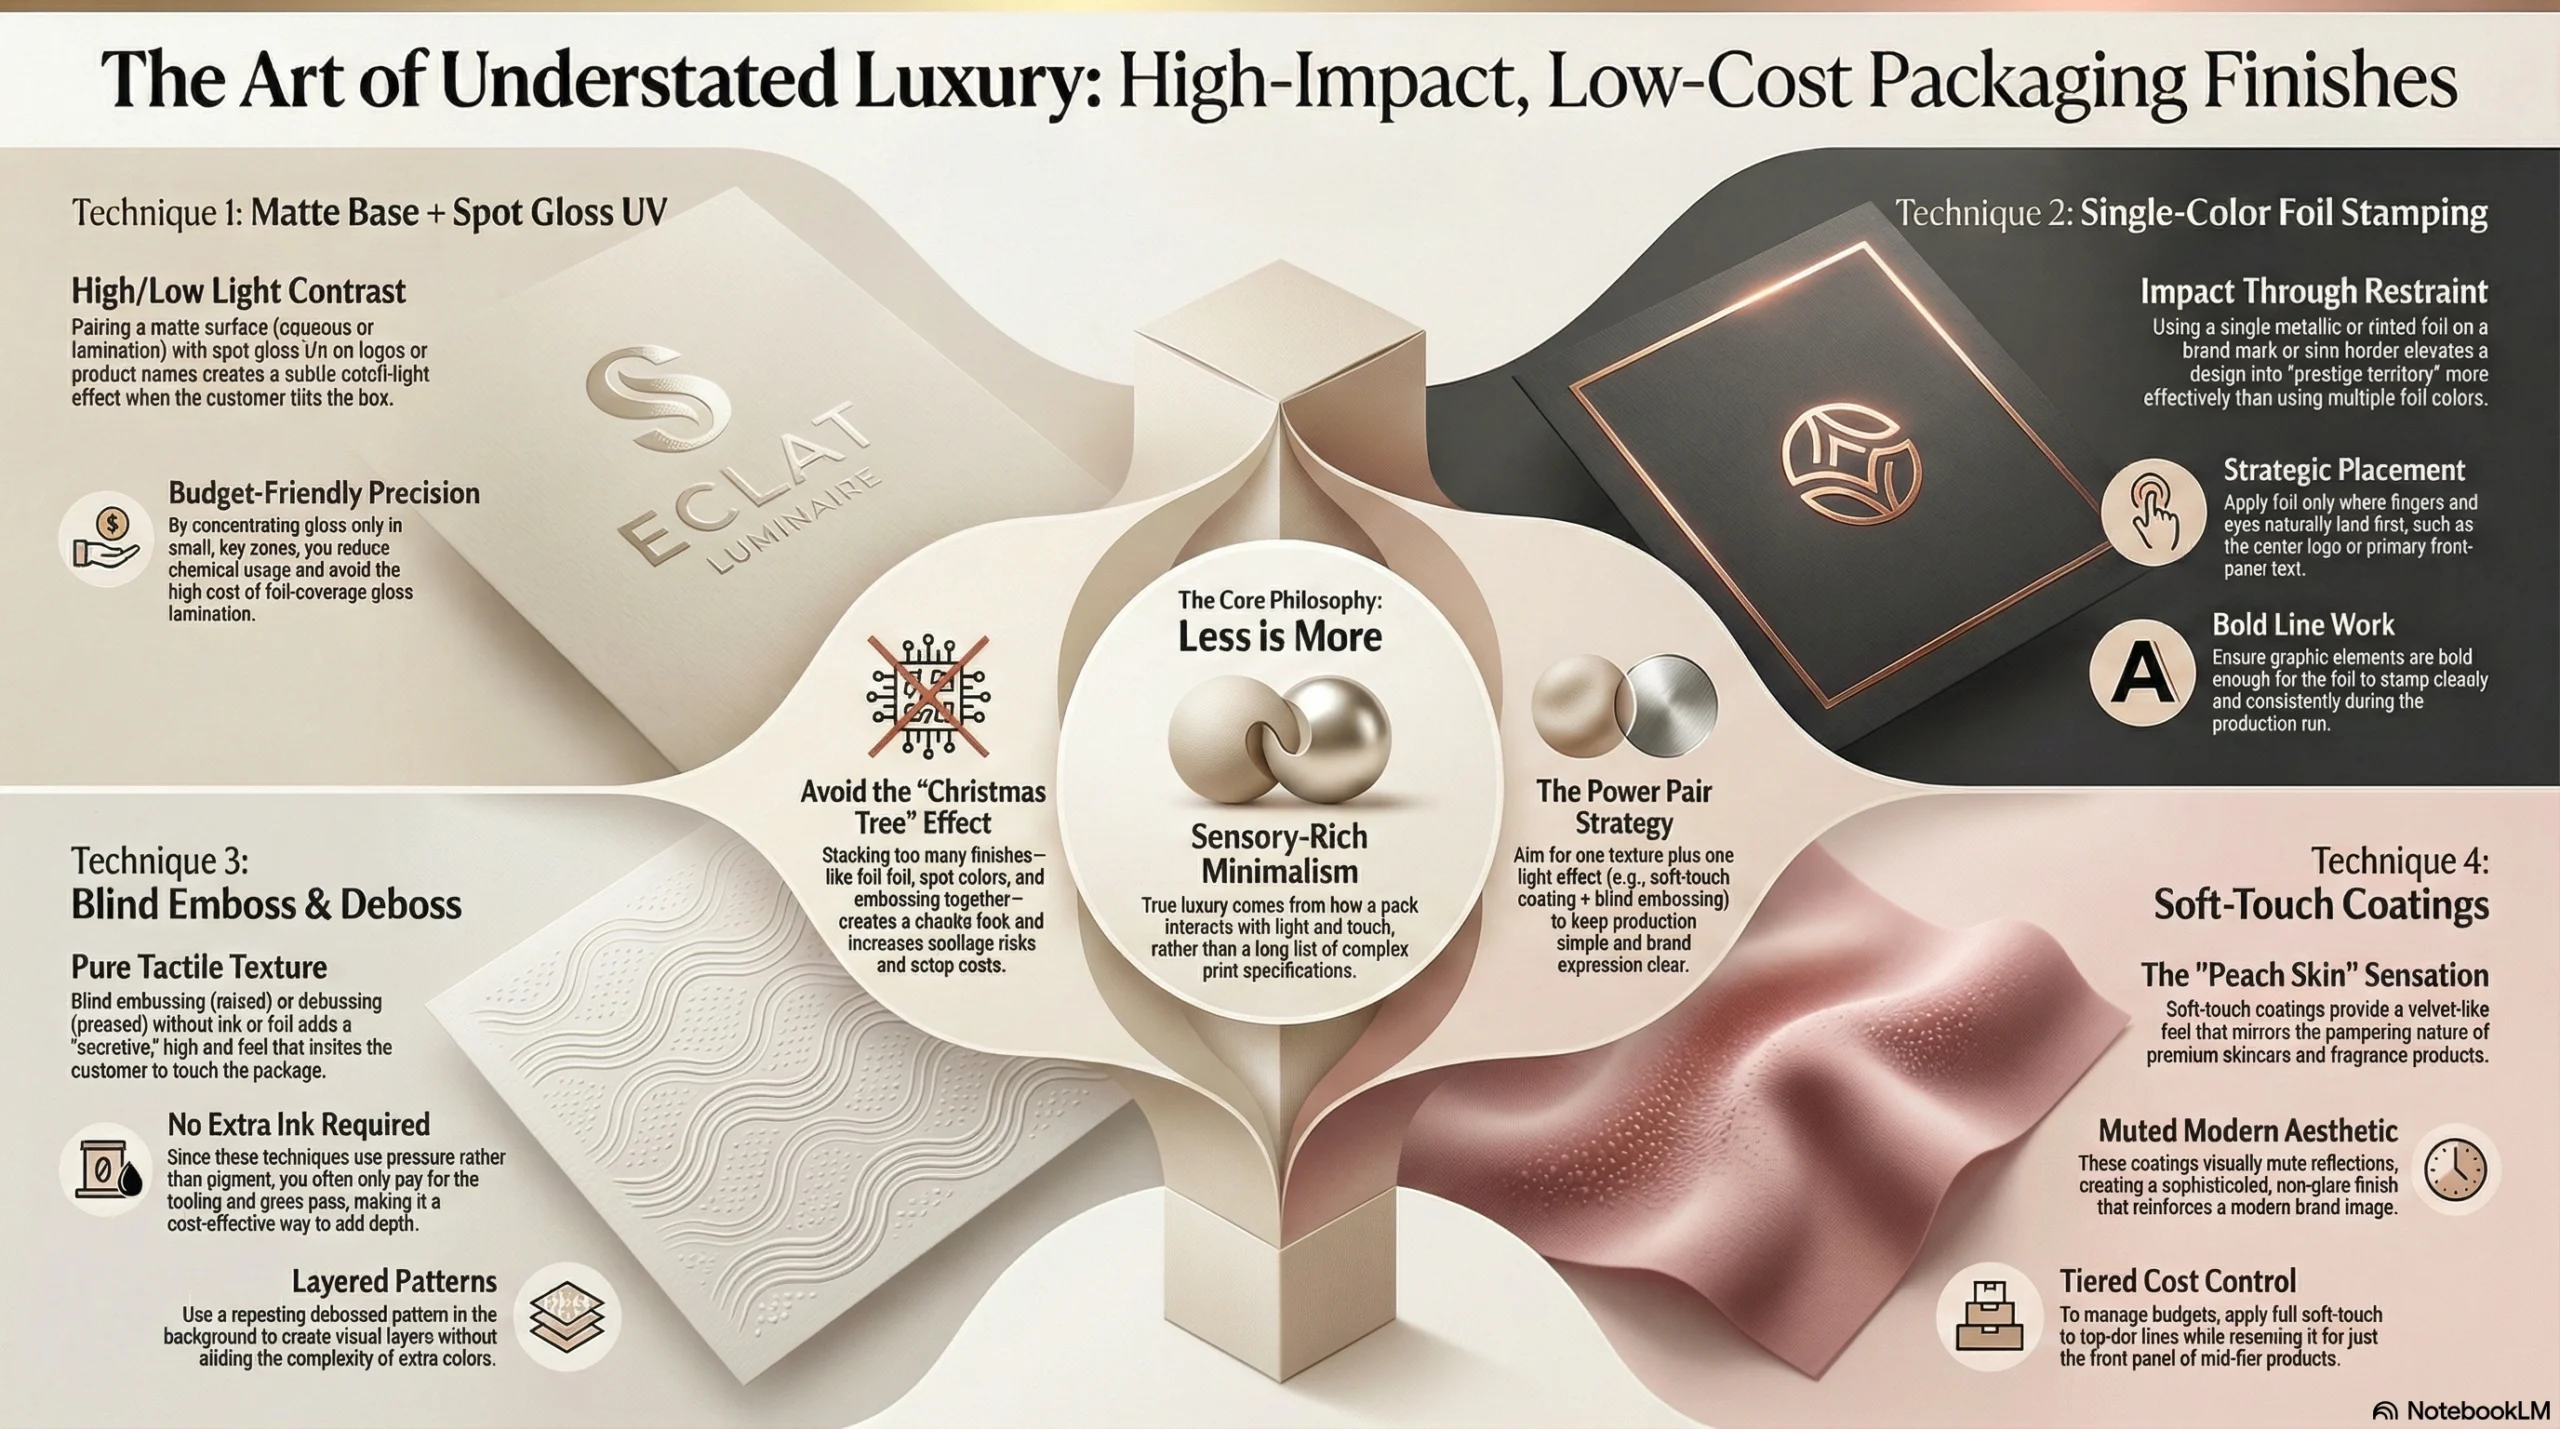
Luxury perception comes from how your pack interacts with light and touch, not how many print tricks you can list on the spec sheet. The most effective beauty cartons right now tend to be visually calm but sensorially rich.
Matte base + spot gloss UV
Starting with a matte surface (either via matte aqueous coating, matte lamination, or a naturally matte substrate) gives you a soft, modern base. Then, by applying spot gloss UV only to key elements—logo, product name, a subtle pattern—you create a high/low light contrast. When a customer tilts the box, only those details catch the light, which feels intentional and premium.
Why it’s budget‑friendly:
You avoid full‑coverage high‑gloss laminations.
You concentrate the special effect in small zones, cutting chemical usage and setup complexity.
Single‑color foil stamping
Foil is most powerful when used with restraint. One metallic (gold, silver, rose gold, or a carefully chosen tinted foil) applied to your brand mark, a slim border, or a minimal graphic element can elevate a simple design into prestige territory. Using multiple foil colors, or foiling huge areas, quickly drives up cost and can start to look gaudy rather than premium.
Guidelines:
Keep line work bold enough that the foil can stamp cleanly and consistently.
Use foil where fingers and eyes naturally land first (center logo, key front‑panel text), not everywhere there is space.
Blind emboss / deboss
Blind embossing (raised) or debossing (pressed in) without ink or foil creates pure texture. On a minimalist layout, a blind emblem, pattern, or wordmark adds a subtle, almost secretiveness that feels particularly high‑end. It invites touch—people run their fingers over it, which deepens the perception of quality.
You can:
Emboss a logo so it catches light differently from the surrounding matte surface.
Deboss a repeating pattern into a background area so the design feels layered without extra color.
Because there’s no extra ink involved, you often just pay for the tool and the press pass, not additional color.
Soft‑touch coatings
Soft‑touch coatings (varnish or film) give that “velvet” or “peach skin” feel. In beauty, this is strongly associated with premium skincare and fragrance because it mirrors the sensorial language of the products themselves—soft, smooth, pampering. It also visually mutes reflections, reinforcing a modern, sophisticated aesthetic.
To control cost:
Use soft‑touch over the whole outer surface for your top tier lines, and reserve it for just the front panel or key SKUs in your mid‑tier ranges.
Avoid pairing full soft‑touch with too many other heavy techniques on the same pack; this keeps both budget and waste in check.
Why one or two finishes beat a “Christmas tree”
Stacking multiple heavy finishes—full soft‑touch, full foil flood, multiple spot colors, emboss, gloss, and metallic inks—often ends up looking chaotic and drives spoilage risk and make‑ready cost up. Focusing on one texture + one light effect (for example, textured board + single foil, or soft‑touch + blind emboss) makes your brand expression clearer and your production simpler. It also leaves room for limited editions to “go further” when you need a peak moment.
Design Moves That Stretch Budget
Once your substrate and finishes are doing their job, design is where you can squeeze even more perceived value out of the same spend.
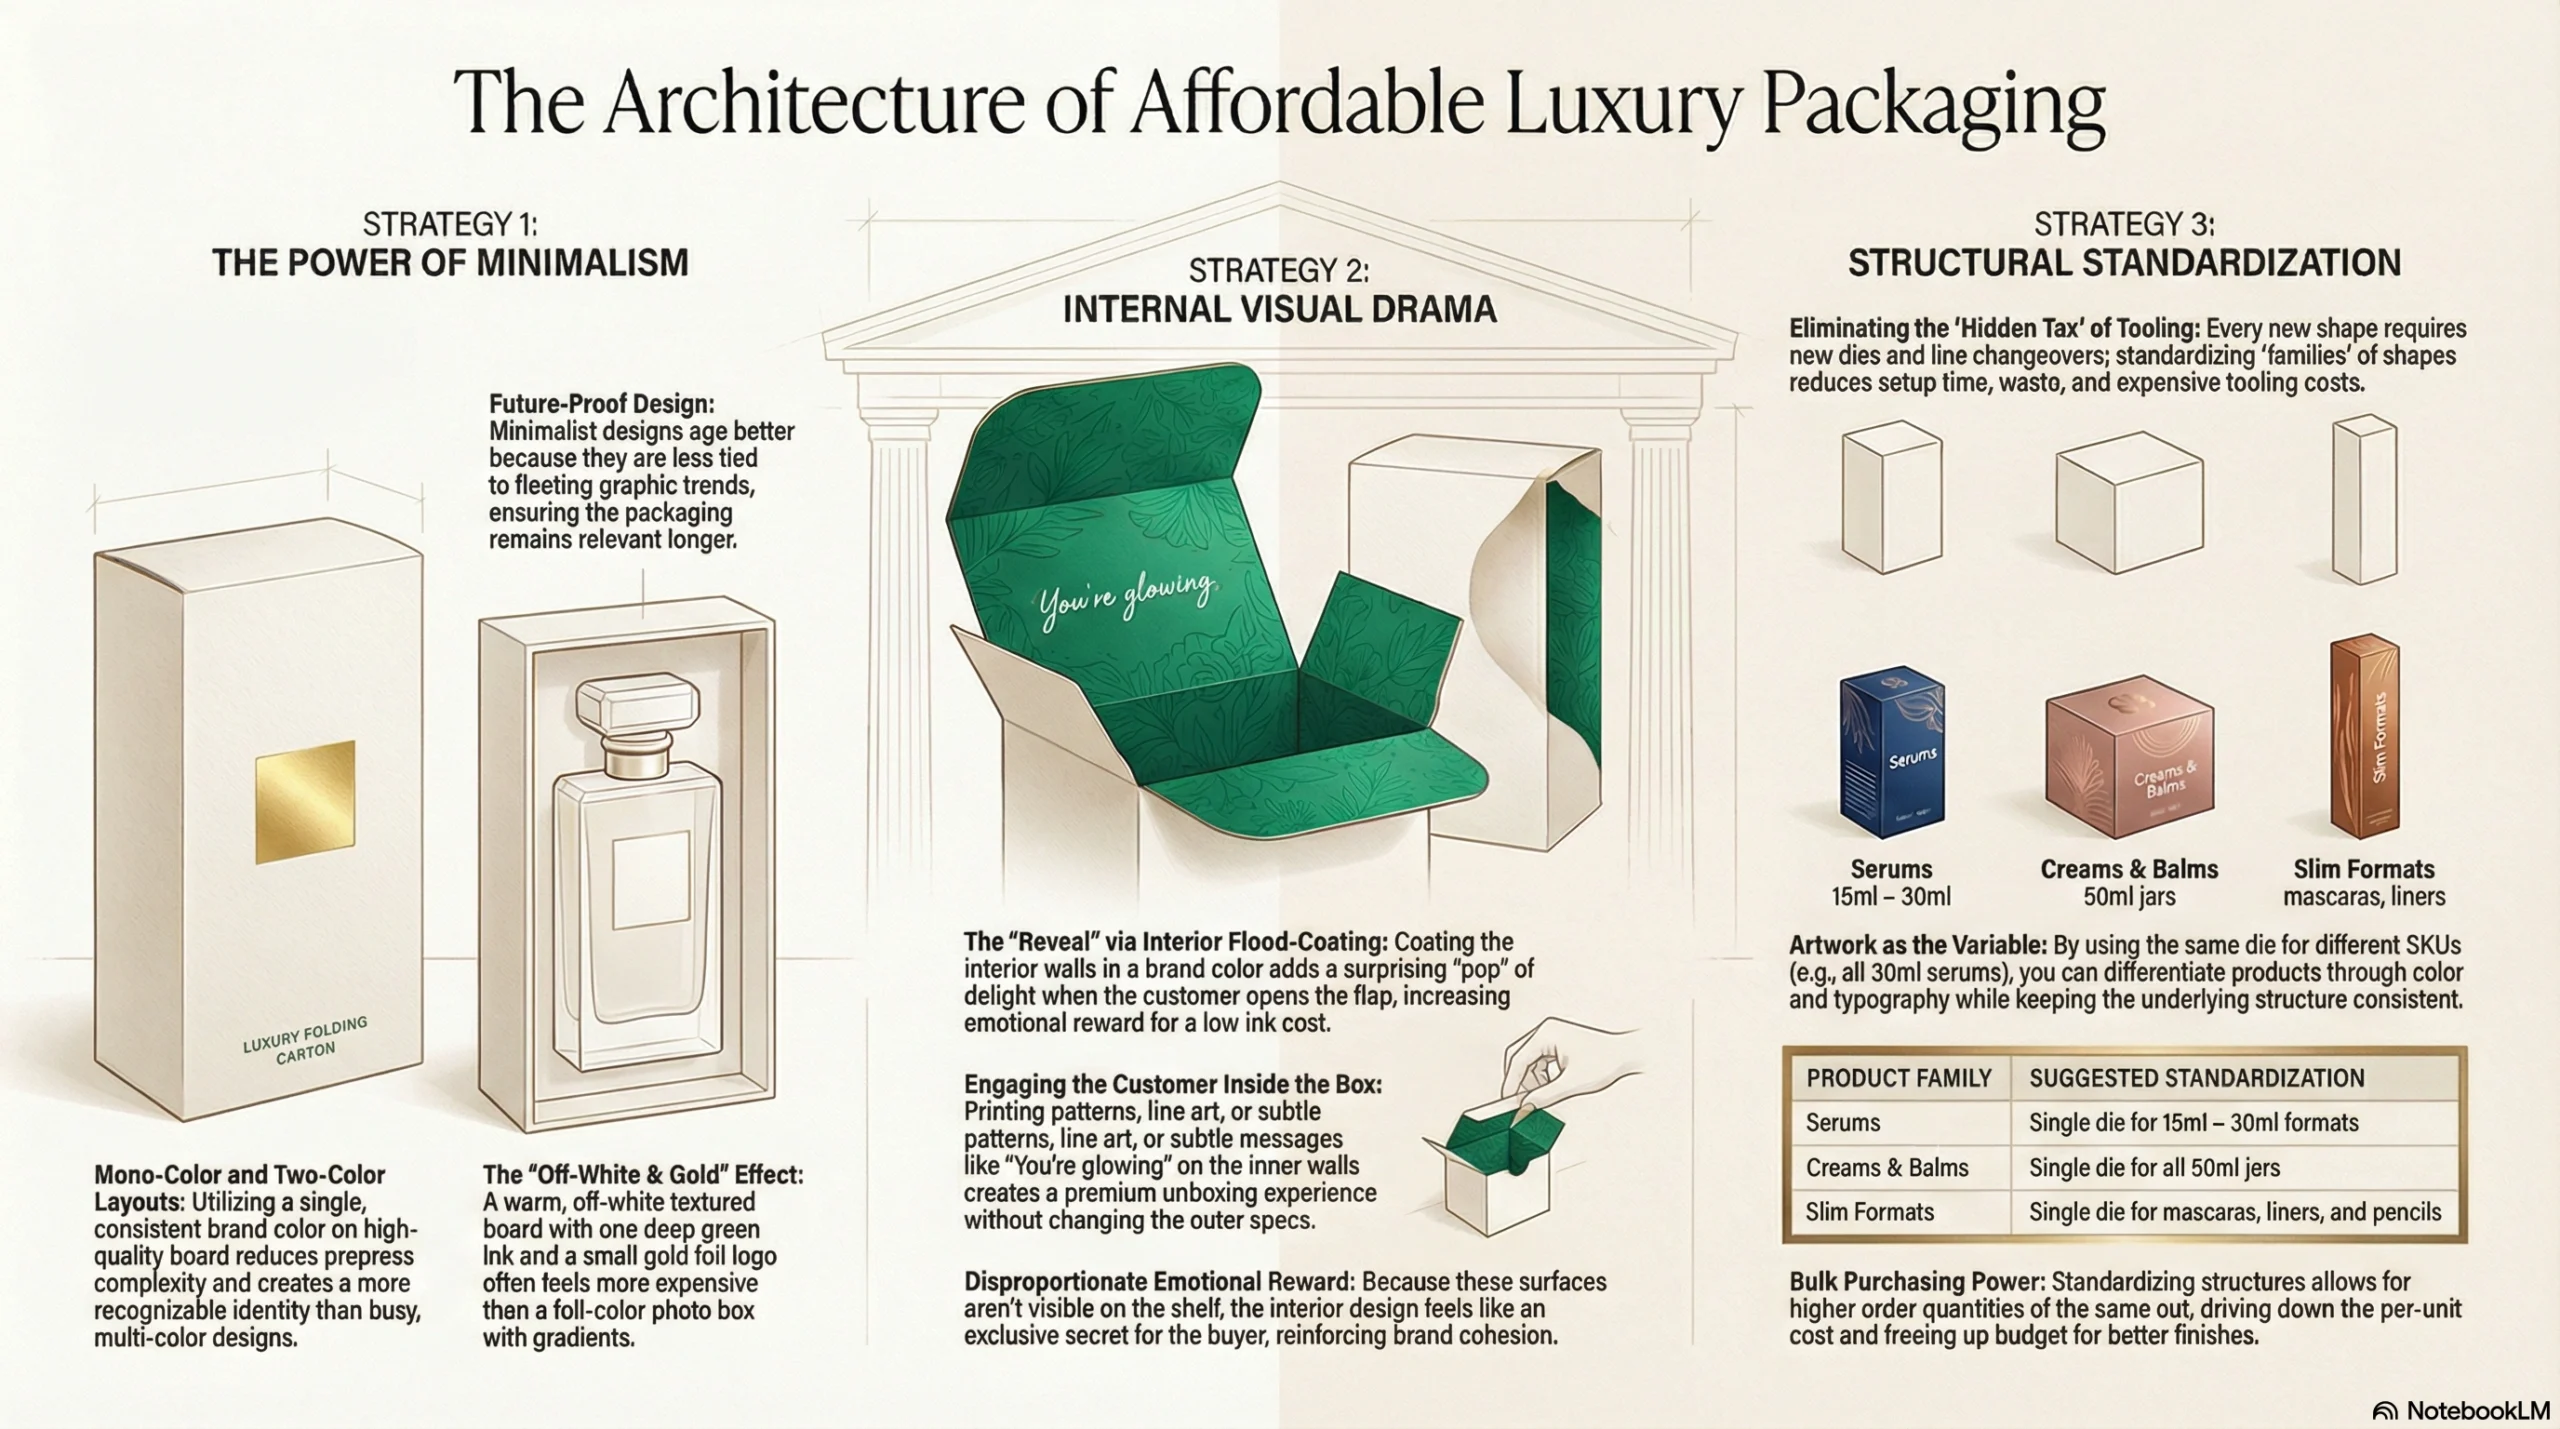
Minimalist, mono‑color layouts
Mono‑ or two‑color designs on a good board are the backbone of modern luxury. A single brand color—applied consistently across a family—can become as recognisable as a logo. Minimalism also:
Reduces prepress complexity (fewer separations, simpler trapping).
Lowers risk of color conflicts with foils and coatings.
Ages better, since it’s less tied to short‑lived graphic trends.
An example: a warm off‑white textured board with one deep green ink for all typography and a small gold foil logo will often feel more expensive than a full‑color photo box with gradients and many overlapping elements.
Putting visual drama inside the box
You don’t have to put all your drama on the outside. Interior print is a powerful, relatively low‑cost way to add delight:
Flood‑coat the interior in a brand color so it feels like a “reveal” when the customer opens the flap.
Print a pattern, illustration, or subtle message (“You’re glowing,” “Open for good skin days”) on the inner walls or lid.
Include simple line art that echoes your outer design, making the entire object feel cohesive.
Because you’re printing on surfaces that aren’t always visible on shelf, you get a disproportionate emotional reward for a small additional ink area. It also helps create a premium unboxing experience without changing the outer spec.
Standardising structural families
Tooling (dies) and structural development are expensive. Every new shape and size you introduce has a hidden tax: new cutting tools, more line changeovers, more QC variables. By standardising a few structural “families”—for example:
One die for 15–30 ml serums.
One for 50 ml jars.
One for slim formats like mascaras and pencils.
—you reap several benefits:
You can order higher quantities of the same cut, driving unit cost down.
You reduce setup time and waste on your converter’s lines.
You free up budget to invest in better board or finishes because your structural overhead is lower.
Artwork then becomes the variable: color, typography, and small graphic changes differentiate SKUs while the underlying structure stays consistent. This approach also keeps your range visually coherent on shelf and online, reinforcing brand recognition and making it easier for customers to navigate your portfolio.
In practice, “looking luxury on a mid‑range budget” is less about finding the cheapest way to mimic high‑end brands and more about choosing a few levers and pulling them hard: a better board, one intentional texture, one light effect, and a disciplined, minimalist design system. Do that consistently, and your cartons will telegraph premium quality long before anyone reads a single claim—or checks the price tag.
Retail Shelf Design: “Billboard” Rules
When your product hits a crowded shelf, your carton has to behave like a tiny billboard: it must grab attention, be understood instantly, and make the decision to pick up almost effortless. In most beauty aisles, a shopper is scanning from 6–10 feet away, moving quickly, and comparing you with dozens of SKUs in their peripheral vision. That environment rewards clarity, hierarchy, and restraint, not dense information and decoration.
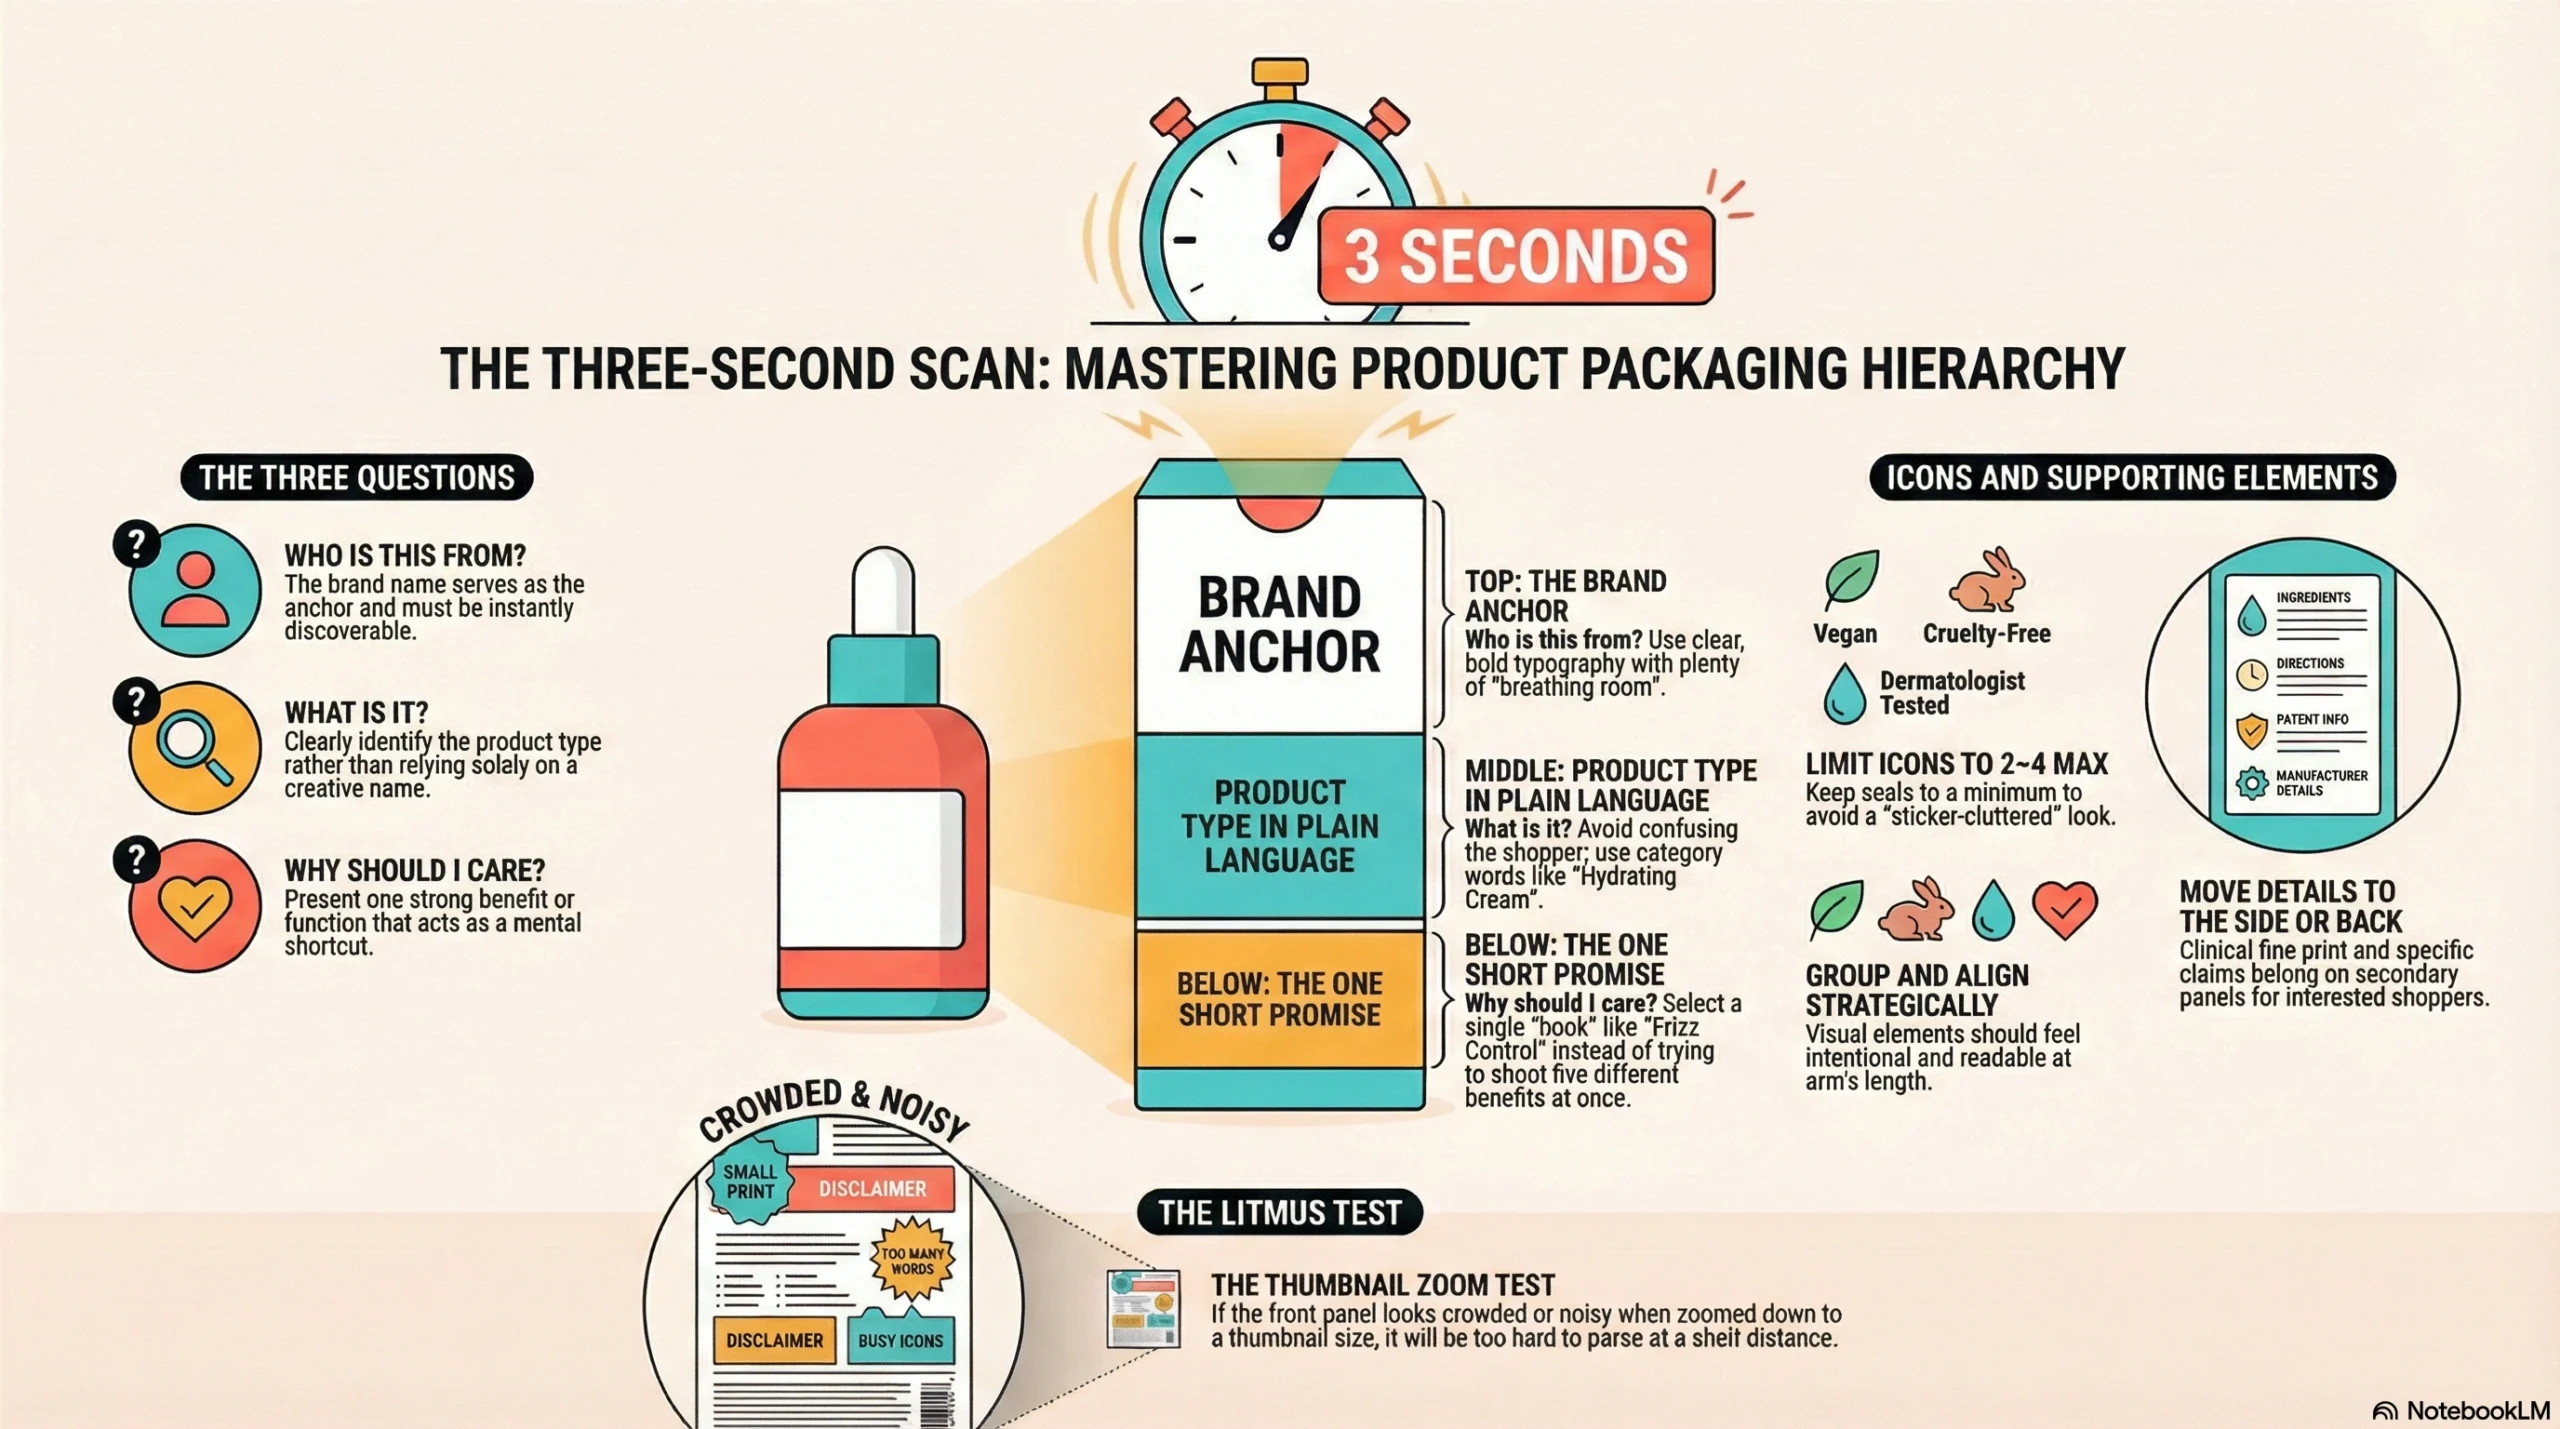
Hierarchy for the 3‑Second Scan
Think of your front panel as a headline, not a brochure. In roughly three seconds, the customer should be able to answer three questions without squinting or stepping closer:
Who is this from? (Brand name)
What is it? (Product type, not just a poetic name)
Why should I care? (One strong benefit or function)
To achieve this, build a visual hierarchy:
Brand name as anchor.
Use a clear, bold type size for your brand or line name, and give it breathing room. It doesn’t have to be the biggest element, but it must be instantly discoverable and legible at distance.Product type, not just product name.
“Moonlight Elixir” is nice, but somewhere nearby you need “Retinol Serum” or “Hydrating Cream” in plain language. Customers scan for category words; if they can’t tell what it is quickly, they move on.One key benefit or promise.
Pick a single powerful hook—“Brightening,” “SPF 50,” “Frizz Control,” “Acne Treatment,” “Barrier Repair.” This is the mental shortcut that helps them decide “this is for my problem.” If you try to shout five benefits, none of them stick.
In practice, a strong front panel might look like:
Top: BRAND NAME (clear, confident type)
Middle: PRODUCT TYPE (e.g., “Vitamin C + E Serum”)
Below: ONE SHORT PROMISE (“Radiance & Dark Spot Correction”)
Everything else becomes supporting cast. Detailed claims (“reduces wrinkles by 27%”), clinical fine print, or long descriptions belong on the sides or back, where shoppers go once they’re already interested.
Icons and seals—vegan, cruelty‑free, SPF, PA++++, “dermatologist tested”—are useful, but only when:
There are very few on the front (think 2–4, not 10).
They’re drawn cleanly and at a size where they’re readable at arm’s length.
They’re aligned and grouped so they feel intentional, not like stickers thrown on at the last minute.
The litmus test: if your front panel looks crowded when you zoom it down to a thumbnail size, it will be noisy and hard to parse at shelf distance.
Color & Contrast That Win the Aisle
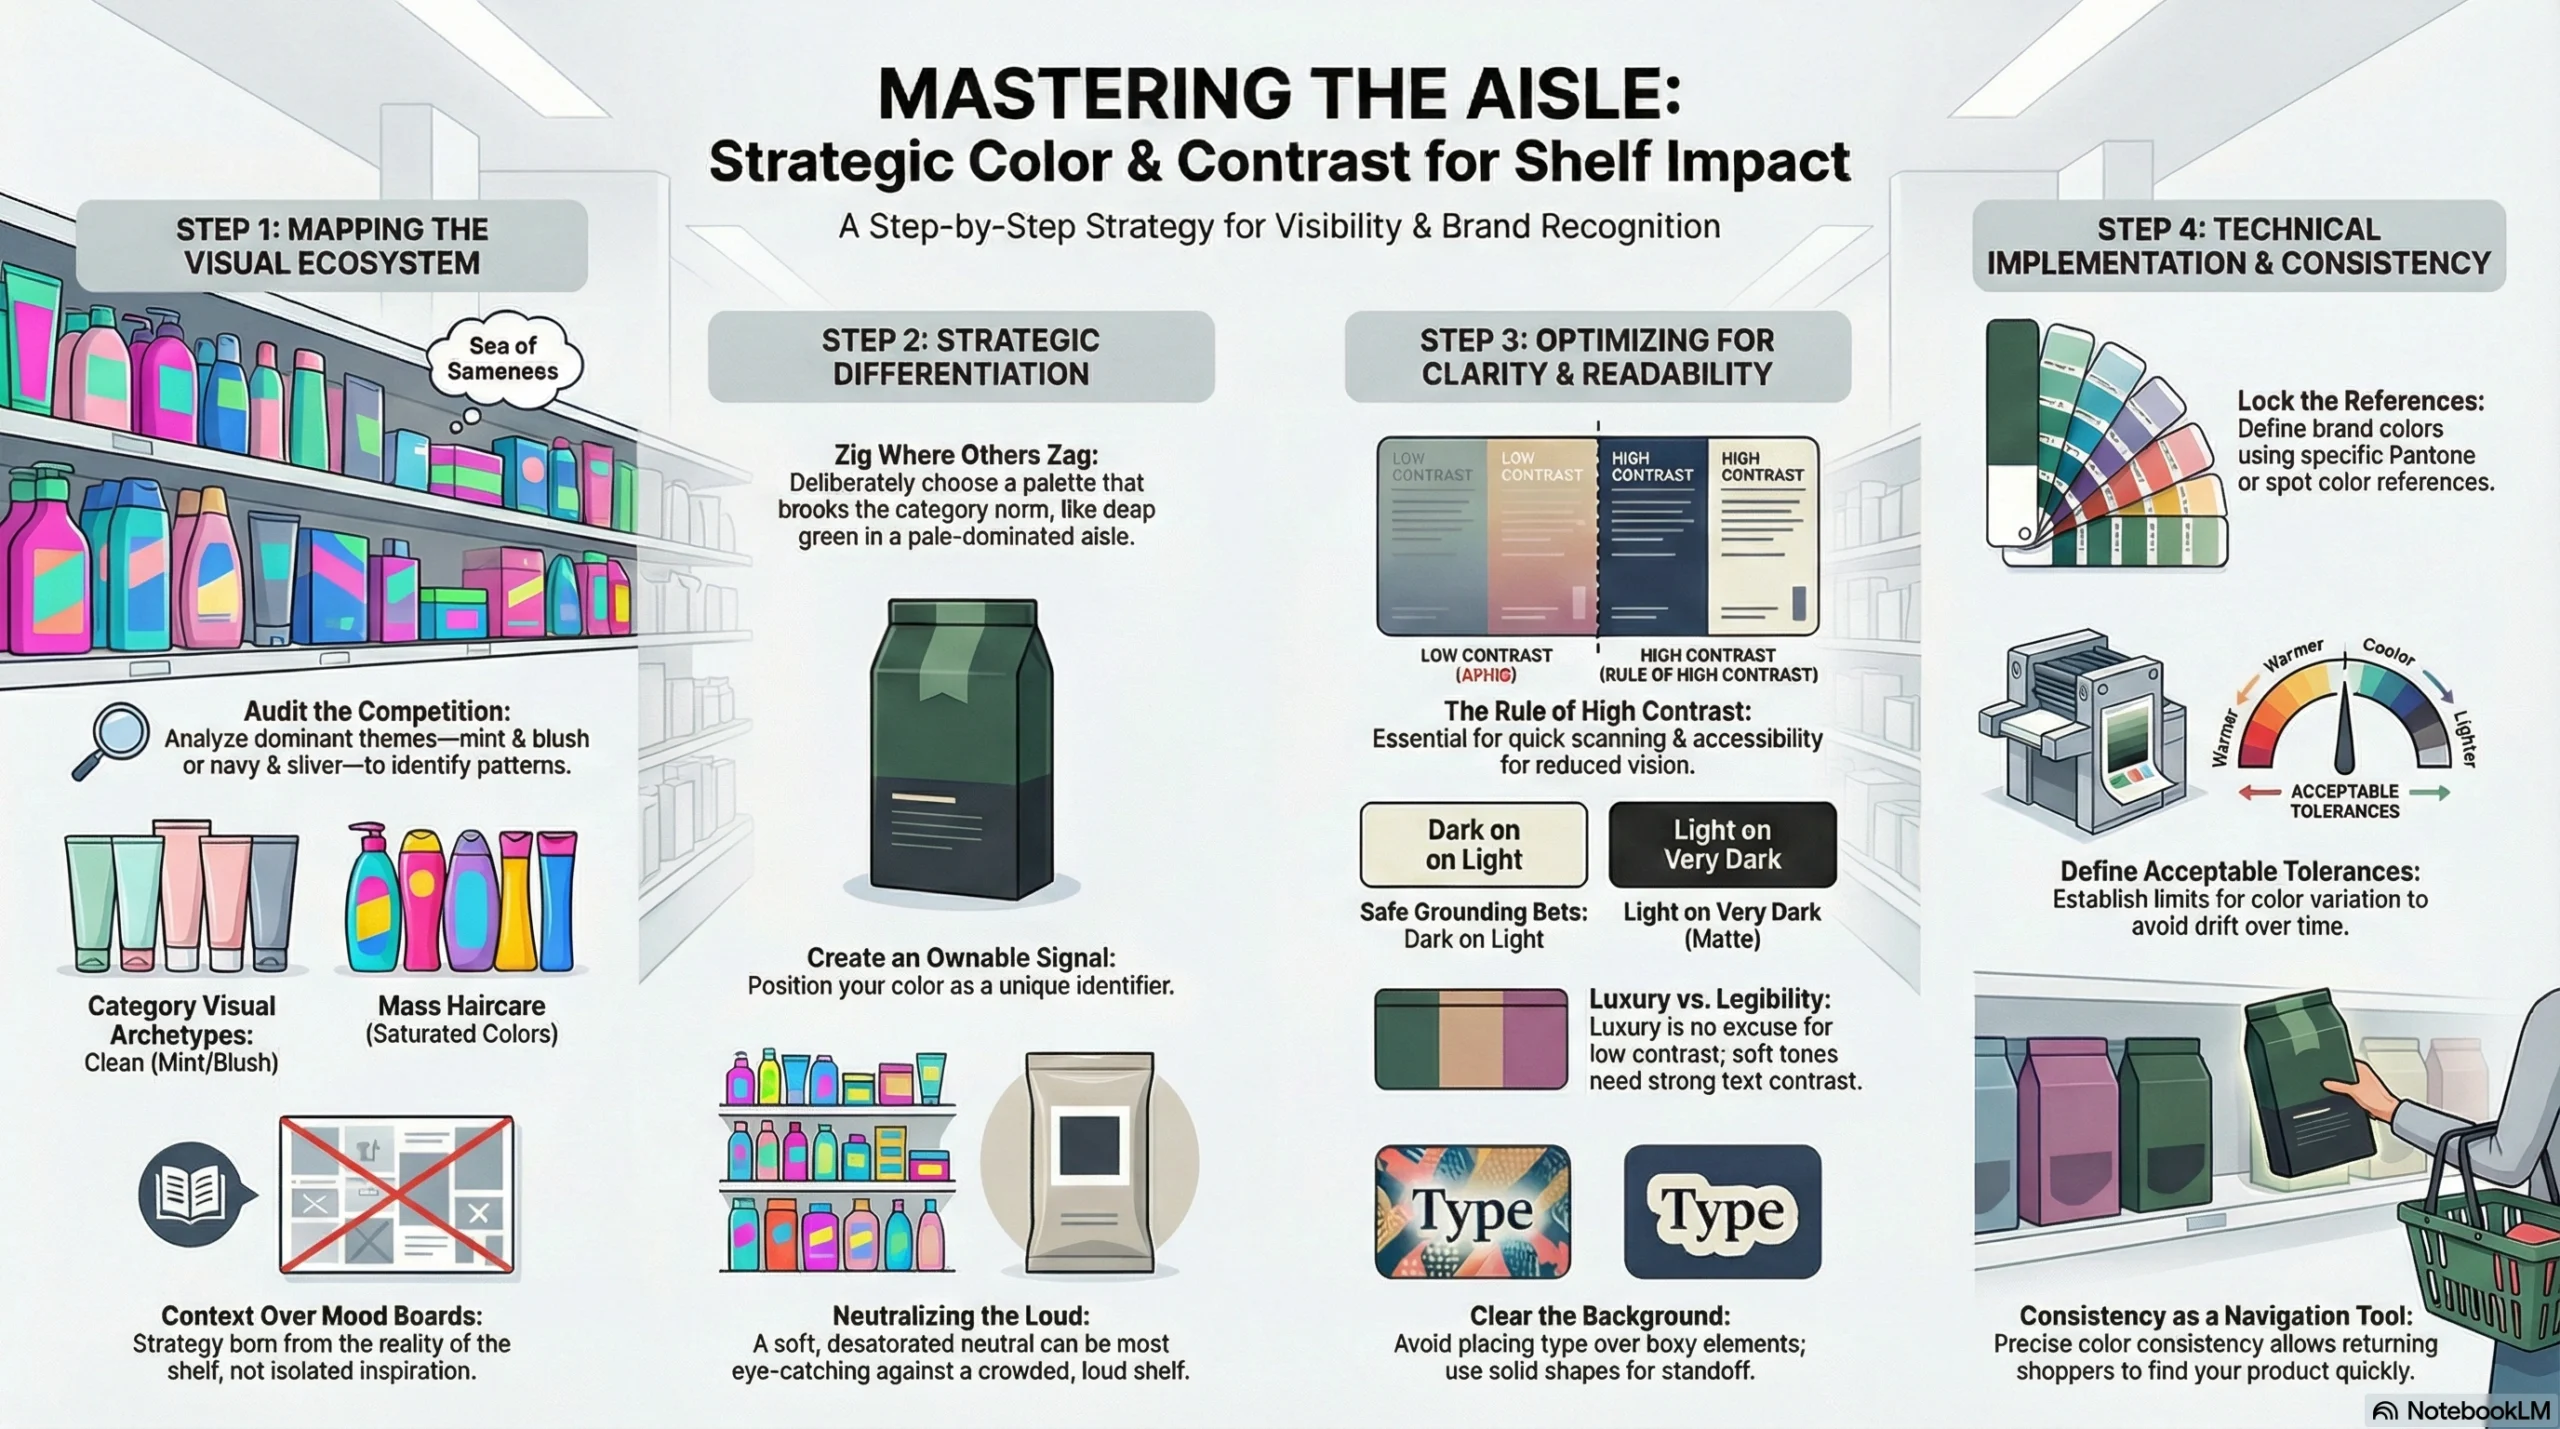
On a real shelf, color does two jobs: it gets you noticed and it helps shoppers navigate your range. Good color strategy starts from the context, not the mood board.
Start by mapping the aisle.
Before locking anything, look at what dominates your category:
Are “clean” competitors mostly white with mint and blush accents?
Are mass haircare brands saturated and bright?
Are clinical actives mostly blue and white, or silver and navy?
You then deliberately zig where others zag:
Pick a deeper, richer tone (forest green, aubergine, charcoal) if everyone else is pale.
Or choose a soft, desaturated neutral if the shelf is loud and saturated.
This doesn’t mean being random—it means positioning your color as a recognisable, ownable signal in that specific visual ecosystem.
Contrast is what makes your information readable.
Luxury doesn’t mean low contrast text on pretty backgrounds that no one can read. High contrast between text and background is crucial for:
Quickly scanning brand and product names.
Ensuring ingredient lists and warnings are legible for all shoppers, including those with reduced vision.
Dark text on a light ground or light text on a very dark, matte ground are the safest bets. If you’re using softer tones, make sure your main text color still hits strong contrast. Avoid placing text over busy gradients, photos, or patterns unless you’re using a solid backing shape behind the type.
Consistency across print runs matters as much as the color itself.
Once you choose your brand colors, lock them down with:
Defined Pantone (or equivalent) references for spot colors.
Clear tolerances for acceptable variation.
A color management process with your printer so reorders don’t drift warmer, cooler, darker, or lighter over time.
That consistency is what lets a returning shopper find your cleanser or serum quickly even when the planogram changes or new competitors appear.
Structuring Panels for Clarity
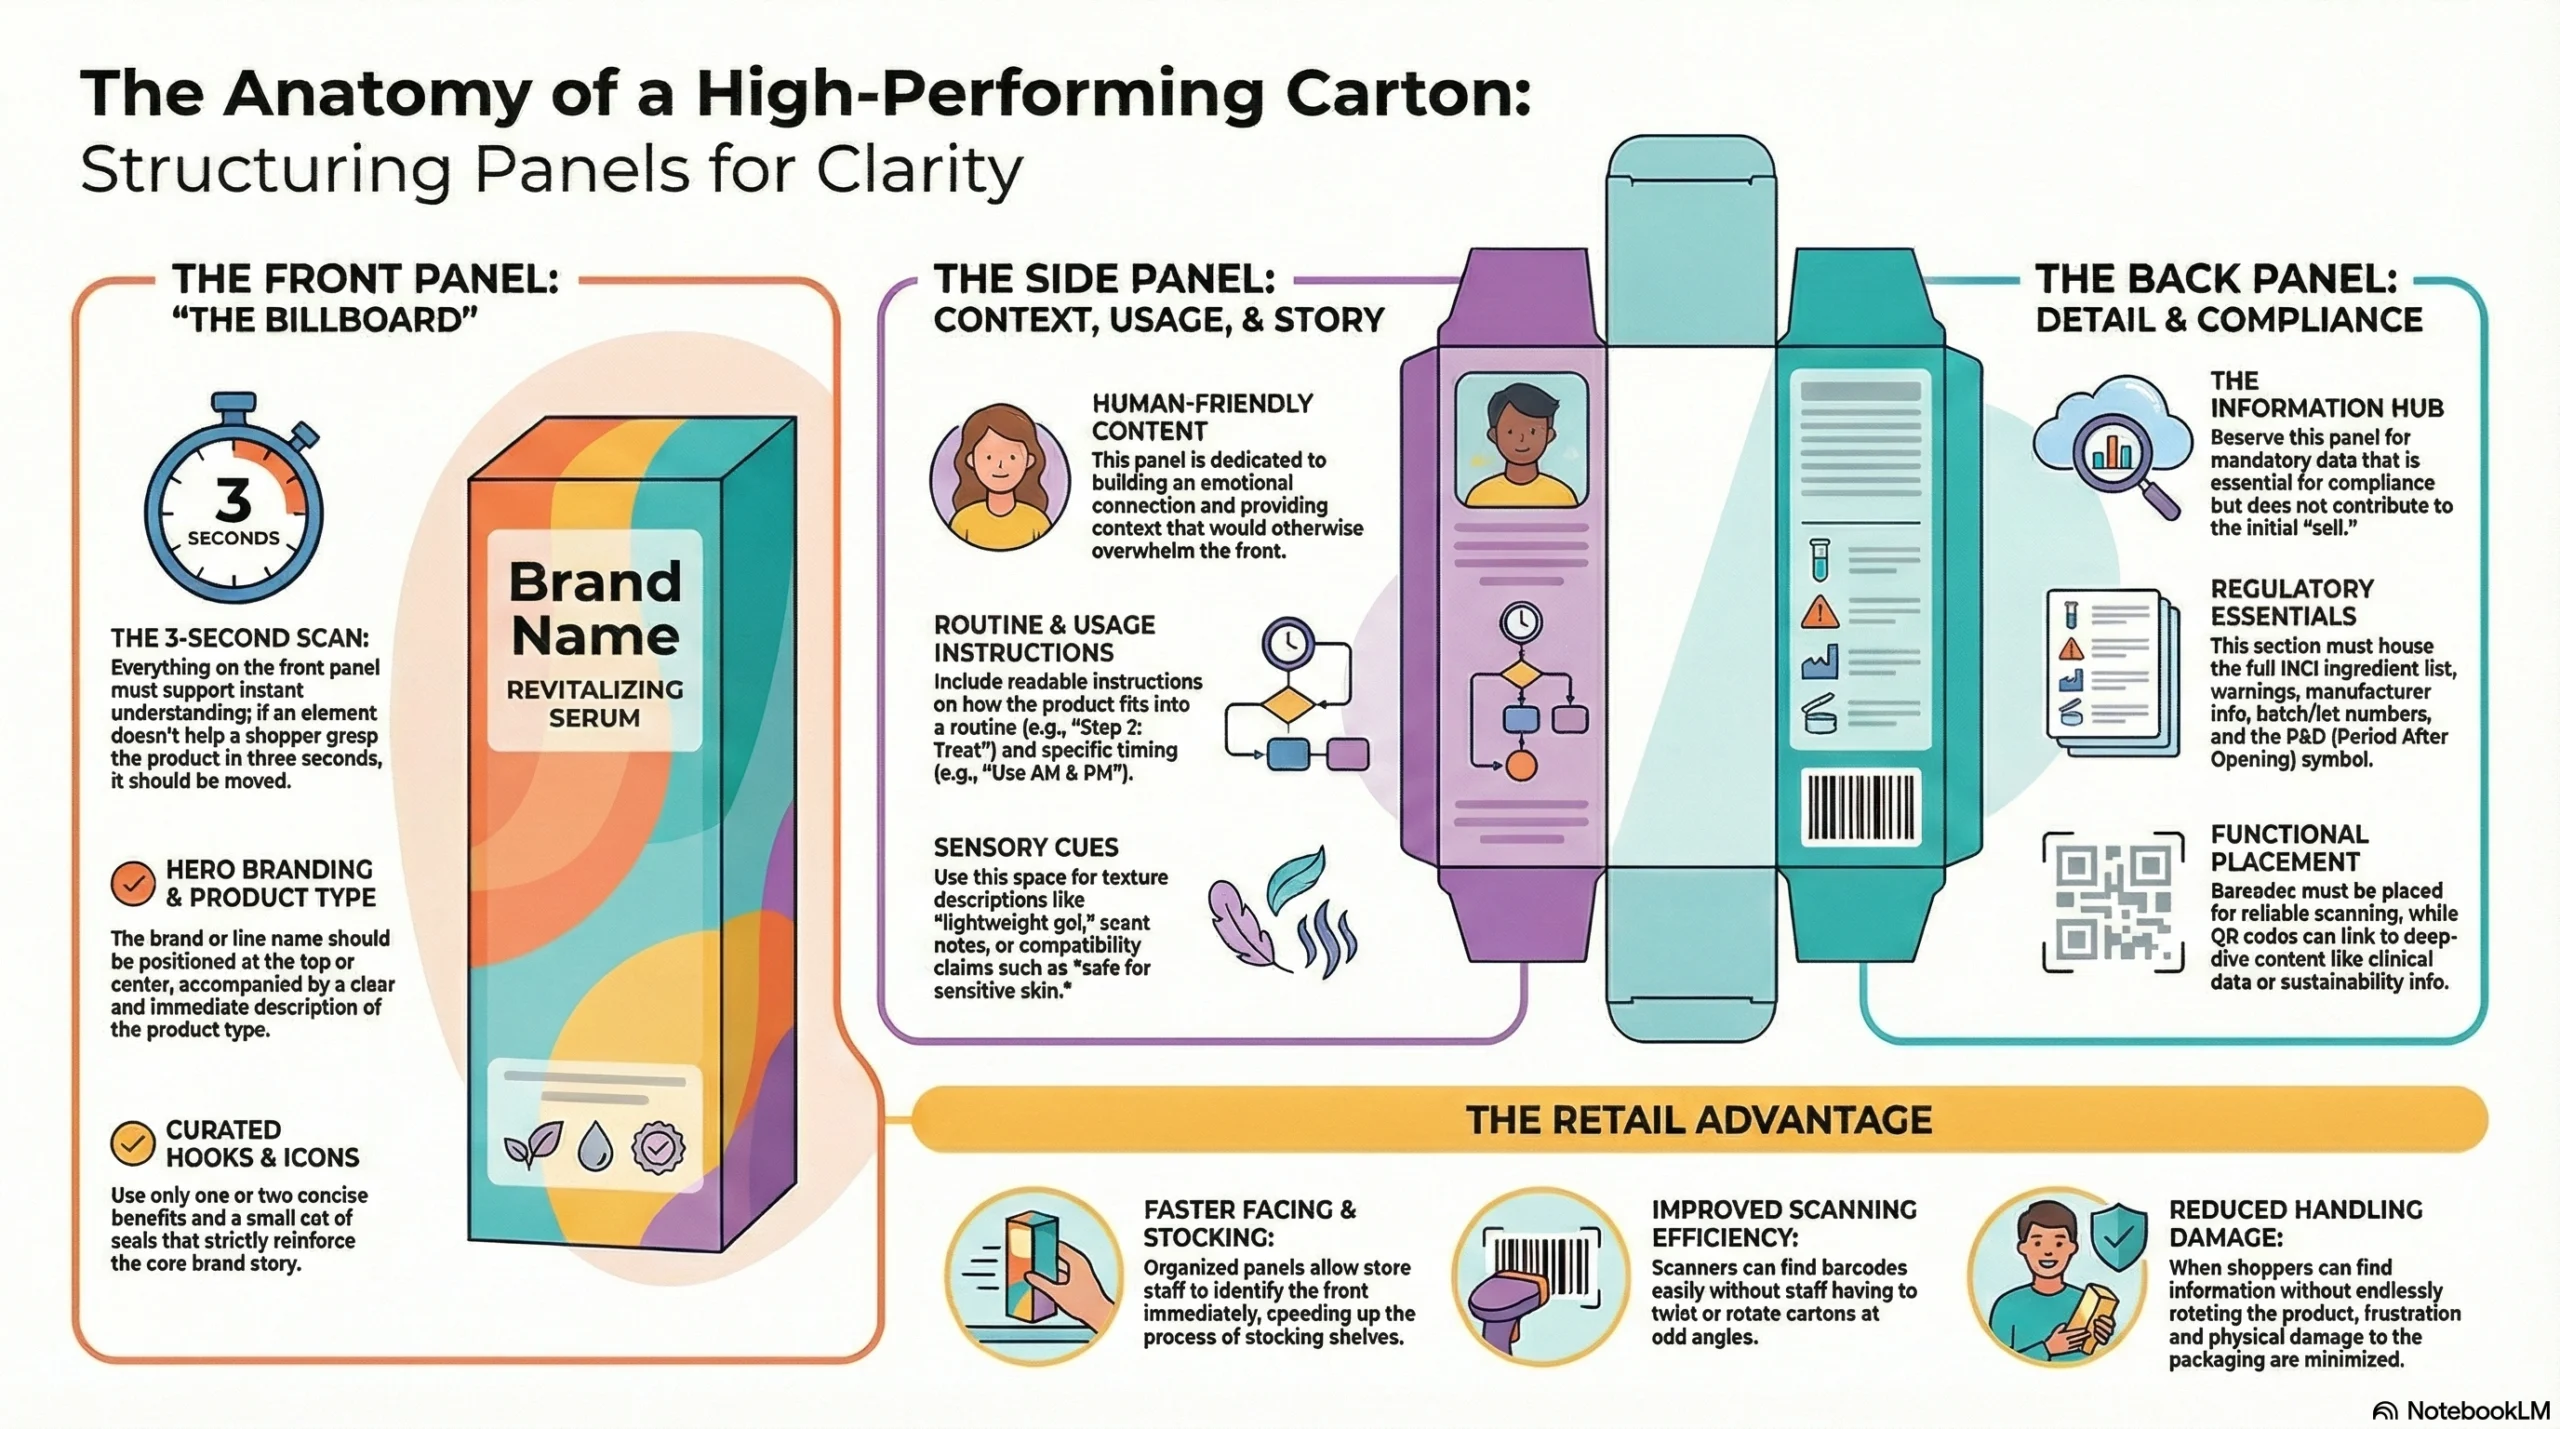
A folding carton gives you multiple “surfaces” to tell your story. Instead of trying to cram everything onto the front, assign each panel a job. This not only improves clarity for customers, it also makes life easier for retailers and regulators.
Front panel: the billboard
The front is for attraction and instant understanding:
Hero brand or line (top or center).
Clear product type.
One or two concise benefits or hooks.
A small, curated set of icons or seals, if they reinforce your core story.
Everything on this panel should support the 3‑second scan. If an element doesn’t help, move it elsewhere.
Side panel: context, usage, and story
Use one side panel for human‑friendly content:
Short brand story or philosophy.
Usage instructions in readable type (not micro text).
Where it fits in the routine (e.g., “Step 2: Treat,” “Use AM & PM after cleansing”).
Extra cues like texture description (“lightweight gel”), scent notes, or compatibility (“safe for sensitive skin”).
This is where you build emotional connection and avoid overwhelming the front.
Back panel: detail and compliance
Reserve the back for information that has to be there but doesn’t sell on its own:
Full ingredient list in INCI format.
Warnings, allergen statements, and regulatory text.
Manufacturer/distributor information, batch/lot, and PAO symbol.
Barcodes placed where they scan reliably without disrupting the front or side design.
QR code linking to longer‑form content (how‑to videos, usage guides, clinical data, sustainability information).
By concentrating the dense content here, you keep the rest of the pack calm and usable, while still meeting retailer and regulatory expectations.
Why this structure also helps retailers
When your panels are organised:
Store staff can face and stock quickly because it’s obvious which side is front.
Scanners can easily find barcodes without twisting cartons to odd angles.
Shoppers don’t have to rotate the product endlessly to find what they’re looking for, which reduces handling damage and frustration.
In other words, a well‑structured carton doesn’t just look better—it works better for everyone interacting with it, from automated systems to human hands. And that functional clarity reads as professionalism and quality, which is exactly what you want your “billboard” to communicate in those first few seconds on the shelf.
Designing for E‑commerce and DTC
Selling beauty DTC means your cartons now go through conveyors, sorters, vans, and front porches—not just a gentle journey onto a retail shelf. To survive that, your folding cartons must be structurally stronger, more compact, and engineered as part of a full “ship‑ready” system instead of just pretty secondary packaging.
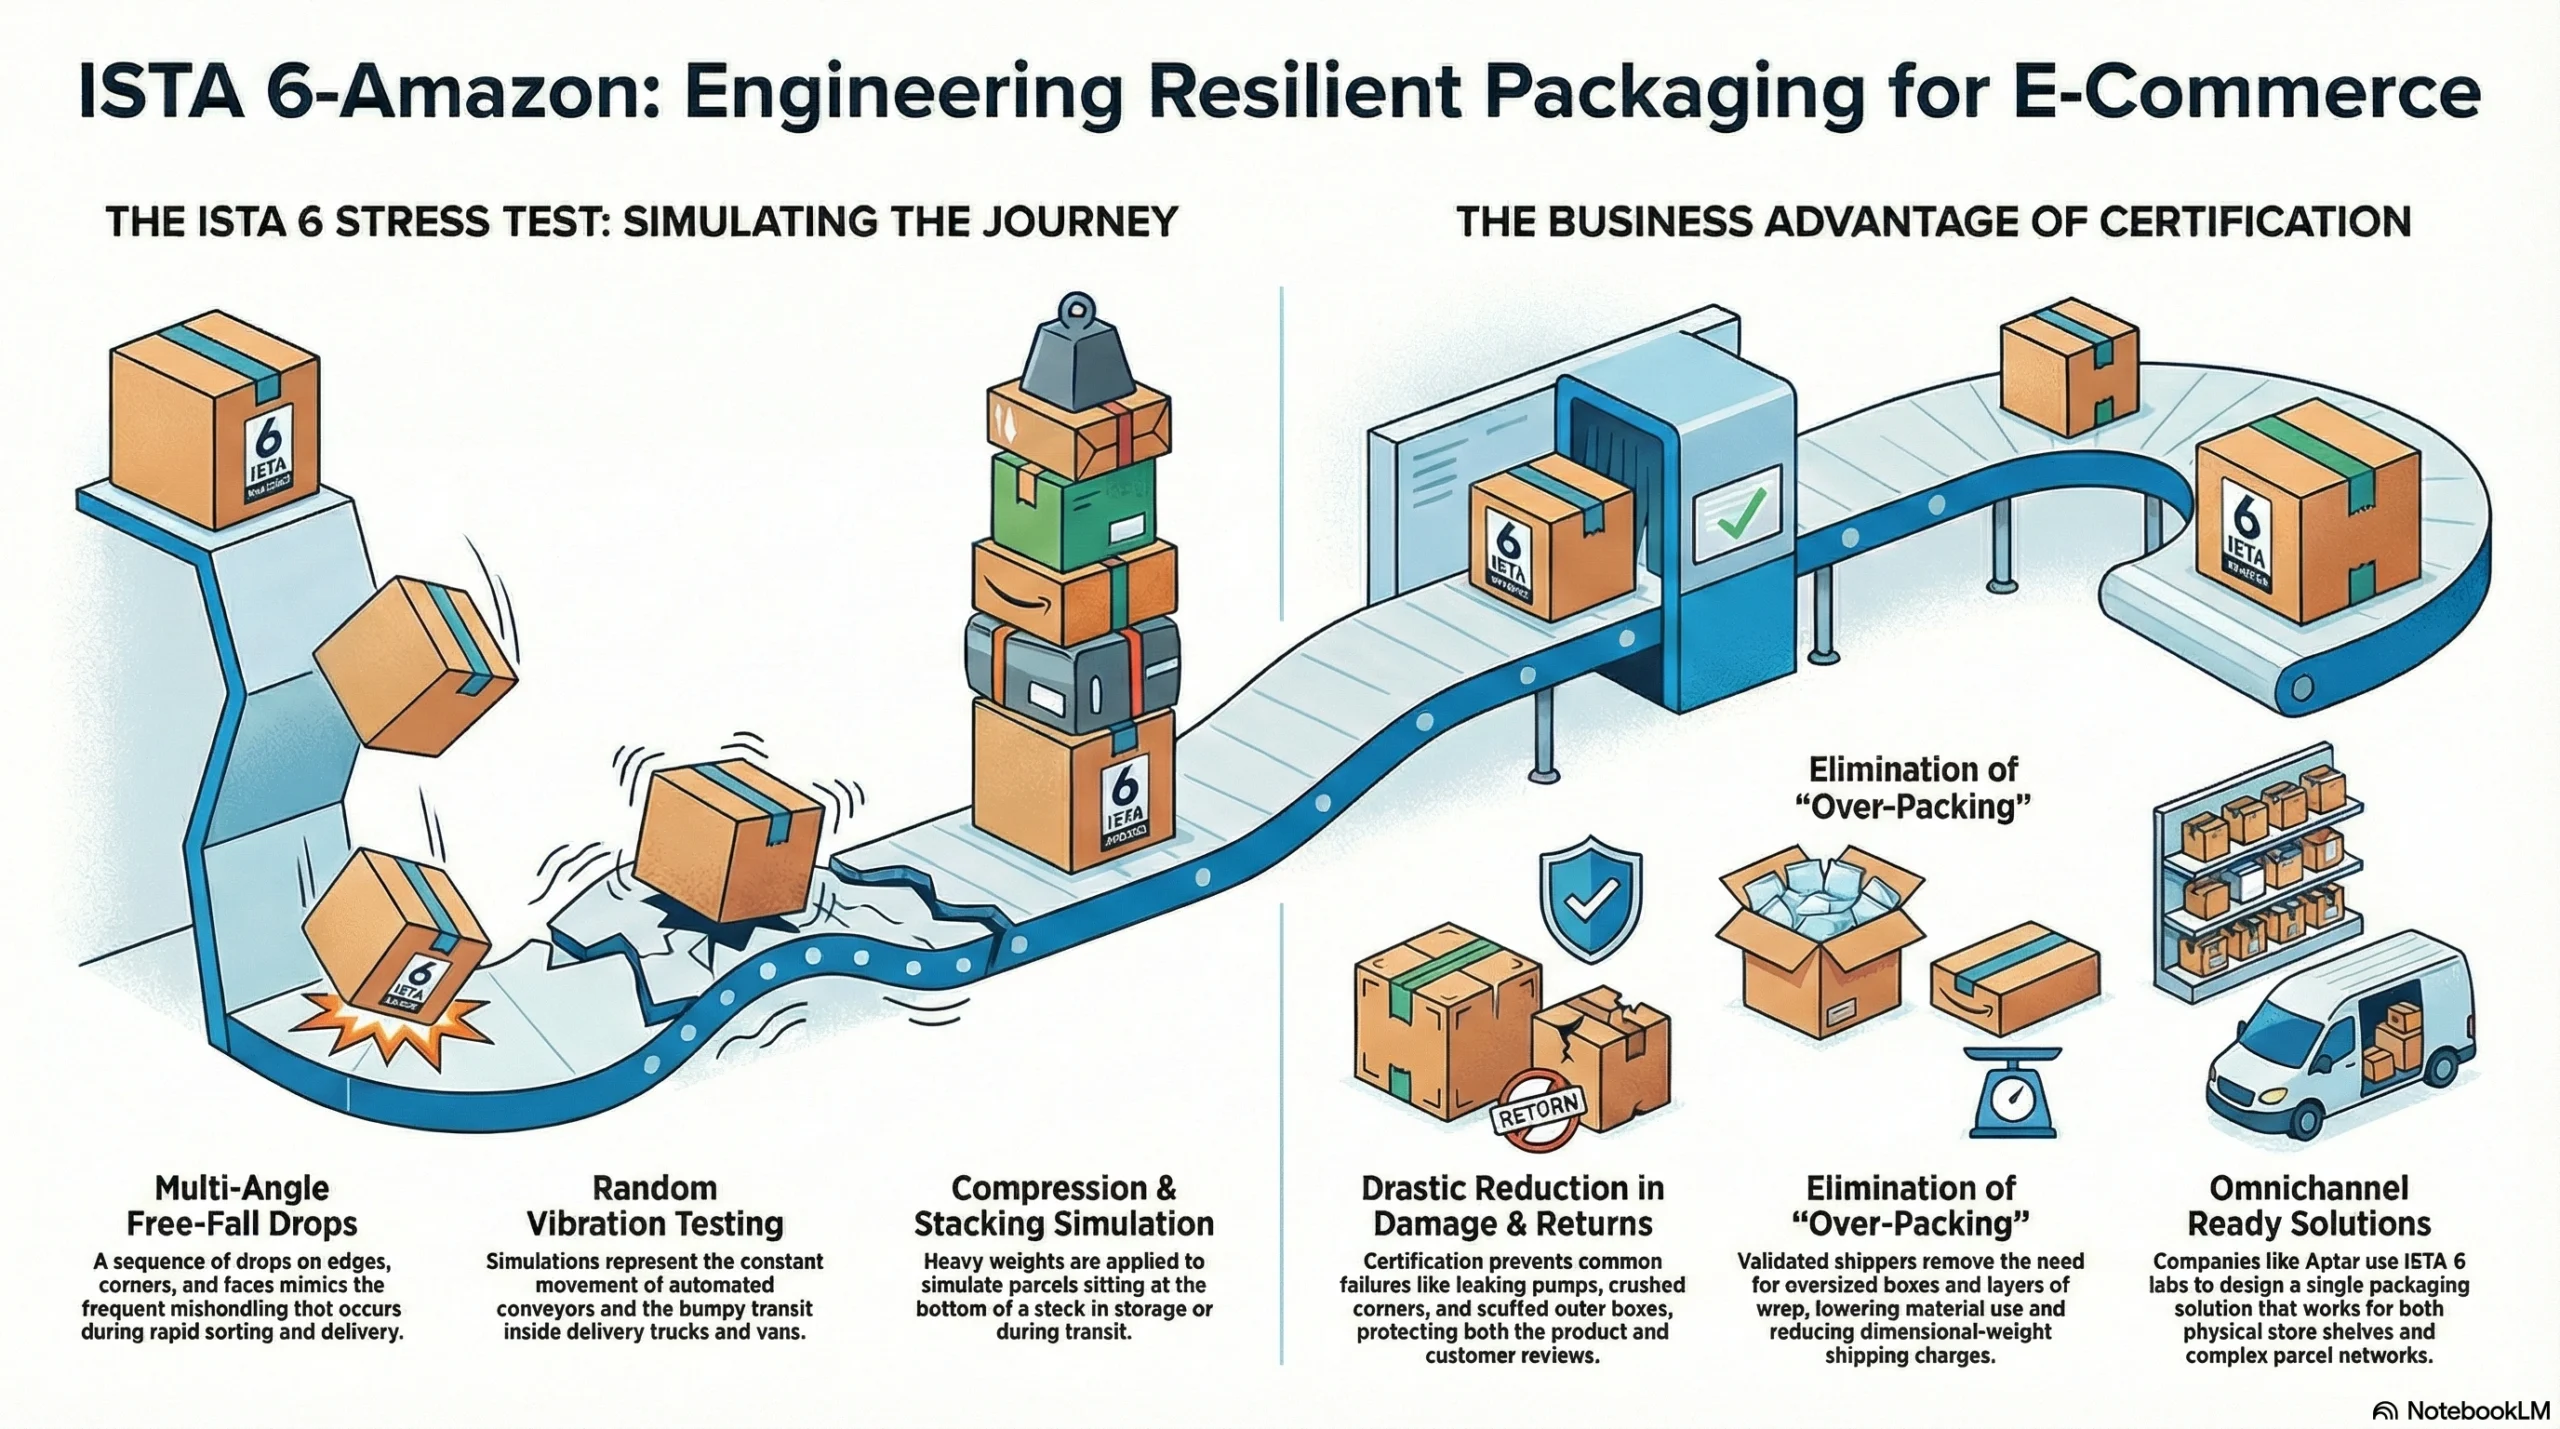
Why ISTA 6 Matters
ISTA 6‑Amazon is a test protocol created with Amazon to simulate what actually happens in their fulfilment network: multiple drops from different heights, random vibration, side and top compression, and sometimes even environmental factors. Labs certified under Amazon’s APASS program or ISTA‑6 standards put your packaged product through:
A sequence of free‑fall drops on edges, corners, and faces to mimic mishandling.
Random vibration tests representing conveyors and truck/van transport.
Compression tests to simulate stacks of parcels sitting on top of each other in storage and transit.
Cartons (and their systems) that pass ISTA‑6 have two big advantages:
Lower damage and return rates. You dramatically cut breakage, leaking pumps, scuffed outer boxes, and crushed corners, which reduces replacement and reship costs and protects reviews.
Less over‑packing. When your primary packaging and small shipper are validated in testing, you don’t need oversized boxes, air pillows, or multiple layers of wrap “just in case.” This lowers material use and helps control dimensional‑weight charges.
Beauty suppliers like Aptar have even built ISTA‑6 labs specifically to help brands design omnichannel‑ready packaging—one solution that works for store shelves and parcel networks—so you don’t need separate “online” and “offline” specs.
Scuff Resistance & Corner‑Crush
Two failure modes make a “premium” beauty box look cheap on arrival: scuffed print and crushed corners.
Scuff resistance on folding cartons
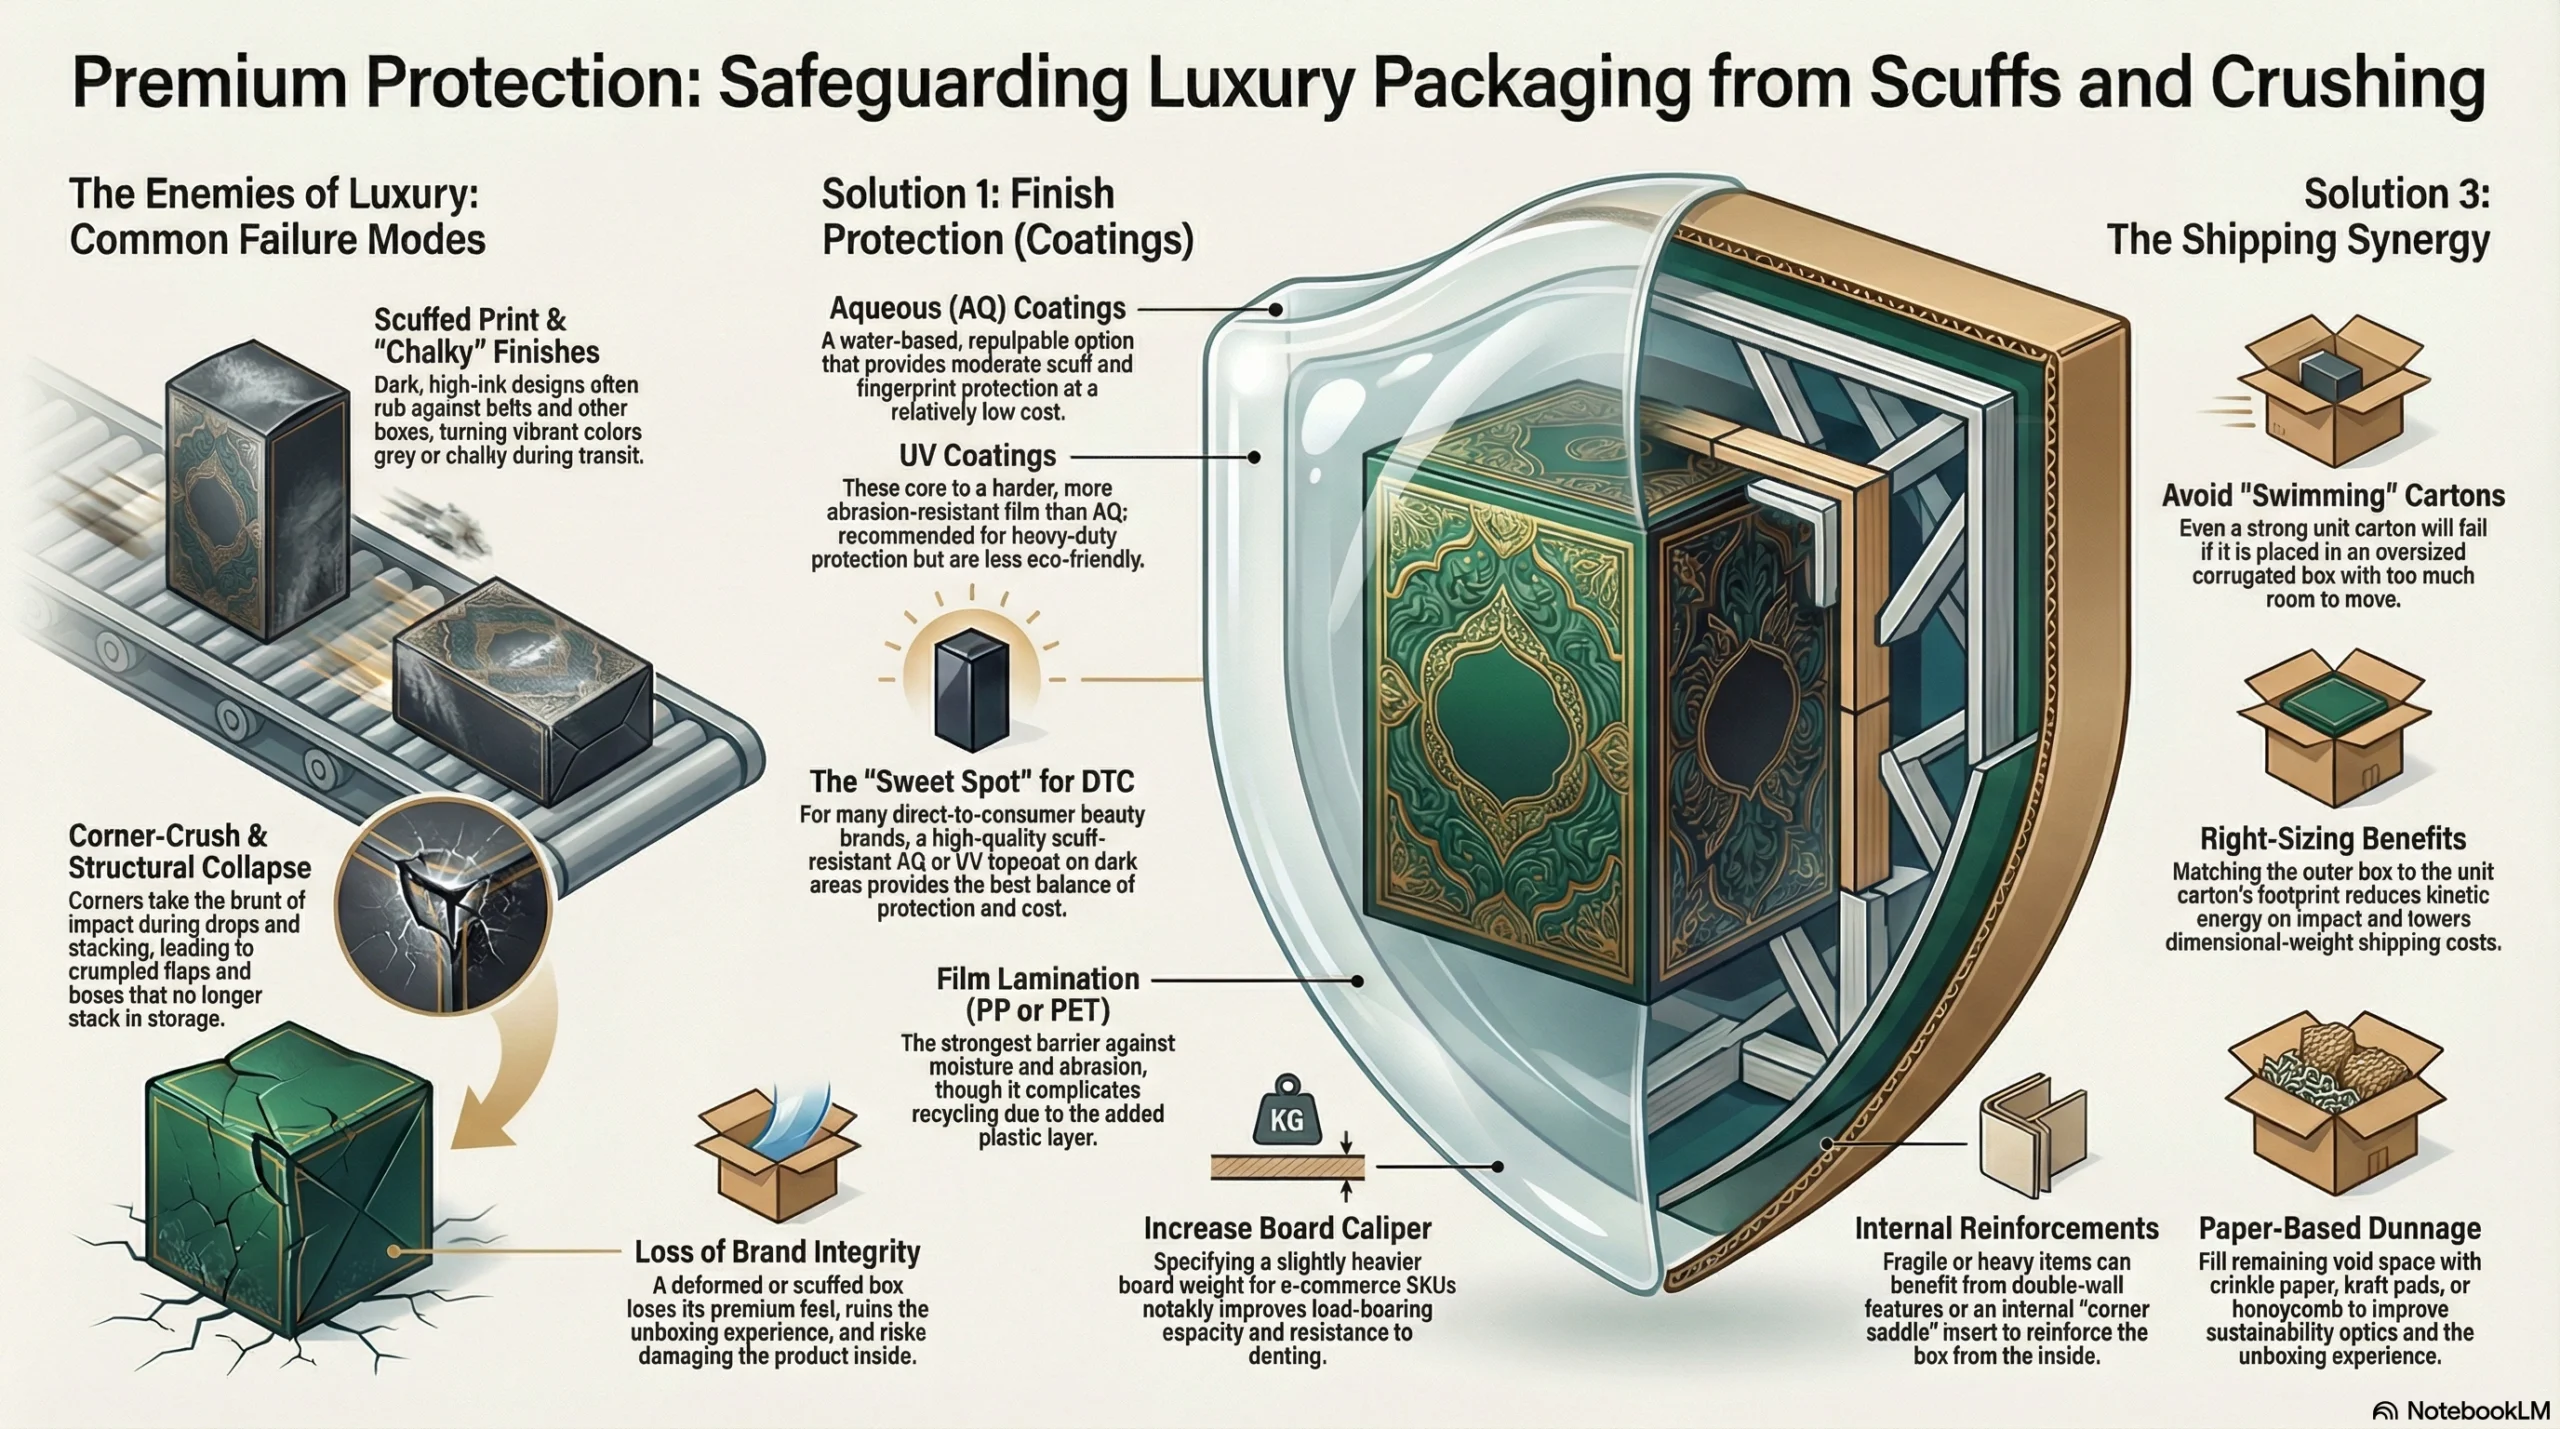
Dark, high‑ink‑coverage designs are particularly vulnerable to rubbing and abrasion in automated systems. As cartons slide against belts and other boxes, unprotected ink can go chalky or grey.
To combat this:
Use aqueous (AQ) or UV coatings tuned for scuff resistance. AQ coatings are water‑based, repulpable, and provide moderate protection against scuffs and fingerprints at a relatively low cost. UV coatings cure to a harder, more abrasion‑resistant film and are recommended where heavy duty protection is needed, though they are less eco‑friendly.
For very high‑risk routes or luxury packs, a thin film lamination (PP or PET) provides the strongest barrier against abrasion and moisture, but it complicates recycling because it adds a plastic layer.
The right choice depends on your brand’s sustainability stance and the abuse your packaging sees; for many DTC beauty brands, a good scuff‑resistant AQ or UV topcoat on dark areas is the sweet spot.
Corner‑crush resistance
Corners are the first parts of a carton to hit the floor in a drop, and they take most of the load in stacking. Weak corners lead to:
Crumpled top flaps that ruin shelf‑ready appearance.
Deformed boxes that no longer stack well in storage.
Internal movement and product damage because the structure loses integrity.
To improve corner performance:
Specify slightly heavier board for e‑commerce‑first SKUs; a step up in caliper notably improves load‑bearing and resistance to denting.
Use carton designs with well‑supported corners—proper glue flap widths, adequate glue coverage, and clean scoring all help prevent splitting.
For particularly fragile or heavy products, consider double‑wall features or adding an internal “corner saddle” via the insert that reinforces those points from the inside.
And always think of the unit carton together with the shipper: even a strong folding carton will fail if it’s swimming in an oversized corrugated box.
Right‑sized outers and void fill
Pair your unit cartons with corrugated outers that closely match the system footprint, then fill remaining void space with paper‑based dunnage (crinkle paper, kraft pads, or honeycomb). Right‑sizing:
Minimises internal travel distance during drops (less kinetic energy on impact).
Reduces the volume used for shipping, which directly lowers dimensional‑weight costs.
Cuts how much filler you need, improving sustainability optics and unboxing experience.
“Ready to Ship” Beauty Carton Systems
The big shift in beauty packaging for e‑commerce is from fragile primary + decorative carton + lots of random void fill to integrated, tested systems that are “ready to ship” with minimal extra material.
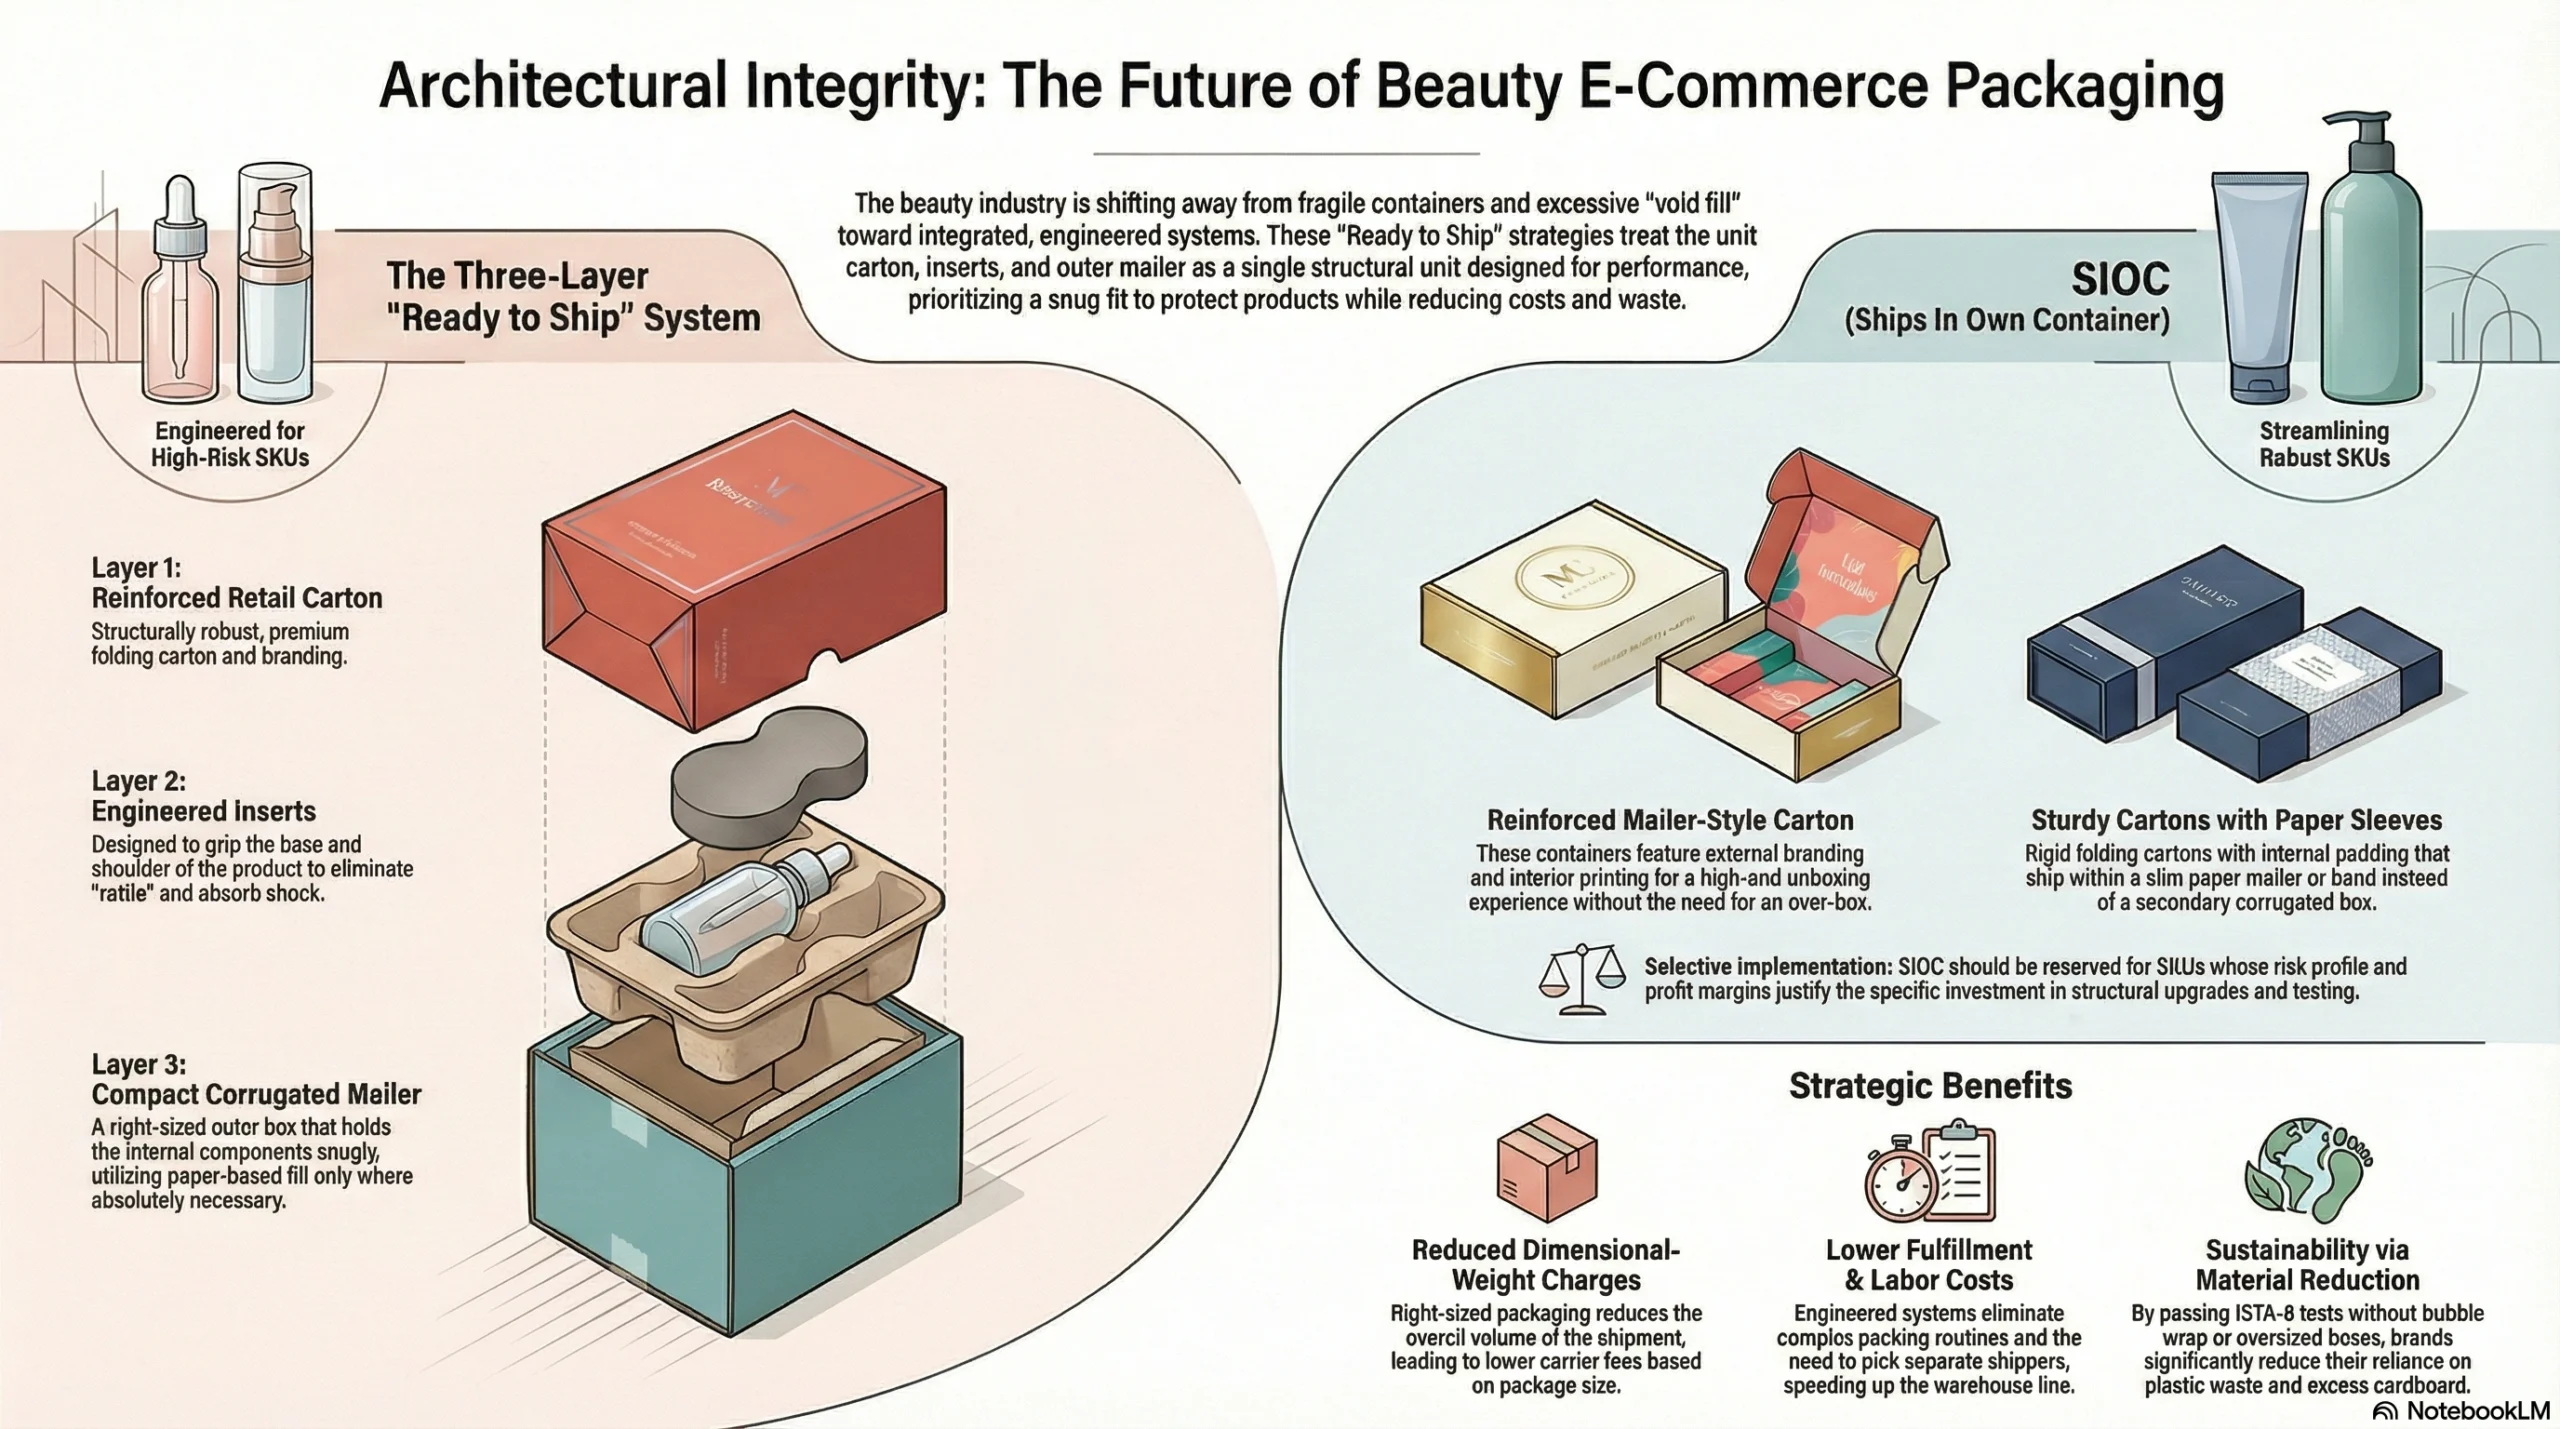
Sturdy unit cartons plus integrated inserts
Instead of treating the folding carton as “just graphics,” more brands now design the unit carton, its insert, and the outer mailer as a single engineered system. The aim is to pass ISTA‑6 or similar testing with:
A structurally capable folding carton (heavier board, good corners).
A properly engineered insert (paperboard, foam, or molded pulp) that locks the product in place.
A compact corrugated mailer that holds everything snugly.
For high‑risk items—glass droppers, heavy jars, fragile airless pumps—the formula often looks like:
Retail carton: visually on‑brand, with reinforced structure.
In‑carton insert: designed to grip base and shoulder, eliminate rattle, and distribute impact.
Outer mailer: right‑sized corrugated, minimal void, paper‑based fill only where truly needed.
This three‑layer system can often pass e‑commerce testing without bubble wrap or oversized boxes, which reduces labor (no complex packing routines), materials, and shipping cost.
“Ship in own container” for robust SKUs
For more robust SKUs—say, a lightweight plastic tube or a low‑risk haircare bottle—you can push further toward efficiency using a SIOC (Ships In Own Container) strategy, where the branded carton doubles as the shipping container or only needs a slim overwrap.
Examples:
A rigid or very sturdy folding carton with internal padding that goes into a snug paper mailer or band, with no extra box.
A reinforced mailer‑style carton with branding on the outside and interior print for unboxing, certified to ship without over‑boxing.
When SIOC designs pass ISTA‑6, you gain:
Lower packaging material cost (one box instead of two).
Lower fulfilment cost (fewer steps; no need to pick a separate shipper).
Lower dimensional‑weight charges due to reduced overall volume.
The key is to be selective: not every product should ship in its own container. Reserve SIOC for SKUs whose risk profile and margin justify the investment in testing and structural upgrades. For the rest, lean on the three‑layer system.
By treating e‑commerce performance as a design input, not an after‑the‑fact fix, you end up with folding cartons that arrive crisp, intact, and on‑brand—without drowning your products in void fill or giving away margin to damage and dimensional weight.
Subscription & Discovery Sets: Flow and Multi‑SKU Layouts
Subscription and discovery formats aren’t just “a few products in a box.” They’re curated lineups with different shapes, sizes, and priorities, and customers judge them heavily on how intuitive and delightful the unboxing feels. Structurally, that means controlling where each product sits, how it’s revealed, and how clearly the layout explains “what to use, when.”
Multi‑SKU Carton Structures
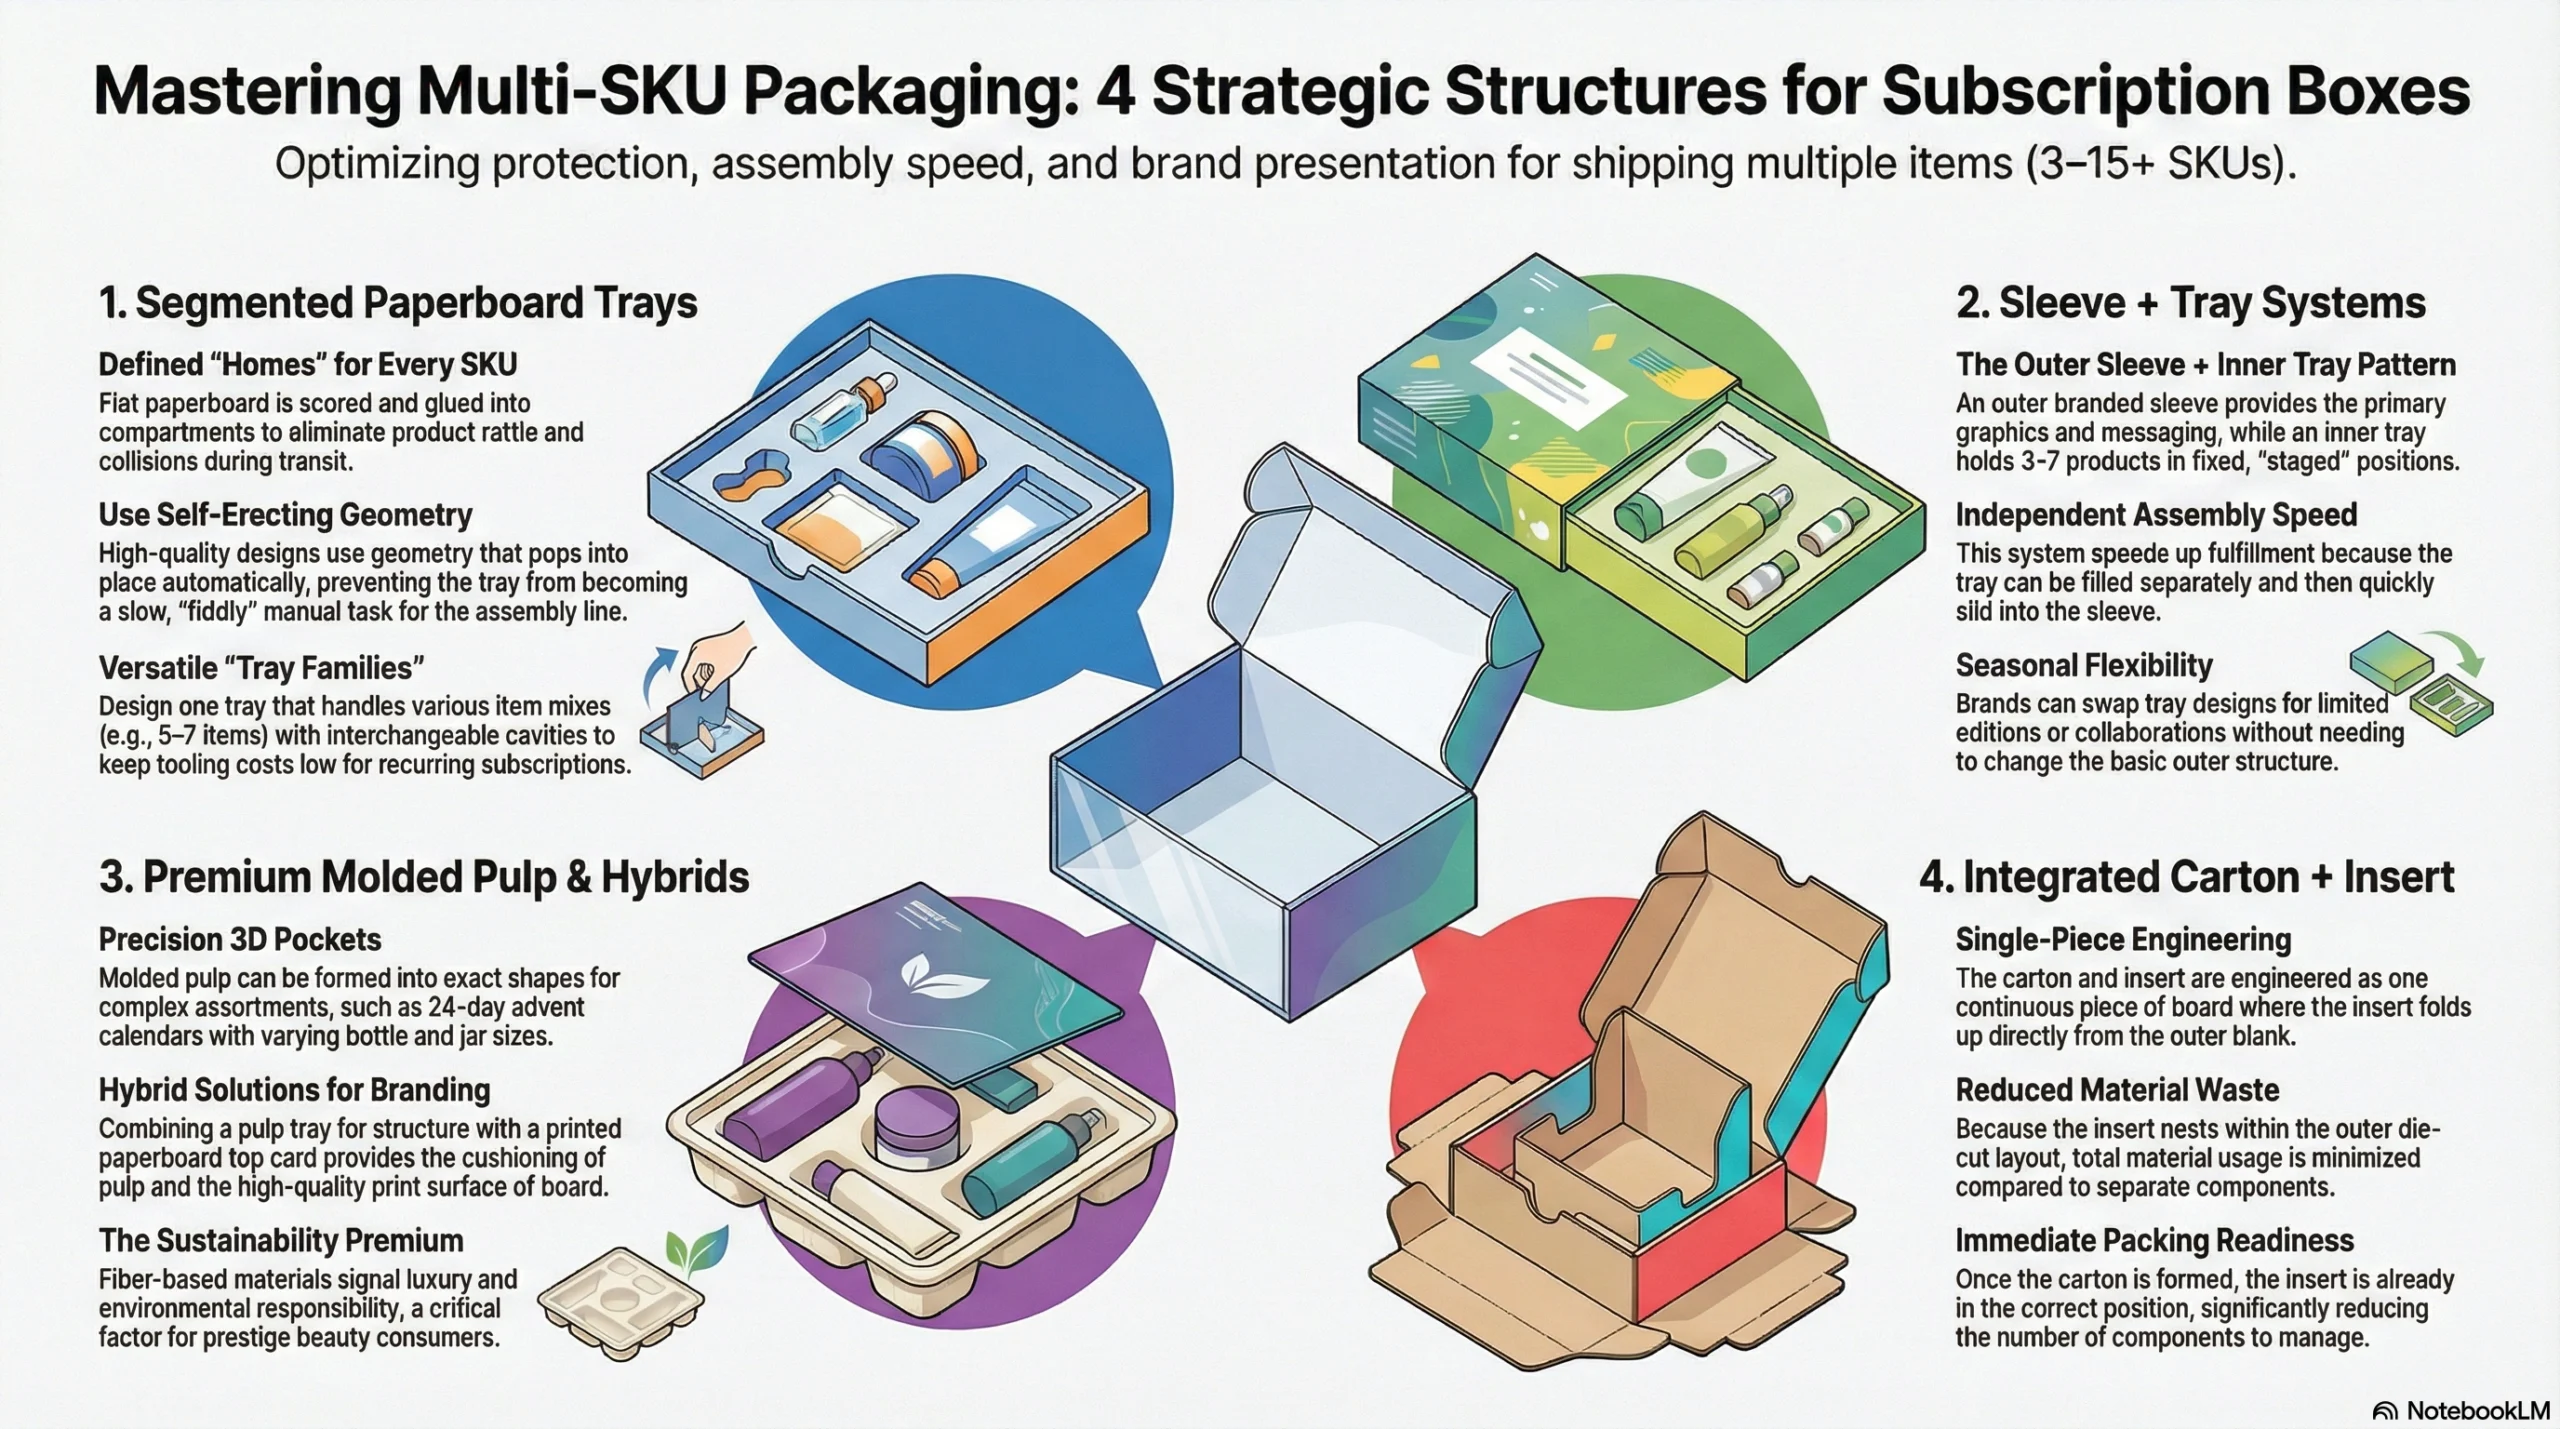
For subscription boxes and discovery kits, you’re usually placing 3–15+ items into a single shipper. Loose packing looks cheap, increases damage, and makes it harder to tell a story. Purpose‑built interiors fix that.
Segmented paperboard trays
Segmented trays are flat paperboard inserts scored and glued into compartments, or die‑cut with individual cavities for each item.
They lock every SKU into a defined “home,” eliminating rattle and product collisions in transit.
The segments can be sized to different diameters/heights, accommodating vials, minis, sachets, and full‑size products in one layer.
Good designs use self‑erecting geometry so the tray sets up quickly on the line, not as a fiddly hand‑made divider.
For recurring subscriptions, it’s common to design one tray family that can handle a range of item mixes (e.g., always 5–7 items) with some cavities interchangeable – this keeps tooling costs low while letting merchandising teams swap SKUs.
Sleeve + tray systems
A very effective pattern is: outer sleeve (branding) + inner tray (staging).
The sleeve carries most of the graphics, brand colour, and messaging. It can be printed heavily, finished nicely, and still remain structurally simple.
The tray is die‑cut to hold 3–7 products in fixed positions. When the sleeve slides off or the tray pulls out, the products are already “staged” like a display.
This approach:
Keeps the outer surface clean and on‑brand.
Lets you swap tray designs (e.g., seasonal, collab, or limited‑edition layouts) without changing the basic outer structure.
Speeds assembly because the tray can be filled independently and then inserted into the sleeve.
Molded pulp and hybrid interiors for premium or seasonal sets
For high‑end discovery sets and holiday calendars, brands are increasingly using molded pulp or hybrid pulp/board inserts:
Molded pulp can be formed with precise 3D pockets of varying depths, making it ideal for complex assortments (think 24‑day calendars with different bottle and jar sizes).
It carries strong sustainability cues (recyclable, fibre‑based), which is important in prestige beauty where consumers expect both luxury and responsibility.
Case studies like Chanel’s molded‑pulp advent calendar show you can push pulp to high aesthetic standards, with smooth surfaces, hinged structures, and integrated cavities shaped to iconic bottles.
Hybrid solutions often combine:
A pulp tray for structure and cushioning.
A printed paperboard top card or sleeve for branding and messaging.
This keeps most of the interior mono‑material while giving you a high‑quality print surface.
Integrated carton + insert as a single piece
Instead of separate loose inserts, some converters engineer carton and insert as one integrated piece of board—the insert folds up from the same blank and locks into the walls.
This reduces the number of components you manage and assemble.
It cuts material waste because the insert nests within the outer die‑cut layout.
It speeds packing because, once the carton is formed, the insert is already in the correct position.
Clear‑thinking structural design at this stage is what lets you ship multi‑SKU sets efficiently and safely, without turning your fulfilment operation into a hand‑packing nightmare.
Unboxing Flow Design
Multi‑SKU packaging lives or dies on flow—the sequence in which customers see, recognise, and understand each product. Research and industry commentary on unboxing show that structured, narrative experiences drive higher satisfaction, retention, and social sharing than random assortments tossed in a box.
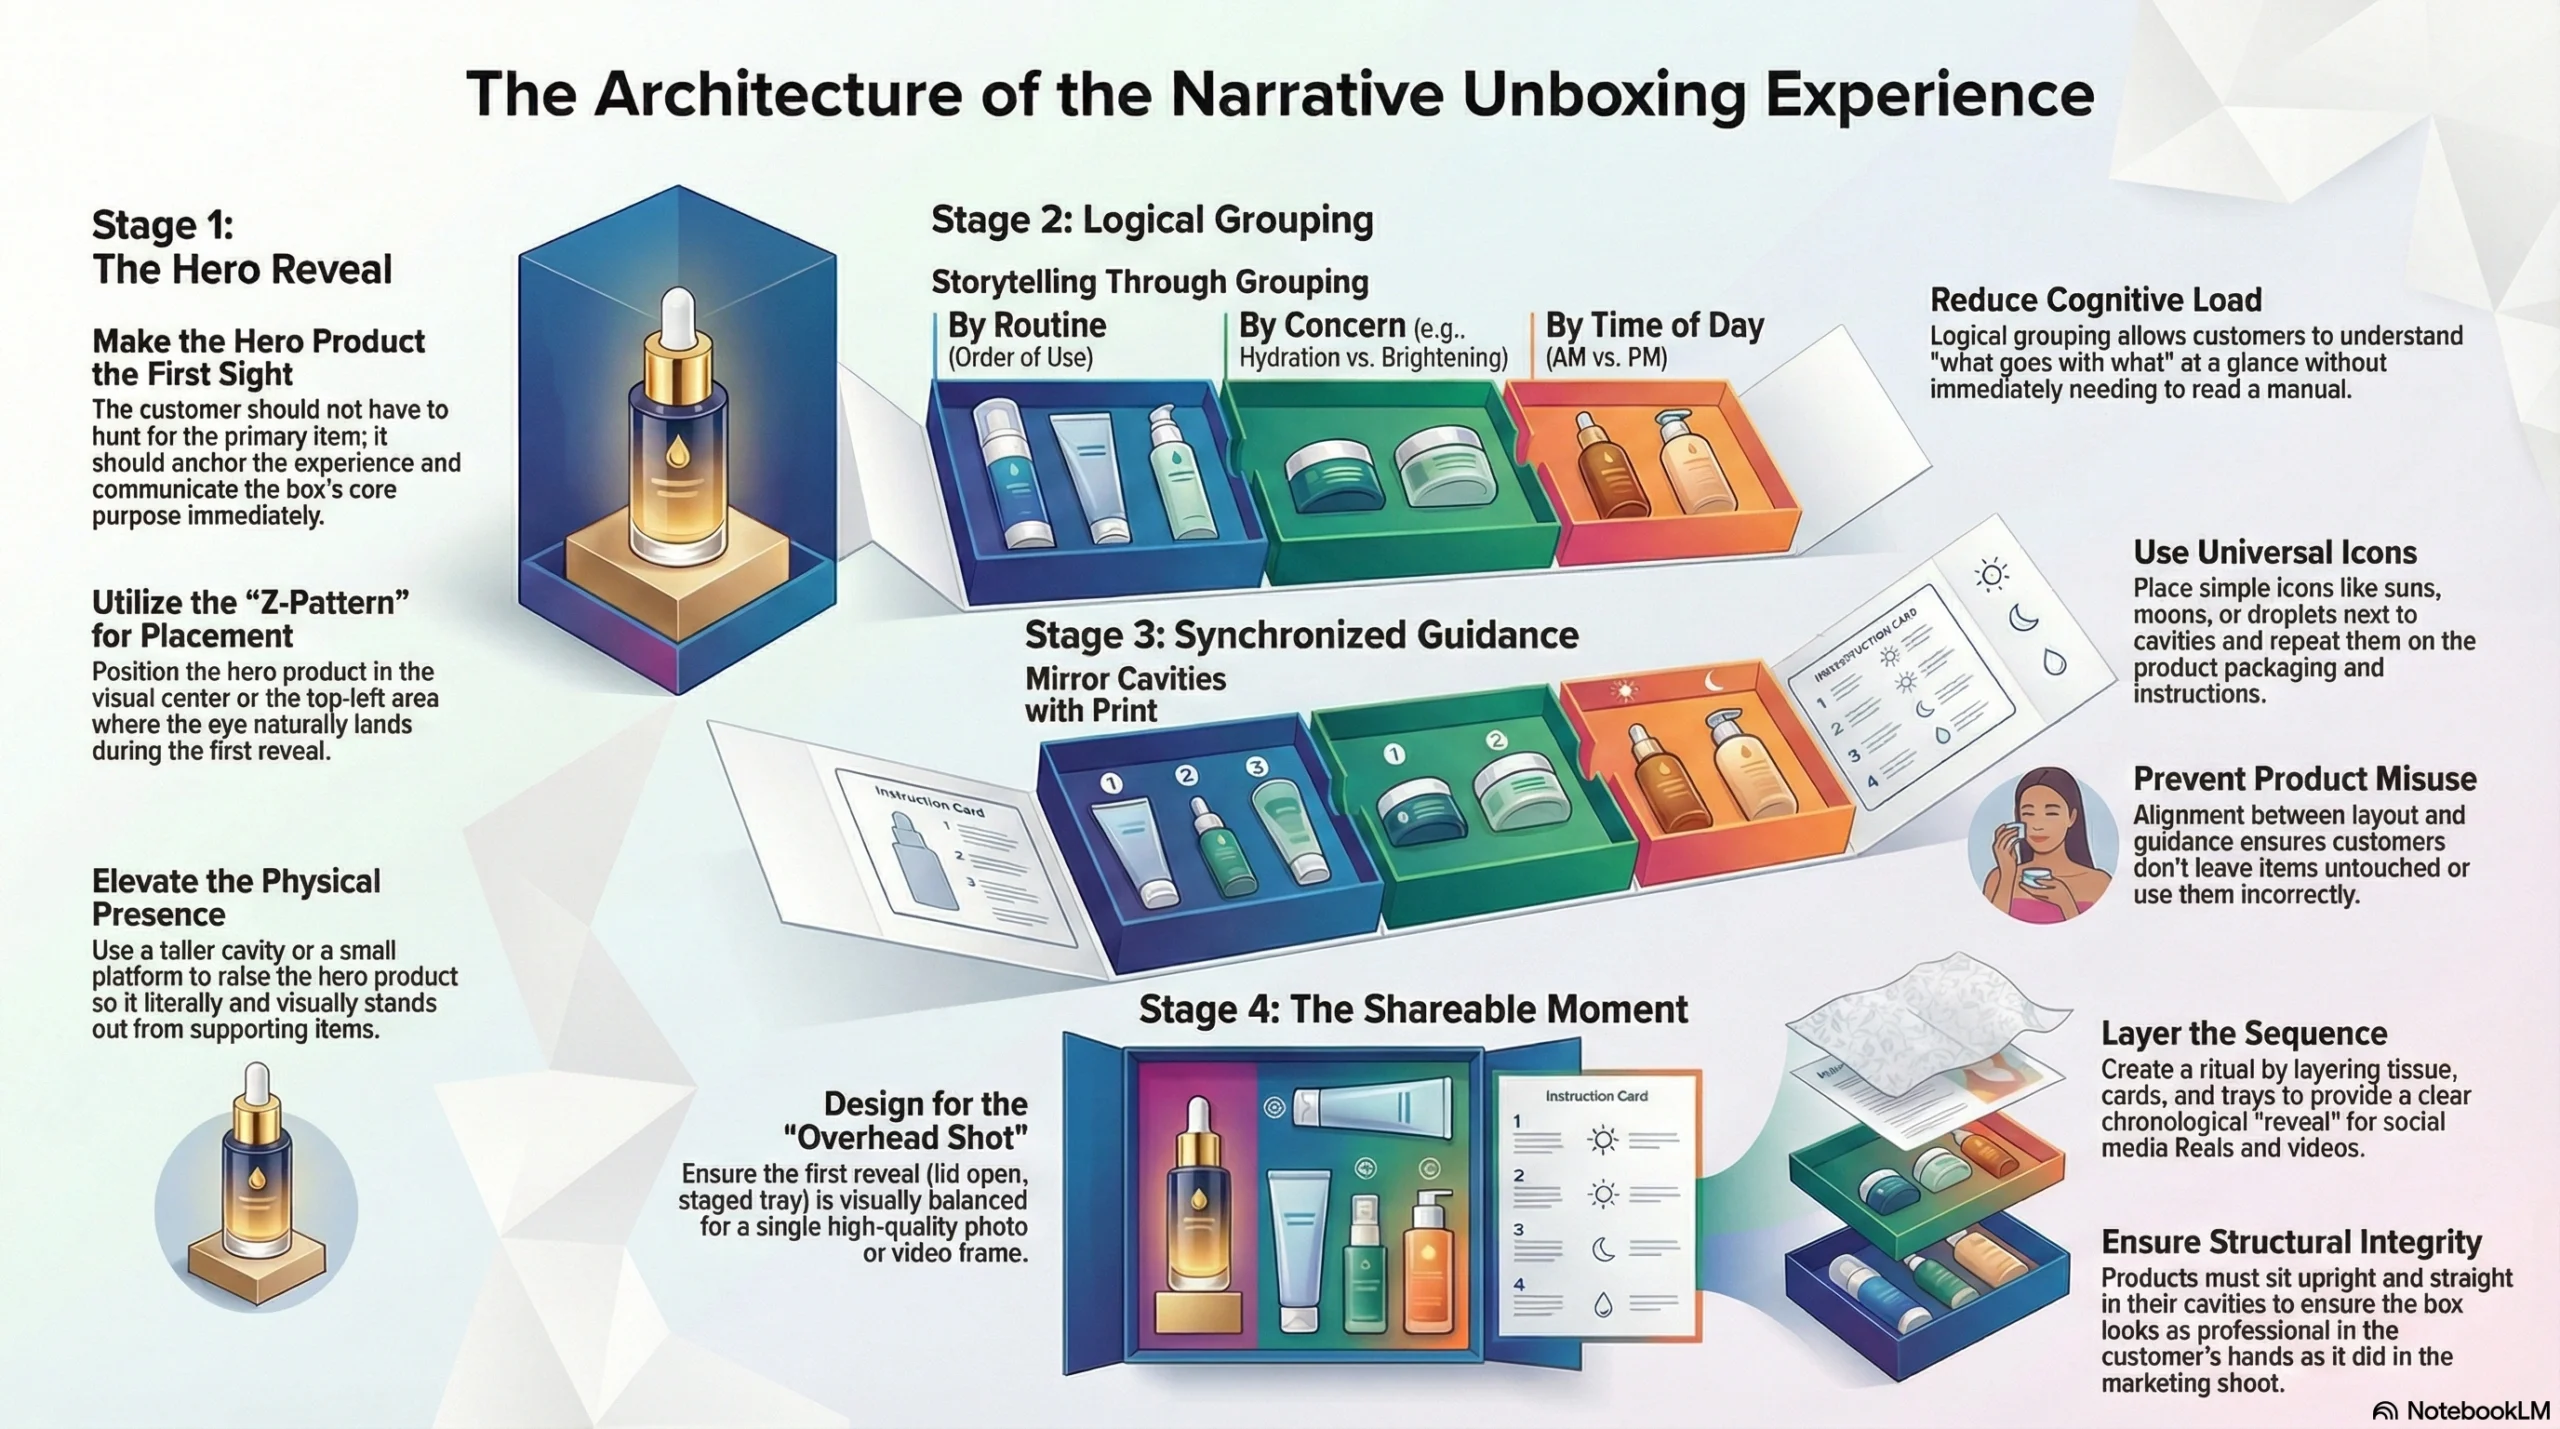
Make the hero product the first thing they see
When the lid opens, the customer shouldn’t have to hunt for the item that matters most:
Position the hero in the visual centre of the tray or at the top of the “Z‑pattern” (top left to bottom right) where eyes naturally land.
Consider raising it slightly with a taller cavity or a small platform so it literally and visually stands out.
For calendars or multi‑day experiences, the “hero” might be the final door or the largest compartment—engineer that as the climax of the journey.
This anchors the experience and immediately communicates what the box is “about.”
Group supporting items in a logical way
Random scatter makes the set feel like leftovers. Logical grouping, on the other hand, tells a story:
By routine step: Cleanser, exfoliant, serum, moisturiser, SPF arranged in order of use.
By concern: Hydration products together, brightening products together, anti‑acne together.
By time of day: AM products on one row, PM products on another.
This not only looks neater in the tray; it also reduces cognitive load for the customer. They can glance at the layout and understand “what goes with what” without reading a booklet.
Connect physical layout with printed guidance
The most successful subscription and discovery sets synchronise where an item lives in the tray with how it’s explained in the print:
Number cavities (1, 2, 3…) and mirror those numbers on a routine card or inside‑lid graphic that explains: “1 – Cleanse, 2 – Treat, 3 – Moisturise,” and so on.
Use simple icons (sun/moon, drop, shield, sparkle) next to cavities and repeat the same icons in the instructions and on primary packaging.
For advent‑style calendars, doors are often numbered and spatially arranged to create anticipation; high‑end pulp calendars now do this with well‑engineered cavity patterns and door layouts.
This alignment makes the experience feel curated rather than random and dramatically reduces the chance that customers will misuse products or leave items untouched because they’re unsure where they fit.
Design unboxing as a shareable moment
Studies and industry case work show that unboxing experiences that combine aesthetics, storytelling, and sensory appeal are more likely to be filmed and shared on social media. For multi‑SKU sets, this means:
Designing the first reveal (open lid → staged tray) to look good in a single overhead shot.
Layering elements (tissue, cards, tray) so there’s a clear “sequence” for video and Reels.
Ensuring products sit upright and straight in their cavities so the box looks as good in the customer’s hands as it did in your shoot.
When your printed sequence, tray layout, and structural choices all support a smooth, visually satisfying unboxing, you’re not just preventing damage—you’re building a repeatable ritual that keeps subscribers engaged and encourages them to show off your brand to their audiences.
Slim Cartons (Lipstick, Mascara, Pencils)
Slim cartons for lipsticks, mascaras, and pencils seem simple, but structurally they’re some of the most unforgiving formats you’ll design. Their narrow panels and short tucks concentrate stress at a few small points, and they’re handled constantly—on the line, in stores, in handbags—so any weakness quickly shows up as popped flaps, cracked scores, or rattling products that feel cheap.
Common Failure Modes
Auto‑opening during shipping
Because slim cartons have small tuck flaps and light products, there’s less friction holding the flap in place. If tuck length is short or dust flaps don’t engage fully, vibration and handling can work the closure loose. Once the flap is open, testers fall out in store, or products arrive loose in e‑commerce shippers.
Tearing and cracking at scores
Paperboard has a grain direction, and it folds more cleanly with the grain than across it. On slim cartons, if the grain runs the wrong way relative to the long panels:
Scores crack and show white “stress lines” after just a few openings.
Corners weaken and tear where the tucks meet the side panels.
Because the panels are so narrow, there’s very little extra material to “hide” that damage.
Product rattle and movement
Lipsticks, mascaras, and pencils are usually narrower than the internal width of a standard slim carton. If you don’t control that gap, the product rattles every time someone picks it up. That rattle:
Immediately undermines perceived quality (“this feels cheap/empty”).
Increases scuffing and edge wear as the product knocks against the box walls.
Over time, rattling products can also stress the tuck closure from inside, increasing the chance of auto‑opening.
Structural Fixes
You don’t need a totally new structure to fix these issues—just small, targeted engineering improvements.
Adjust grain direction
Best practice for folding cartons is to run the grain parallel to the main panel height, so the long side panels fold with the grain.
In slim cartons, that means:
Side walls stay stiff and straight rather than bowing.
Scores at the top and bottom folds crack less and withstand repeated opening and closing.
If you’re seeing cracking at the top or bottom edges, check if you’re folding across the grain—flipping the sheet layout may solve it without changing anything else.
Increase tuck length and dust‑flap engagement
For slim cartons, short tucks don’t create enough friction or mechanical “bite” to stay closed under vibration.
Improve closure by:
Lengthening the top and bottom tuck panels so they extend deeper into the box.
Ensuring dust flaps are sized and angled to fully close gaps and lightly press against the tuck when closed.
Using a small slit‑lock or friction‑lock detail on premium cartons where you want a more positive “snap” without going to magnets.
Even a 3–5 mm increase in tuck depth can significantly reduce auto‑opening in transit.
Add internal “tongues” or collars
To eliminate rattle and keep the product centered:
Integrate small paperboard tongues into the side panels or a simple internal insert. These fold inward and lightly pinch the barrel of a lipstick or mascara, adding just enough friction to hold it steady.
For pencils or very slim products, a narrow collar insert—a die‑cut strip that forms a ring or cradle inside the carton—can stabilise the product at mid‑height as well as at the base.
These features can usually be added to the existing die with minimal extra board and no separate part numbers. They don’t have to clamp hard; a light grip is enough to stop movement and noise.
Sustainable Beauty Cartons Without Losing Premium Feel
Sustainable beauty cartons no longer have to look “worthy but dull.” The most interesting work in 2025–26 is happening where premium aesthetics and circular design overlap—mono‑material boards, smarter coatings, and new window technologies that remove fossil plastics without sacrificing shelf appeal.
Moving Away from Plastic Windows and Heavy Lamination
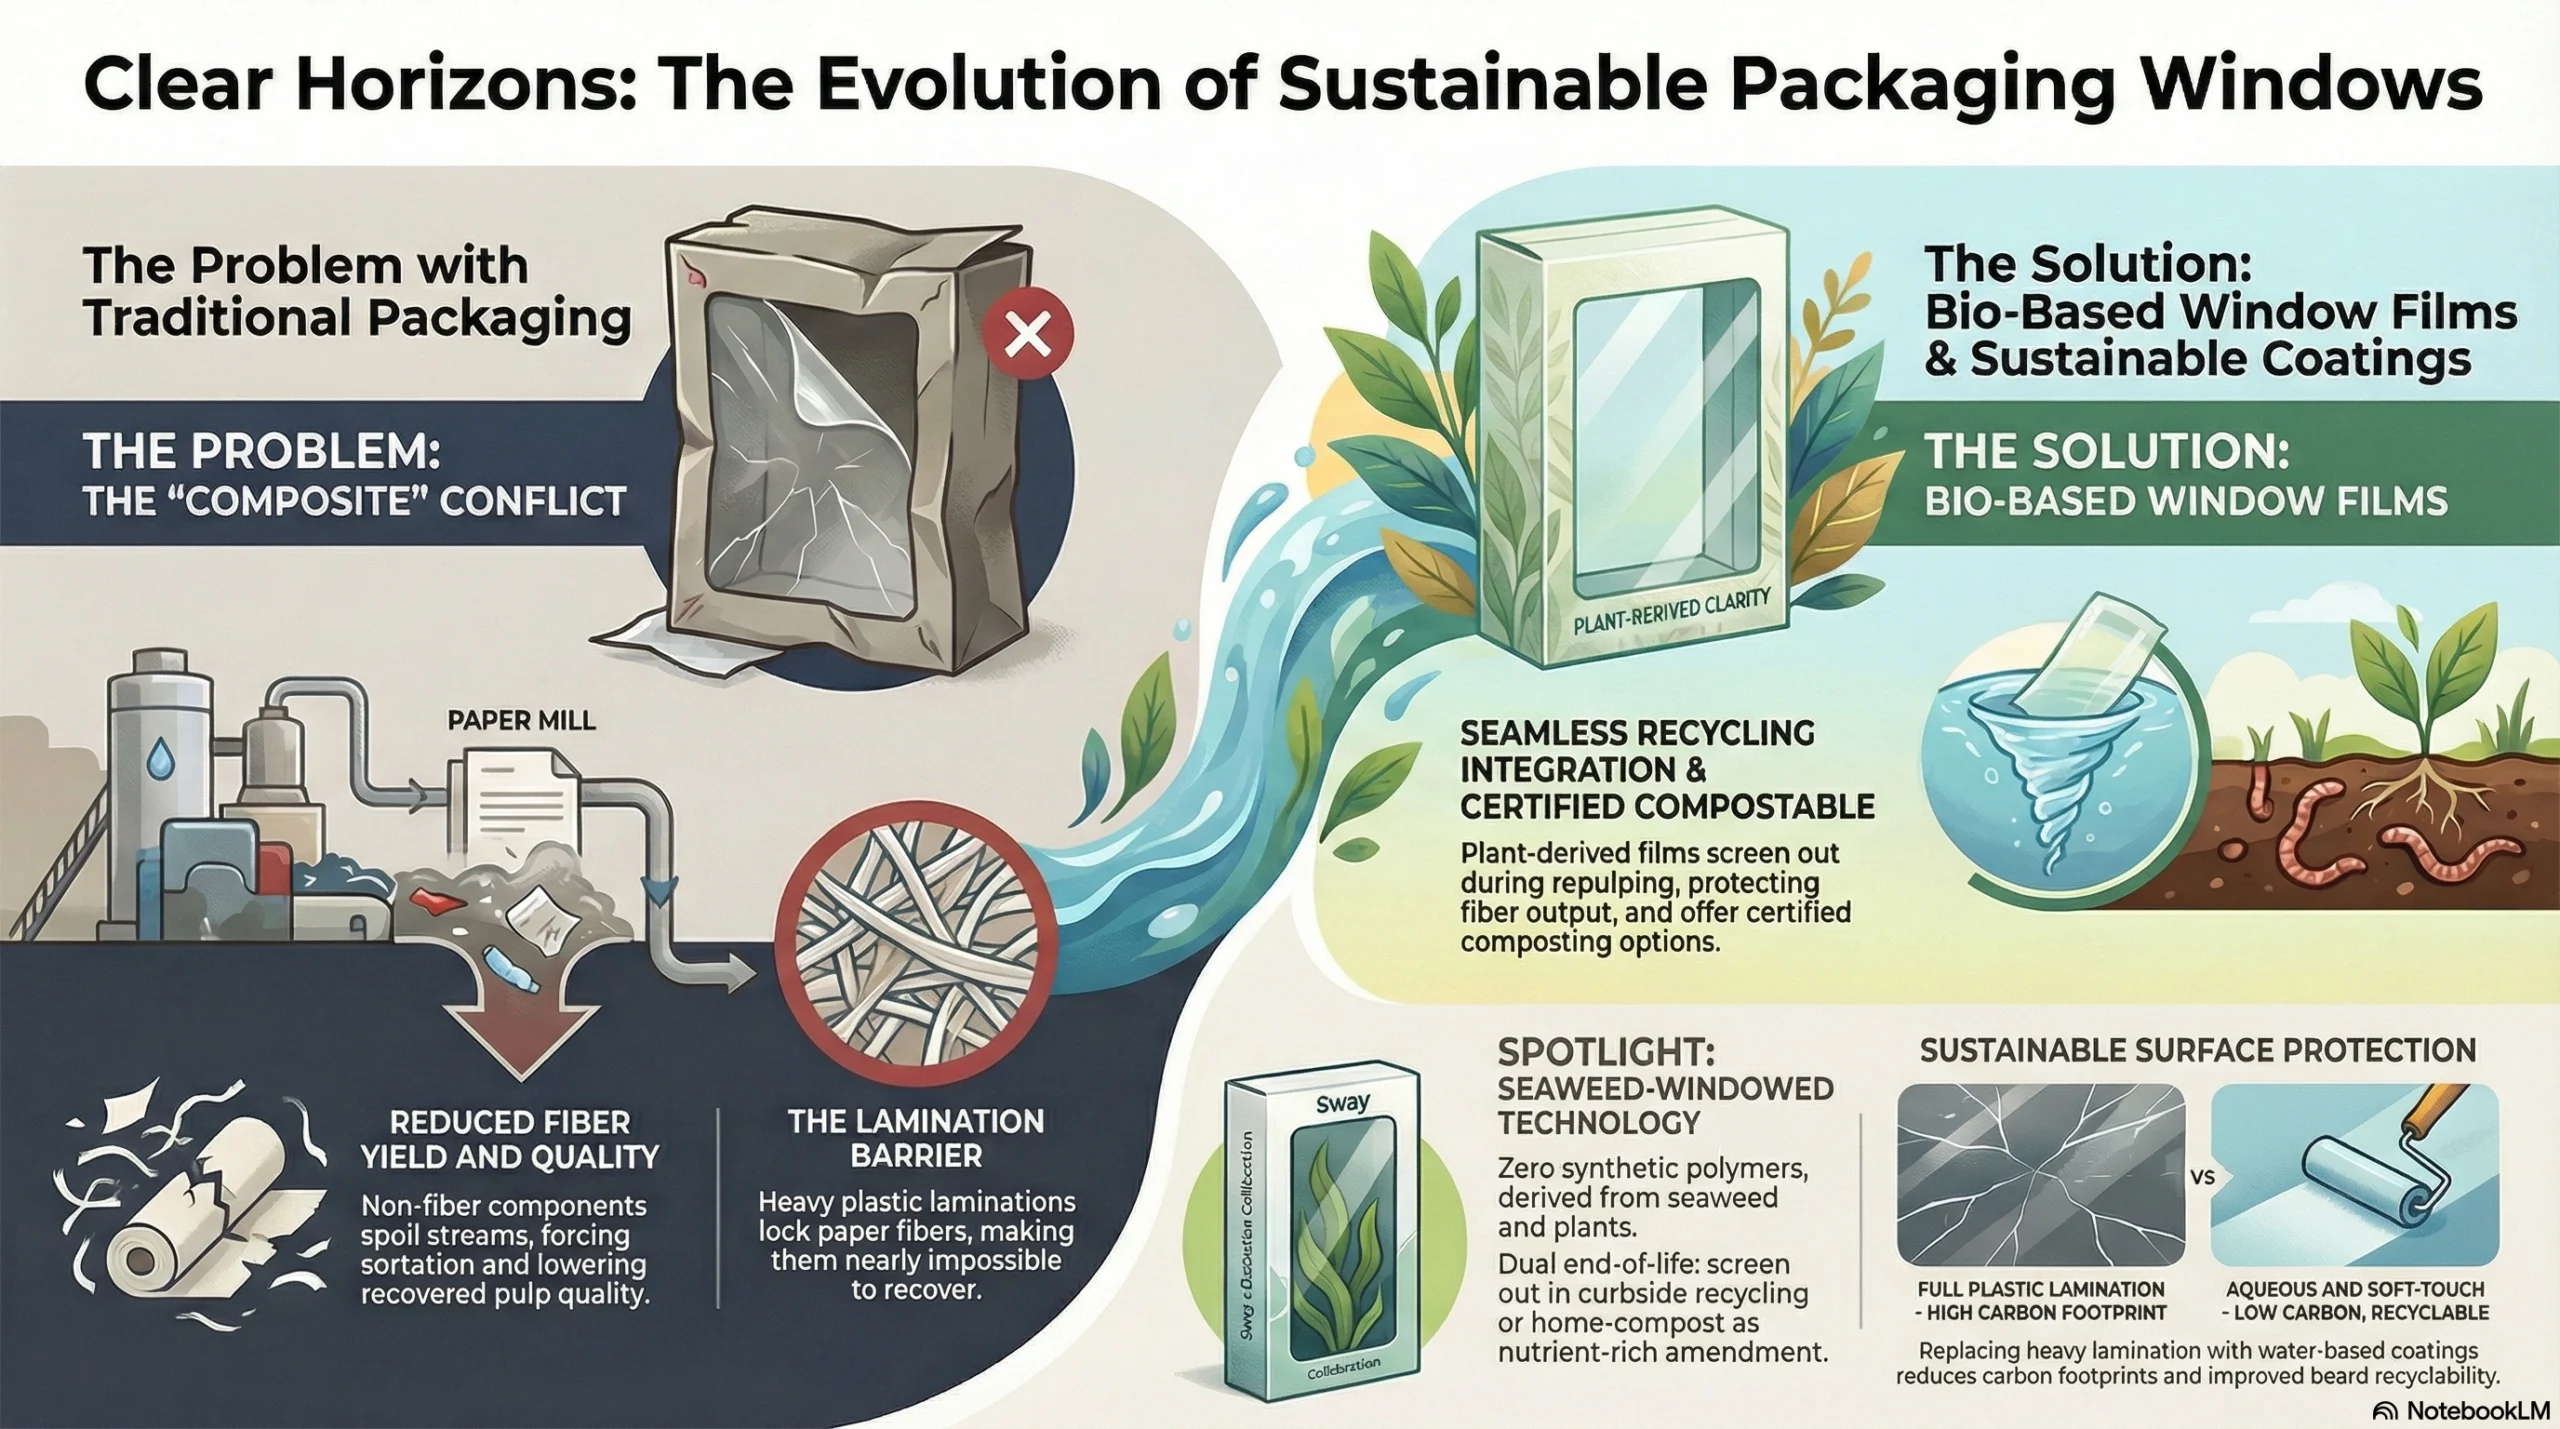
Traditional plastic windows (PET, PVC, PP) and thick plastic laminations are a problem because they turn an otherwise recyclable board box into a composite that mills have to separate or reject. Recycling research shows that plastic windows and similar non‑fibre components can contaminate paper streams and reduce fibre yield, forcing sortation or lowering the quality of recovered pulp. In practice, this means a lot of “windowed” cartons don’t get recycled as cleanly as consumers expect.
To address this, suppliers are introducing bio‑based window films designed to behave more like paper in the system. These are typically derived from cellulose or other plant inputs and aim to be:
Clear and durable enough for retail.
Certified biobased and often compostable.
Compatible with standard paper recycling streams, where they can be screened out like other minor non‑paper contaminants without damaging the fibre output.
A standout example is the Sway x EcoEnclose seaweed‑windowed retail box. This collaboration replaces fossil‑based plastic film with a seaweed‑based window that is certified 100% biobased and home and industrial compostable, while the box itself uses 100% recycled paperboard. According to EcoEnclose and Sway:
The window film is made entirely from seaweed and plants, with no synthetic polymers in the fibres or film.
The full box is accepted in curbside recycling; during repulping, the seaweed film is screened out along with other small contaminants.
Alternatively, the window can be peeled off and composted, where it breaks down rapidly into a nutrient‑rich amendment.
This kind of solution gives you a real product peek—critical for color cosmetics—without committing to a plastic window that undermines your sustainability messaging.
Heavy plastic laminations pose similar issues. While they protect print and add gloss or matte effects, they:
Are difficult to separate from paper fibres.
Reduce the recyclability of the board.
Increase fossil material content and carbon footprint compared to water‑based coatings.
That’s why many beauty brands are now reserving full lamination only for specific SKUs and moving the rest to aqueous, dispersion, or soft‑touch water‑based coatings that protect surface print without locking the fibre behind a plastic skin.
Plastic‑Free Alternatives That Still Sell the Product
You still need to communicate shade, texture, and payoff—but you no longer have to rely on a PET window to do it.
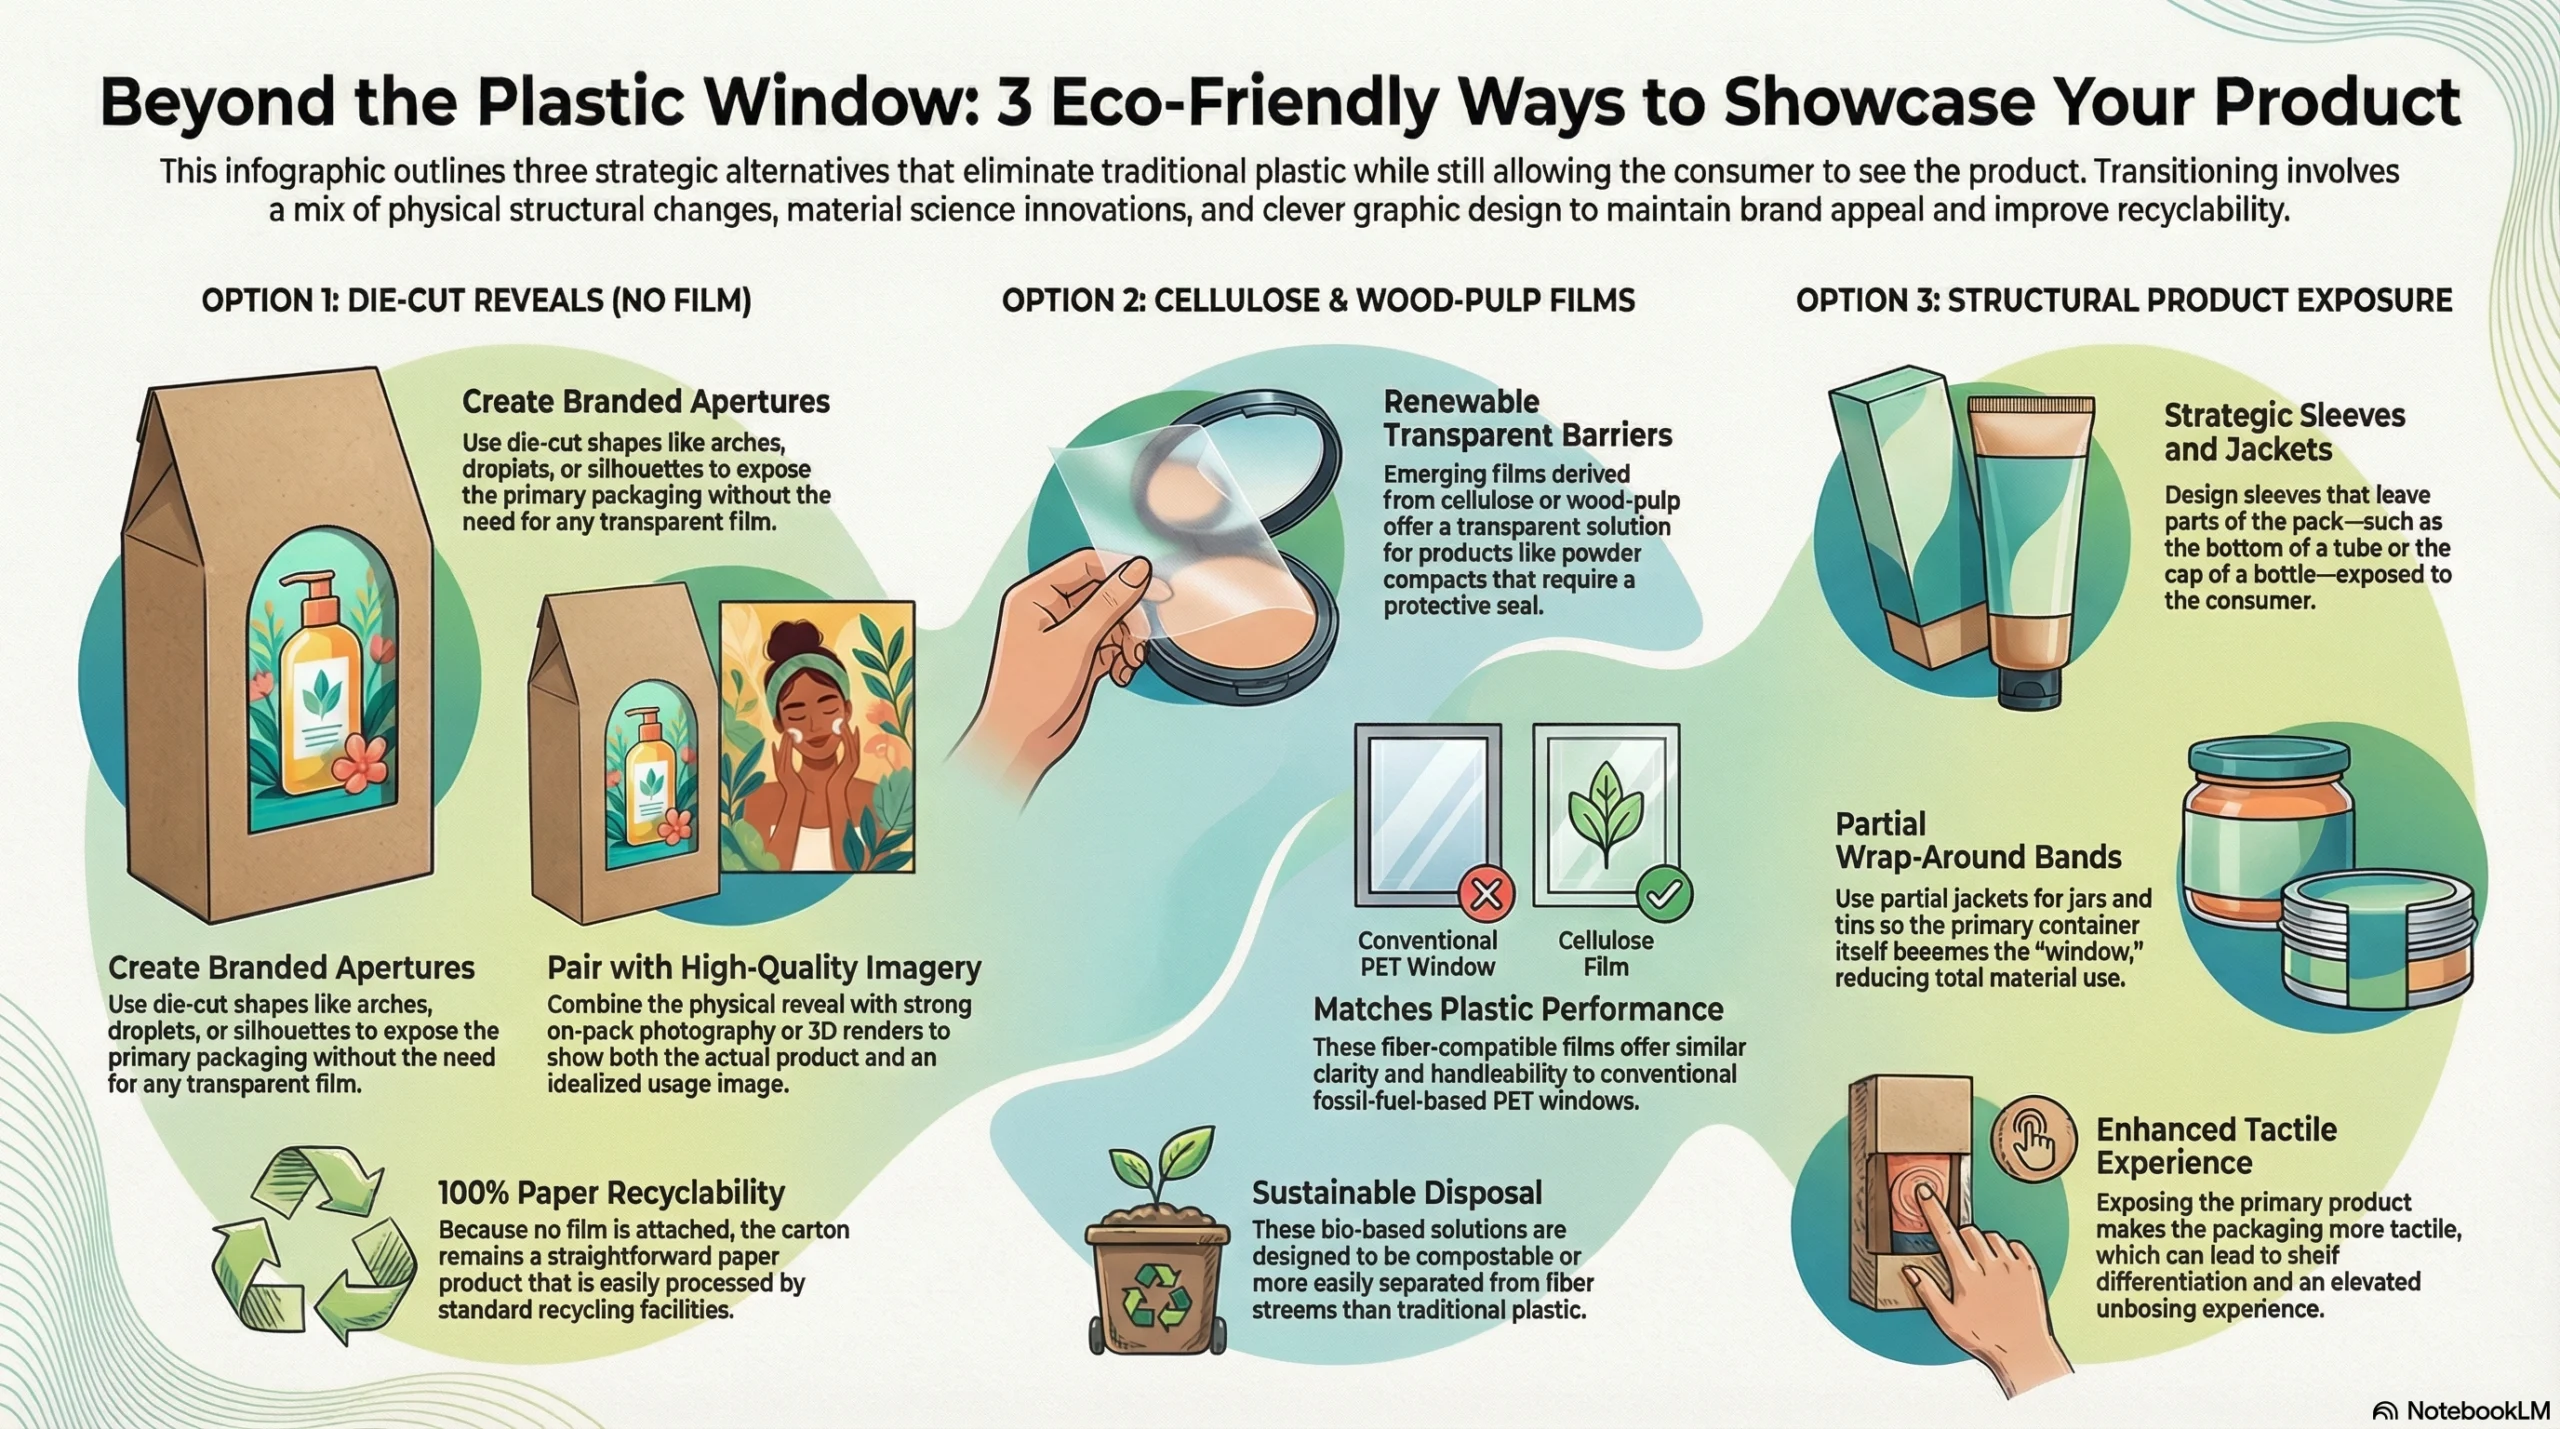
Die‑cut reveals with no film
One of the simplest switches is to replace clear windows with die‑cut apertures:
Create branded shapes (arches, droplets, silhouettes) that expose either the primary packaging or a portion of it.
Pair them with strong on‑pack photography or 3D renders so shoppers see both the actual product and an idealised usage image.
Because there’s no film at all, the carton remains a straightforward paper product in recycling, and the die‑cut itself becomes a design feature.
Cellulose and wood‑pulp based films
Where you genuinely need a transparent barrier (for example, powder compacts or palettes with loose components), cellulose or wood‑pulp based films are emerging. Solutions like the fibre‑compatible films offered by sustainability‑focused converters are designed to:
Use renewable inputs instead of fossil feedstocks.
Offer similar clarity and handleability to conventional plastic.
Be compostable or more easily separated from fibre streams.
While specs vary, the intent is the same: let your carton behave as close to mono‑material as possible in real‑world waste systems, even when a “window” is necessary.
Structural product exposure
You can also sidestep films entirely with structural design:
Use sleeves that leave part of the primary pack exposed (for example, the bottom half of a tube or the cap of a bottle) while still giving you billboard real estate for branding.
Design wrap‑around bands or partial jackets for jars and tins so the product itself becomes the “window.”
These solutions keep the packaging fully fibre‑based and often make the primary container more tactile, which is great for elevated unboxing and shelf differentiation.
Recyclable and Mono‑Material Cartons
The big directional trend is toward mono‑material solutions—packs designed so that every major component can go through the same recycling stream. For folding cartons, that means aiming for a unit where board, coatings, and any “window” choices are compatible with standard paper processes.
Key moves that beauty brands are making:
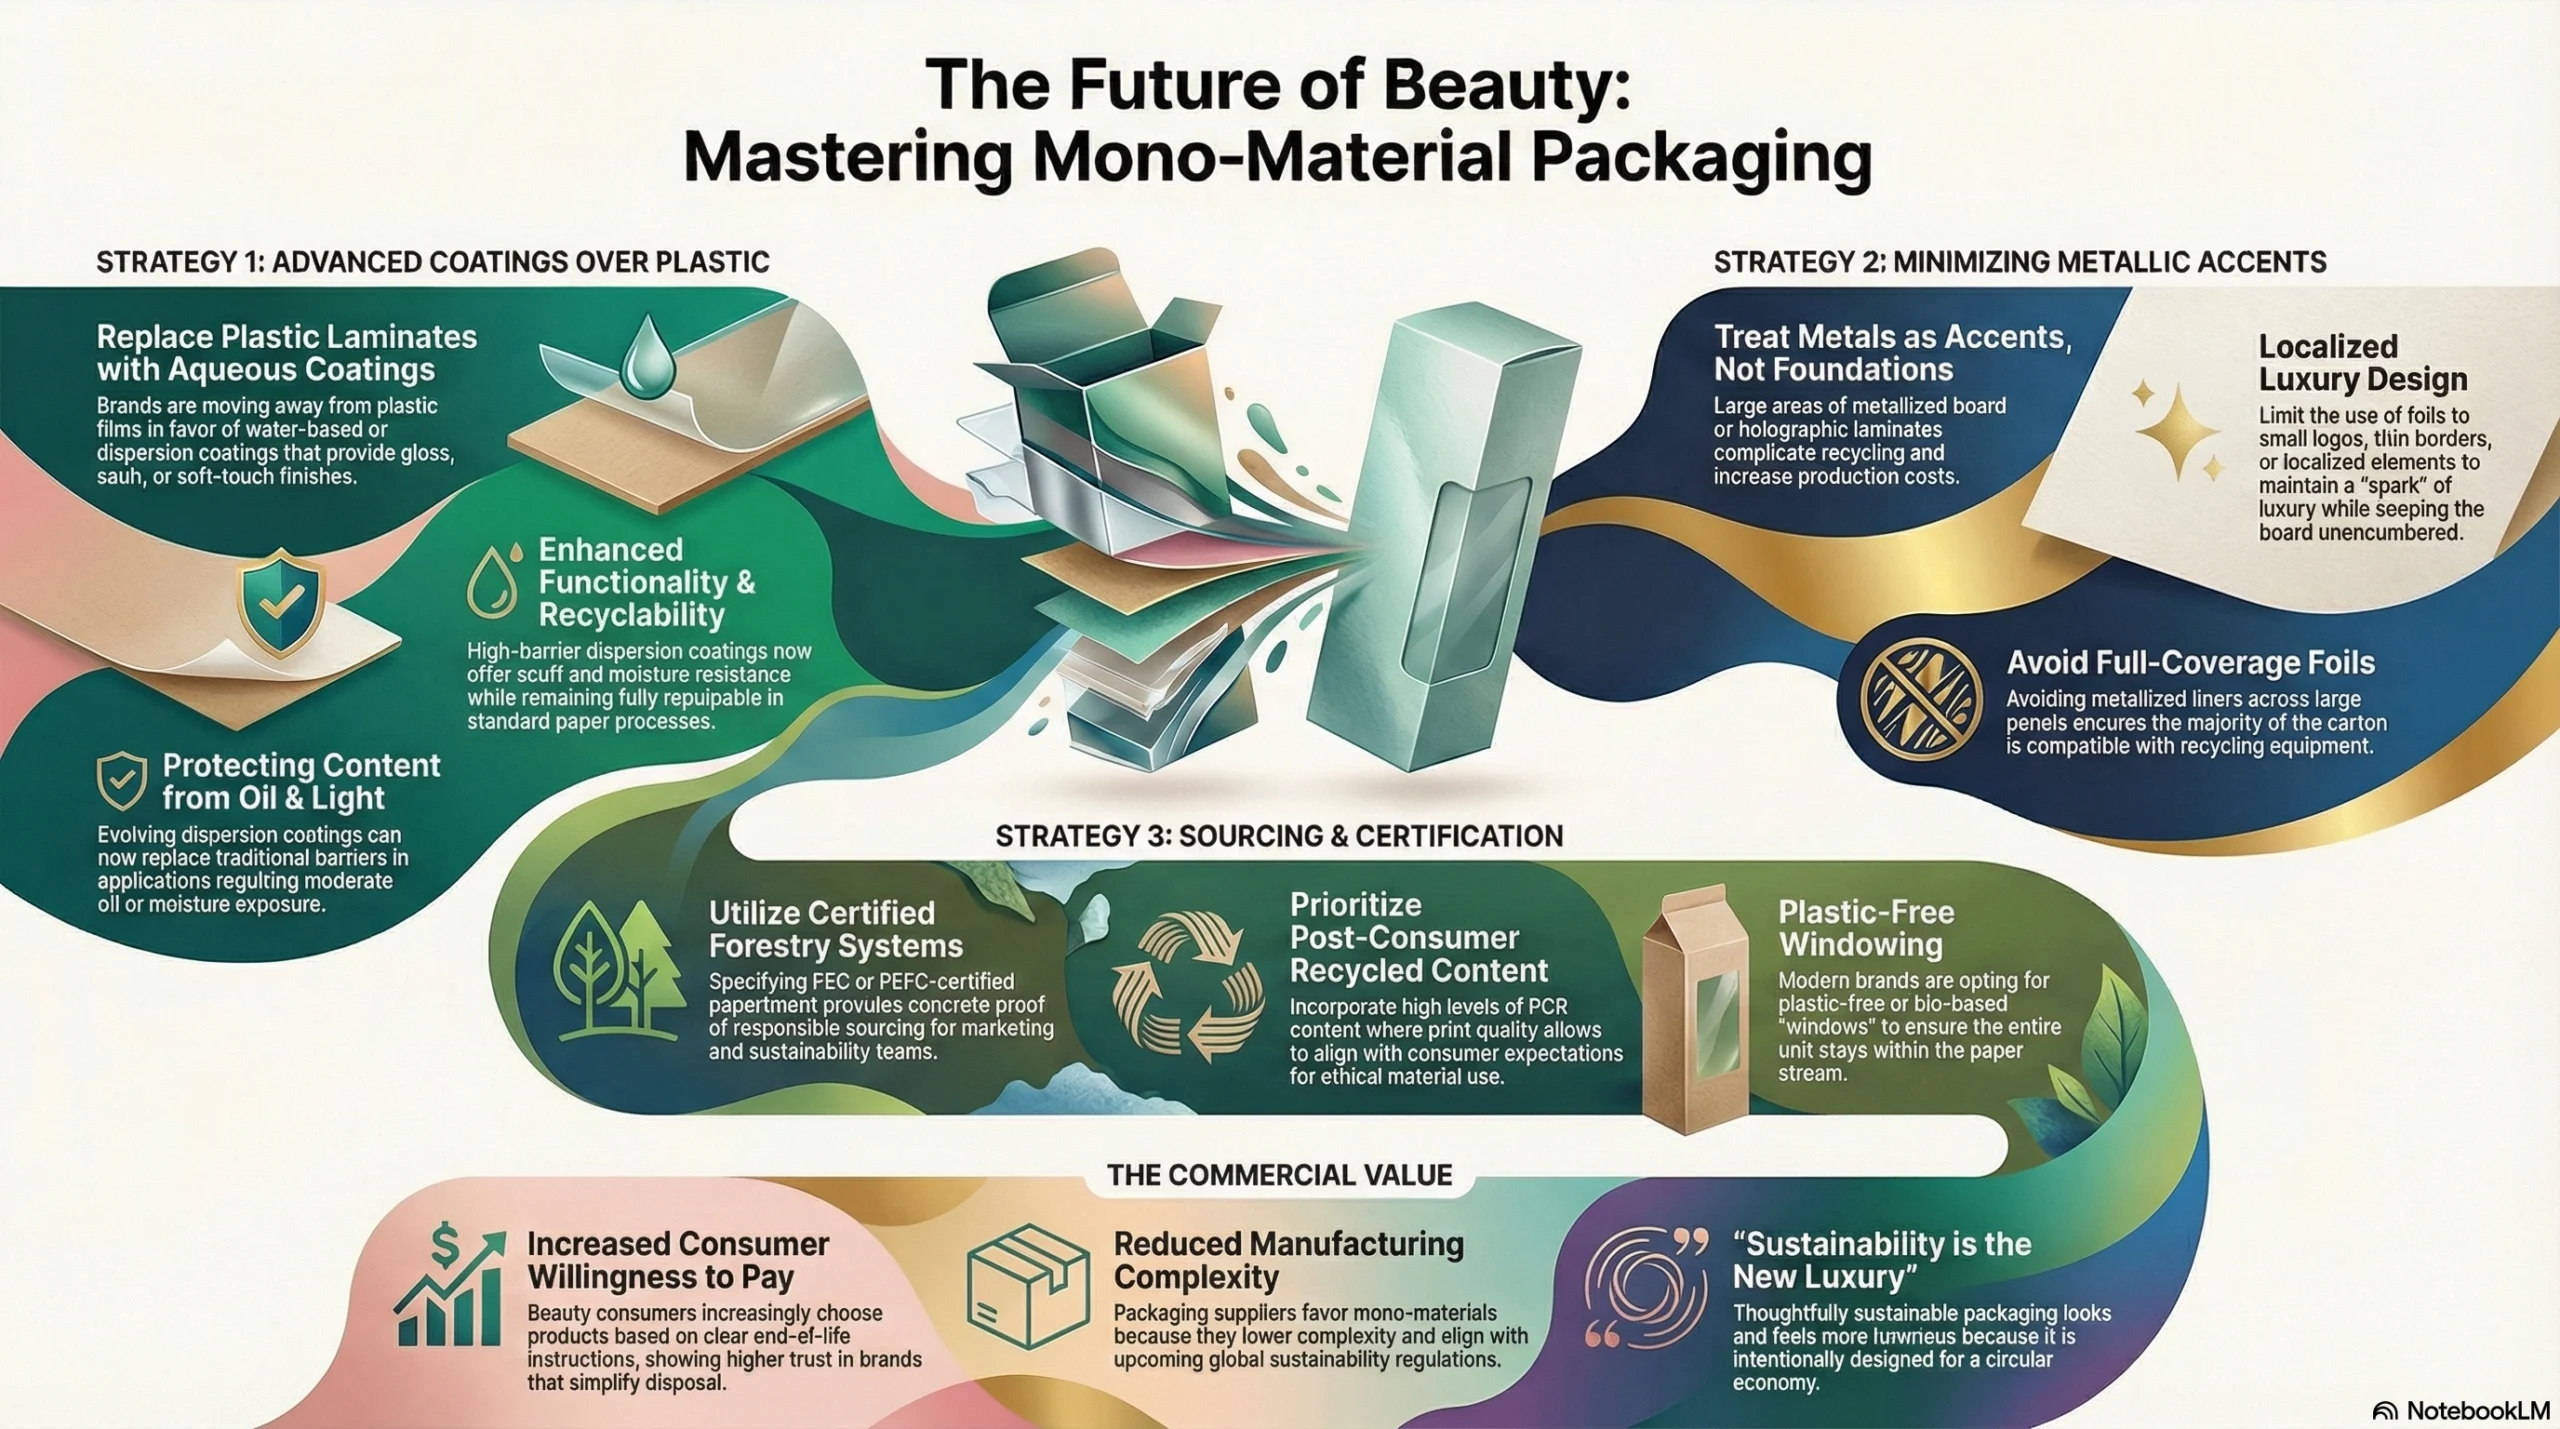
Use water‑based or dispersion coatings instead of plastic laminates
Aqueous and dispersion coatings:
Provide gloss, satin, matte, or even soft‑touch finishes.
Improve scuff and moisture resistance.
Are generally repulpable and more compatible with paper recycling than plastic films.
High‑barrier dispersion coatings are also evolving to replace some of the barrier roles that laminates played, especially in applications with light moisture or oil exposure.
Keep metals and plastics as accents, not foundations
Metallised films, full‑coverage foils, and large areas of metalised board complicate recycling and add cost. In response, brands are:
Limiting foils to small logos, borders, or localised design elements rather than full floods.
Avoiding metallised liners and plastic holographic laminates across large panels.
This keeps the majority of the board unencumbered, while still delivering a “spark” of luxury.
Source board from certified, credible systems
Many premium and “clean” beauty brands now specify:
FSC, PEFC or equivalent certified paperboard to validate responsible forestry.
High post‑consumer recycled (PCR) content where print quality allows.
These certifications give marketing and sustainability teams concrete proof points and align with consumer expectations for ethical sourcing.
Why mono‑material and recyclability matter commercially
Reports and industry case studies show that:
Beauty consumers are increasingly making purchase decisions based on packaging sustainability and clear end‑of‑life instructions.
Brands that simplify disposal—“this whole box goes in paper recycling”—see higher willingness to pay and stronger trust, particularly in premium and “clean” segments.
Packaging suppliers are actively pushing mono‑material designs (for cartons, tubes and pouches) because it improves recyclability, lowers manufacturing complexity, and aligns with upcoming regulations.
In other words, moving your beauty cartons toward recyclable, mono‑material systems with plastic‑free or bio‑based windows is no longer just a nice‑to‑have; it’s quickly becoming table stakes for credible, modern brands. The good news is that you don’t have to sacrifice a premium feel: with the right board, coatings, and smart structural reveals, your packaging can look and feel more luxurious because it’s thoughtfully sustainable, not in spite of it.
Conclusion: Building Beauty Packaging That Works as Hard as Your Formulas
Your beauty and cosmetics folding cartons are doing far more than holding product—they’re the first physical proof of your brand’s quality, values, and attention to detail. To make them work strategically, focus on the fundamentals:
Match structure to format: Tubes, jars, droppers, pumps, and slim sticks each need specific carton styles and inserts to prevent damage and eliminate rattle.
Invest in what customers touch first: Heavier board, textured substrates, and one or two smart finishes (soft-touch, foil, emboss) deliver luxury perception at mid-range budgets.
Design for clarity: Use billboard-style hierarchy on the front panel, color that differentiates on shelf, and logical panel layouts so shoppers understand instantly.
Engineer for e-commerce: Scuff-resistant coatings, reinforced corners, and tested insert systems reduce damage and dimensional weight without over-packing.
Think in systems, not single SKUs: Multi-SKU trays, unboxing flow, and structural families let you scale efficiently while maintaining premium presentation.
The brands winning in 2026 are also building for the future by shifting to mono-material, recyclable cartons with plastic-free or bio-based windows—proving that sustainability and premium aesthetics aren’t trade-offs anymore. When you apply these principles consistently across your line, your packaging becomes a strategic asset that protects your products, drives purchase decisions, and signals that your brand belongs in modern, premium beauty. Use this guide as your brief when working with packaging partners, and you’ll move from “nice boxes” to a cohesive system that genuinely supports growth across every channel.
FAQs
Glass dropper bottles need auto-lock bottom cartons for weight-bearing strength, combined with inserts that immobilize the bottle at two critical points: the shoulder (to prevent neck snapping) and the base. Use die-cut paperboard inserts that create a collar around the shoulder plus a disk or cup under the base, or consider EVA foam inserts for ultra-premium lines. The key is keeping the bottle upright and preventing any rocking or tipping that could stress the fragile neck during drops.
Focus on three strategic upgrades: heavier board caliper (move from 18-20pt to 22-24pt), textured substrates (linen, felt, or uncoated stocks), and one or two focused finishes rather than multiple effects. A matte base with spot gloss UV, or soft-touch coating with a single foil accent, often looks more expensive than over-decorated packs. Black-core or tinted boards also elevate perception by making exposed edges look intentional. These material choices affect every panel without adding complex finishing steps.
Design your packaging as a tested three-layer system: a structurally reinforced folding carton with scuff-resistant coating, an engineered insert that locks the product in place, and a right-sized corrugated outer with minimal void fill. Consider ISTA 6-Amazon testing protocols, which simulate real fulfillment drops, vibration, and compression. Use slightly heavier board, reinforce corners, and pair unit cartons with aqueous or UV coatings on dark designs to prevent them arriving scuffed or crushed.
Yes—through bio-based window alternatives or structural solutions. Seaweed-based films (like Sway x EcoEnclose) are 100% biobased, compostable, and curbside recyclable while still providing product visibility. Alternatively, use die-cut reveals with no film at all, paired with strong on-pack photography, or design sleeve structures that partially expose the primary packaging. Cellulose-based films also offer transparency while remaining fiber-compatible in recycling streams, keeping your carton mono-material and genuinely sustainable.
Slim cartons fail when grain direction is wrong (causing scores to crack), tuck flaps are too short (insufficient engagement), or products rattle inside. Fix these by: specifying grain parallel to the main panel height so scores fold cleanly, increasing tuck depth by 3-5mm for better closure security, and adding simple internal paperboard tongues or collars that lightly grip the product barrel to eliminate movement. These small tweaks dramatically improve structural integrity without major cost increases.
Use segmented paperboard trays with individual cavities sized to each product, or sleeve + tray systems where the inner tray is die-cut to hold 3-7 items. Design the unboxing flow deliberately: place the hero product in the visual center or slightly raised, group supporting items by routine step or category, and add numbering or icons that tie physical placement to printed instructions. For premium seasonal sets, consider molded pulp inserts that provide 3D cushioning while staying fiber-based and recyclable.